Sunday, August 31, 2008

Trunk, Staff and Perch


I finished tent stitching all the wooden parts of the wizard design last night. There is a lot of tent stitch here when you also add the little books at the wizard's feet, the globe under one arm, and the inside of his cauldron. But I think this piece will be so busy otherwise, that it needs some plain stitches to balance out the robes, his beard and hair, and the gleam of all that metallic thread.

I've started his left sleeve in Interlocking Goblein with my pretty blue Impressions and I think I'm going to pull it all out. The thread is too heavy looking, if that makes any sense. Will our wizard have a silk robe over the heavy wool purple under robe? Looks like it!

I am going to think about this a bit while I stitch some more background. I need to get some of that out of the way anyhow. I don't like leaving the entire background until last. It is way too tempting to stop stitching when all the fun stuff is done.

Hope everyone is having a safe holiday weekend, and that all those in Hurricane Gustav's path are taking precautions.

Main blog at http://blog.360.yahoo.com/chillyhollow

Saturday, August 30, 2008

Morning Has Broken: A Supplement to What is Needlepoint


Last fall I had the privilege of going to Baltimore for the 2007 ANG Seminar. I was asked to write about the exhibit award winners for ANG's "What is Needlepoint?" section of their website. Now that ANG has redone the website and posted the winners for 2007, I want to add something to what I said about the pieces there. If you aren't familiar with "What is Needlepoint?," please visit ANG's website and click on the 2007 section to see what I said.

http://www.needlepoint.org/whatis.php

If you read my blurb instead of just being mesmerized by the fantastic stitching, you know I awarded my own ribbon for the piece I'd most like to take home. Due to the cost, ANG only photographed award winners, so I was unable to include a photo of this piece, although I described it thoroughly in my narrative on the ANG website. Through the kindness of the stitcher, Joni Stevenson, I am able to post a photograph of the lake scene I found so charming here on Blog.

Joni, who is working through ANG's Master Teacher Program and who will teach a piece at the Milwaukee seminar, has won ANG ribbons for various pieces over the years and has taught for ANG and EGA chapters. In fact, the 2007 winner of First Place in the Adaptation/Non-Professional category, a Judges Award, and the Best in Show piece was stitched by Joni. Clearly she is a master of the needle. Joni graciously wrote a bit about how she came up with this original design below, including listing the threads and stitches she choose to convey early morning fishing trips on the lake.

I hope you enjoy looking at Joni's original piece entitled "Morning Has Broken" which would look really good hanging over my mantel here in Chilly Hollow....


************************************************************************************************* This piece, Morning Has Broken, is dedicated to my husband, who last summer could not convince me or one of our four children to get up at the crack of dawn to go canoeing. I told him that the only family member that would be willing to do that would be the dog.

I have used a complementary color scheme of blue-violet and yellow-orange, which are the colors of first light. Early in the morning the fog lies across the water and in between the small islands before it is burned off by the warm sunlight of the day. The serenity of the moment is held in check by the quiet passage of a canoe across the lake. The quiet, peaceful horizontal lines of the islands and the quiet, strong vertical lines of the trees are contrasted with the sharp diagonal lines of the light of the newly risen sun pushing the dark of the night away. Soon noise and activity will be the dominant force on the lake, but for now it is still peaceful.

My choice of color scheme was purposeful in the respect that I wanted to test myself to see if I could achieve a good design using only two colors and their tints, tones and shades, including the tones created by the mixture of the two tertiary colors, which is a lovely neutral brown-gray. The most important aspect of a complementary color scheme is the control and use of value. While the premise is a peaceful moment on the calm water, I needed something more so as not to have the design be too boring. I emphasized the drama of the breaking morning by juxtaposing the light values of the sunlight with the dark values of the sky and water. I started by painting the slash of yellow-orange across the sky, followed by painting the rest of the 18 count canvas blue-violet.

The threads and stitches were chosen to complement the item being stitched. The clouds in the sky are stranded cotton threads, with several colors mixed in the needle to show the reflection of the sun on the underside of the clouds. The stitch I choose was a diagonal stitch because the clouds are in motion.

The background hills are stitched in tent stitch using Impressions, a silk and wool blend. I like to build the picture from the background to the foreground, so the trees are stitched on top of the background hills. The lightest value of the Impressions was used to simulate a foggy effect around the base of the hills.

The small islands and trees are stitched with wools and cotton threads. One of my favorite wool threads is RG's Twedie 18. (I am so unhappy that they are discontinuing making this thread. The color mixtures in this wool thread are wonderful to work with, and Rainbow Tweed does not come close to replacing it, in my opinion.) The trees in the far background are surface-stitched with random straight stitches in a single strand of dark cotton thread. The trees in the midground area are stitched in Outline Stitch (trunk) and random Gobelin stitches for the branches. We have white pine trees where I live and they have a wonderful airy look to them. The randomness of the Gobelin stitches are used to achieve that effect. I like to use several colors in my trees, not just green or brown. There is gray and navy blue in the trees also.

The water is stitched in stranded silk using a horizontal stitch to achieve a quiet, calm effect. I used silk here instead of cotton because it has more of a smooth, shiny quality to it, for the reflections in the water. I made the canoe out of silk dupioni fabric painted a darker value of the sky color, and the man and dog are stitched on Congress cloth and appliqued to the ground canvas. The dog's ears are covered wire, so that the ear facing the viewer stands out from the dog's head.

The man is facing away from the viewer, in the process of slowly paddling the canoe. He is stitched tent in stranded cotton and the dog is stitched in Encroaching Gobelin using Wisper threads.

I tried to use threads, colors and stitches to achieve realistic effects in this piece.

Joni Stevenson

****************************

I think you suceeded beautifully, Joni. Thanks for sharing this wonderful piece of original needle art!


Main blog at http://blog.360.yahoo.com/chillyhollow

Friday, August 29, 2008

Raining and Dreary


It is still raining hard here in Chilly Hollow, so I thought perhaps you'd like to take a side trip to Key West, home of sun, fun and the most beautiful sunsets in the world.

http://www.islandneedlepoint.com/news/newsIndex/index.shtml

Julie Pischke has a shop in the Keys (I think now open mostly fall and winter for the tourist season, so call before you go) which I've had the pleasure of visiting. Her website has lots of news with plenty of pictures to help you enjoy both her designs and also her stitching visitors and their pieces, particularly her fabulous purses. Check them out by clicking on all the links. By the way, The Art of Needlepoint in the left column has finishing instructions for one of her tiny designs.

I'll go get the pina coladas while you browse....

By the way, the design above is Julie's Island Girl. It's fabulous and on 14 count for those of us who just prefer bigger counts that stitch up faster.

Main blog with another design featured at http://blog.360.yahoo.com/chillyhollow

Thursday, August 28, 2008

Raining Cats and Dogs


It is very overcast, dark and rainy here this morning so my photo is from yesterday and only shows the books stitched, not that I finished the floor around them last night. I've also put two rows of tent stitch all around the outside of the floor area. They will extend up around the wall, too, to help in finishing, although I'll use the pale grey silk there to match the stone wall. Hopefully my colors balance those of the firebird.

Hopefully the Vineyard silks I ordered in Classic browns will arrive today so tonight I can work on the trunk, staff and bird's perch. That poor bird is getting tired of sitting on thin air!

Luckily he belongs to a wizard....


Main blog at http://blog.360.yahoo.com/chillyhollow

Wednesday, August 27, 2008

Now the Finished Finishing

I've also been collecting examples of lovely finished pieces for you to admire. Let's start with Laura Perin who isn't just posting good photos of her finished designs, she's telling you how she used thread size and color in these pieces. It's fascinating reading!

http://two-handedstitcher.blogspot.com/2008/07/old-switcheroo.html

http://two-handedstitcher.blogspot.com/2008/08/more-kimono-trios.html
http://two-handedstitcher.blogspot.com/2008/08/twilight-on-trail.html

http://two-handedstitcher.blogspot.com/2008/08/for-amber-waves-of-grain.html

Speaking of changing a design through color, you might enjoy seeing examples on Orna Willis' blog. These aren't finished pieces but since they fit the color play theme so well, I wanted to include them here.

http://ornadesign.blogspot.com/2008/06/sometimes-i-use-needlepoint-as-color.html

Now more finished pieces. Don't you love Pat's birds!?!

http://needleartnut.blogspot.com/2008/08/betsy-and-boys.html

And how about Jane's Santas?

http://janew1102.typepad.com/my_weblog/2008/08/boxes-on-my-doo.html

And Ruth's strawberries? And roses?

http://www.tistheseason.org/blog/2008/08/chocolate-covered-strawberries.html

http://www.tistheseason.org/blog/2008/06/its-all-about-roses.html

What fun it is to examine great stitching carefully!

Main blog at http://blog.360.yahoo.com/chillyhollow

Finishing Tutorials

I've been trying out all types of finishing here since it saves a lot of money. I want to encourage you to at least try simple finishing yourself. I don't like doing it myself but I love how it turns out and I really really love saving cash for other things.

Today I have three items, a needlebook tutorial from Meari,

http://focusonfinishing.wordpress.com/2008/03/12/needlebook-tutorial/

a beaded scissor fob tutorial from Didi,

http://focusonfinishing.wordpress.com/2008/02/15/beaded-scissor-fob-tutorial/

and a book cover tutorial from Barbara.

http://focusonfinishing.wordpress.com/2008/03/21/book-cover-tutorial/

You'll note they are all posted on the Focus on Finishing blog which is a fun read even if you have never come closer to sewing than noticing a sewing machine display in a fabric store. Have fun!

Main blog at http://blog.360.yahoo.com/chillyhollow

Monday, August 25, 2008

Things I Should Have Said Yesterday

I forgot several things yesterday, one of which is that my old printer/scanner has been replaced. I'll be using the digital camera to take photos until I learn how to use the new one so you won't get a lot of detail now. I'll do my best but my camera doesn't do closeups and the new scanner won't talk to the computer yet.

Anne, avert your eyes when I do manage a photo. I've done the large book in apricot and the little one in red (all tent stitches). Love how it looks myself because I thought the blue book disappeared into the blue robe. (Feel free to not like it. We all have different tastes and desires for how to stitch our canvases.) I also used one ply of black DMC cotton floss to outline the edges of the books in long stitches. The next step is to find some white perle cotton to do the edges of the inside pages in long straight rows. I may even put titles on the books but I haven't decided for certain since they'd have to be partial words or very short titles since there's not much space. I've even debated writing on top of the tent stitches with a permanent marker. [Screams from the peanut gallery!] I am still debating whether to put steam coming out of the cauldron but I probably will. I love using wired Flair for steam and smoke but if I do this, it is going to be at the very end so as not to have to keep dodging the wire which will be quite 3-D.

I'm going to order the Vineyard silks in two browns I need to finish the trunk, staff and then stitch the firebird's wooden perch today. None of the browns in my stash were the right colors or looked good with the crinkly texture of the Vineyard silks.

Main blog at http://blog.360.yahoo.com/chillyhollow

Sunday, August 24, 2008

Birdee Floats in Air


That's because I haven't stitched the parrot stand yet! But the firebird is done. After I transferred my sketch outlines to the canvas I stitched the whole thing in tent stitches using 5-6 different reds, oranges, and corals and a bit of Trebizond in chocolate milk for his beak and foot. Then using the same fire colors, I put stem stitch on top to show his folded wings, tail and topknot on his head. Once the background and perch are done, I will do the background around the bird and then add a bit more stitching on top of the background to build out the topknot a bit and also give him a tongue. I think he's screaming advice to the wizard on his packing!


Here's a closeup. It's difficult to see but this bird is tent stitches with some colors added on top to suggest feathers. The large photo has the three main colors I used, a yellow orange Bella Soie silk floss from Crescent Colours called Carrot Cake, a toned red overdyed cotton floss from Crescent Colors called Cupid, and an orange-red silk that may be Japanese (there's no label). I put them down at the bottom of the wizard's staff to help me decide if I could use any of these colors for one of the wizard books. What do you think? Will the big book look good in orange Carrot Cake and the little one in the red Cupid?

Main blog at http://blog.360.yahoo.com/chillyhollow

Saturday, August 23, 2008

2008 Exemplary Winners


Pour a cup of coffee, sit back, and prepare to be amazed by all the wonderful award winners from the National Academy of Needlearts' 2008 Exemplary show! Click on the tiny photos for slightly larger versions.

http://www.needleart.org/Exemplary08/

The photo above is Gail Sirna's Morning Glory Santa, a personal favorite I saw in person at the 2007 ANG Seminar in Baltimore.

Remember not to drool on your keyboard....

Main blog at http://blog.360.yahoo.com/chillyhollow

Friday, August 22, 2008

Beads, Cauldrons, and a Firebird


Last night I finished as much of the cauldron as I can do for now. Once the books are stitched I can add the handle and maybe even some steam rising from the black sparkly interior.

Soon I'll finish the floor stitches now that I know exactly where the cauldron's bottom and sides sit. I beaded a bit on the purple robe last night also, just a few scattered beads here and there. They are barely visible but they do add texture which was The Plan. Don't you just love it when a plan comes together!?! I hope you can see them in the photo above. I avoided putting a bead under where the moon and stars are supposed to go. They are temporarily in the correct position held down with pink hair tape that doesn't pull the background threads. I won't really attach them until everything else is done.

My final touch was sketching a firebird in the background of the design. I have been playing around with a pencil, a big eraser and my xerox of the canvas for a bit. First I tried an arched window in the background. It doesn't seem to fit the space well. If I made it in proportion to the wizard himself, the top of the arch was cut off at the top of the canvas. That looks weird. If I made it lower down, it looked like the window bottom reached to the floor. So I gave up on the window although I was charmed by the idea of stitching leaves, then vines and then a stained glass window on top. That would have been fun! But as we've already decided this is winter, leaves are really not appropriate anyway.

Next I tried a heraldic shield hung on the stone wall but that didn't go so well either. Those funny symbolic animals are durn hard to draw in a small space. I could have divided the shield into four areas and done stars and other shapes but I didn't much like that idea since there are already stars on the wizard's outfit (the beads are the center of a star shape done in pale purple Accentuate) and he also carries a moon and stars along with the earth. So Plan 2 fell apart. It probably wasn't the best idea anyway since I don't have any Joan Thomasson designs with such an item so I'd have to make it all up from things found on the Internet.

I finally sketched a firebird on a perch and I think that's going to work although my bird is a bit too large and the perch stand a bit too low in the sketch above. I'm going to have to shift it up taller and make the firebird's body and tail a little smaller. With those changes he looks good to me. I'll have to outline him in black marker so I can trace him onto the canvas . Then I can perhaps change the books so that the big blue book is red and the little one green instead of the colors on the canvas. With a red firebird I think I want the larger book in colors to match to balance the design.

Main blog at http://blog.360.yahoo.com/chillyhollow

Thursday, August 21, 2008

Belle and Margaret, Front and Center!


I need you ladies to eyeball the globe and tell me if it is improved. In the photo above I replaced the Petite Treasure Braid lines on the Earth with a very thin DMC Metallic machine embroidery thread. It is black with a lot of highlights. This time I didn't enhance the photo a lot so you may not be able to see it all that well. In person it looks good but photographing metallics is a chancy business.

If you look at the hem of the purple under-robe you'll be able to see that I've added the three padded lines of trim. The original paint on the canvas is two lines of gold with a line of silver in the middle but I switched colors so that I have a fat line of silver nearest the hem, a line of pale purple metallic in the middle and then a narrower line of silver. All the threads are Soft Sheen Fyre Werks and I matched the silver in the Fyre Werks carefully to the silver Kreinik so that the two shades would be as close as possible.

I've also added more to the layers on the purple robe but I doubt you can see it since I didn't get very far in this step last night. Instead I concentrated on the basket next to the books at the wizard's feet. I never liked the idea of a basket much. Surely a cauldron is more likely to accompany a wizard on his travels? So I pencil sketched a likely shape on my copy of my plain canvas until I was satisfied I had the shape right and then stitched it using three threads: a black Frosty Rays used to tent stitch the interior so it had extra sparkle, a line of couched black Petite Very Velvet to make the rim of the cauldron stand out a bit (it's very hard to see but in person you can get the idea) and the body of the outside done with black Flair in Mosaic stitch (on the right of the staff) covered with long lengths of the same thread running horizontally (on the left of the staff) to hide the white dandruf and smooth the outside to make it like a real cast iron pot. Once the books behind the cauldron and the staff are stitched, I'll couch down more Petite Very Velvet to make a handle.

Do let me know what you guys think, especially Margaret and Belle.

Thanks!

Lani's Autumn Leaves in Purse Form


I found the perfect pocketbook to use Autumn Leaves with a couple of weeks ago but dawdled about appliquing the canvas to the front until two weeks ago when the county fair deadline pushed me into finishing this piece. I whipstitched it to the front of this purse, which happened to be the right shade of red and also is made of what looks like a knit cotton. The material the purse is made from is perfect for attaching a NP canvas and then hiding the stitches with trim.

Do you like it? I hope Mom does! This is her birthday present for next month. (This is a secret, remember? Don' give it away!) Her favorite color is red and this is the perfect early autumn purse.


Lani's design looks great here. An all tent stitch piece is perfect for such a finished item. Here's a closer look.


Main blog at http://blog.360.yahoo.com/chillyhollow

Wednesday, August 20, 2008

The Big Picture


Above is a photo of the wizard that I didn't crop to give you a sense of the empty space above his shoulder on the right I think I should fill with something. The top of the white area is about where the arched background shape will end. I'm considering a firebird or a stained glass window since each fits the design and I have examples that the designer Joan Thomasson has done to look at.

Margaret, you'll notice that earth no longer has the grid lines. After you noticed they looked a bit thick, I removed them. I'm looking for another black thread to use instead now.


This is a close up of the purple robe area. I'm doing layers of stitches here, starting with diagonal lines of the two shades of plum Impressions, followed by some silver metallic and now (at the top of the area) rows of doubled purple Accentuate. I plan at least one more layer, a lighter purple Accentuate that isn't doubled. In person it looks very nice but I doubt you can see the metallic shine that I can in person.

Main blog at http://blog.360.yahoo.com/chillyhollow

Tuesday, August 19, 2008

Kudos to Scrim Discovery Needlepoint


This is my shop of the week-Scrim Discovery Needlepoint!


To find out why, you'll need to visit John Young's blog--


By the way, the poster above is from the State Library of Iowa. Down with all sterotypes of needlepointers! Or any needle artist. We come in many shapes, sizes, sexes and colors but we are all kin when it comes to our enjoyment of our stitching.


What Does a Wizard Need?

I mentioned yesterday that I thought my wizard lacked something. I was referring to the area just over his shoulder on the right. I crop the photos you see to make the photos as small as possible so that folks, no matter how slow their Internet connection or old their computer, can load photos relatively quickly. So you don't see the big empty space there. I haven't started putting stone wall stitches on that side of the canvas yet, but the more I stitch this design, the more I think I'd like to add a detail in the setting to help the wizard look balanced. After all, diagonally to the left there is the wizard's staff, his books and the basket. I think I want something in the upper right to make the design look less like a wall with a painting removed.

So I went browsing among Joan Thomasson's other pieces, looking for details that would look good in the wizard piece. How about a stained glass window? Click on "Courses" on the left, and then look at the arched windows in the background of the Maruska piece. They look fun to stitch, too. You'd have to stitch the leaves, then the vines, then the window on top. However, our wizard is shown in winter. (Remember his wool socks? Plus I'm using Impressions, a silk-wool blend, which will give his robes a heavier look than summer wear has.) I think leaves would have to be omitted. Would that really detract from the windows to not have those leaves?

http://www.stitchinstuff.com/

I kept looking. Actually, I was thinking of this piece when I started looking. I had the pleasure of seeing it in person on display at the ANG Seminar in 2001. It is really gorgeous!

http://www.needleart.org/Exemplary01/Happily.php


What you can't really see --and I can't find a better photo-- is the beautiful bird in the golden cage. This is a firebird and the quest item that the young prince went off to find. He happened to find a bride also and you see the wedding party on the left and center. I think adding a bird to the scene might be wonderful. But I have quite a bit of work to do to decide how to sketch it in. And I think the cage might be a bit too much since there is already so much metallic in the piece.

I obviously have a lot of decisions to make about this piece. But occasionally you will find that you want to tinker with a design to make it feel more "right" to you. I think this is going to be one of those occasions for me!

Main blog at http://blog.360.yahoo.com/chillyhollow

Monday, August 18, 2008

Warning! Warning! Danger, Will Robinson!

Read the eBay warning from Eterna Silk if you buy from eBay a lot.

http://www.eternasilk.com/

There's also a gift certificate at their online shop....

Main blog at http://blog.360.yahoo.com/chillyhollow

New and Improved

Princess and Me has redone their website. You probably know about their cute little ornament canvases, each of which comes with a stitch guide, but even if you've seen them many times before, they are always worth a look.

http://www.princessandme.com/

Squiggee's blog has a nice long article about her custom religious canvases that are in the September 2008 Needlepointers magazine. If you saw the article and want more information and some nice photos, you'll want to check this out.
http://squiggeedesigns.blogspot.com/2008/08/tale-of-tapestry.html

One hundred forty three million tent stitches??!

Jane, fainting at the thought in CH

{Please note that Blogspot doesn't allow ambersands in posts so I spelled out the Princess and Me name}

Main blog at http://blog.360.yahoo.com/chillyhollow
Sunday, August 17, 2008

Robe, Trunk, Staff, Sleeves, Globe

PURPLE ROBE

I’ve been busy on small areas on the wizard canvas while I thought about how to handle the purple under-robe area. I ripped out the first stitch I use here, although I liked it, because it wouldn’t work with the stitch I plan for the blue over-robe. Oh, well. In the large photo above, you see the first step of the purple robe stitch. It’s just long diagonal lines in my two shades of purple Impressions. I switch colors to match the shading of the paint underneath. I plan to tie down the long lengths of threads with either more Impressions or silver metallic or both. Stay tuned on that.


As you can see, I started stitching the traveling trunk that holds the wizard’s magic supplies (and probably a clean pair of wool socks). I used the new Vineyard Silks that has metallic woven in to tent stitch the dark brown shading of the trunk. The trunk and the wizard’s staff both have three shades of brown—dark chocolate, milk chocolate and a brown shade in between. I probably need to pick up two more shades of Vineyard Silks in the non-metallic Classic line for the other two shades as I don’t really have anything the right color in a similar texture here in my stash. Looking at the online color card, probably Bark, Monk’s Robe or Dark Earth will work, especially if combined with Rattan.

http://www.vineyardsilk.com/CLASSICgallery/index_3.htm

I used short lengths of the Vineyard Silks Shimmer (color-Truffle) as the cut ends unravel slightly. You will need to tie off this thread a little further from the needle’s eye than normal as it will unravel as you stitch. I used a slightly larger needle eye, too. I did not have any trouble with the brown metallic woven into this silk strand fraying, however. Some people reported that problem when the thread first came out, but it looks like that issue’s been solved.

I attached the brass charm that goes on the front of the trunk just to the left of where it actually goes in the picture so you can compare the charm to the painted lock area, which is larger. I am attempting to illustrate the problems you run into with kits that have charm sets. Sometimes you can’t buy the attachments for various reasons or maybe you won’t want to use them. The needlepoint designer will paint the canvas so that those who don’t use the charms can stitch the item instead. So I had to decide whether to use the brass lock or not. I like how it looks, so I am going to use it, but that means I have to stitch right over the brass paint area underneath (which is larger than the charm) with my brown trunk threads. That won’t be a problem if I used tent stitches for the entire trunk. Because the brass lock also fits right over the metallic trim edges of the trunk, I also have to use a stitch there that doesn’t raise the charm up so much it looks funny. I also caused myself another problem—I decided to make the trim gold instead of silver, so I had to match the brassy gold of the charm to a thread the same shade. Luckily I have a card of Fyre Werks in Soft Sheen #FT15 which is very close in color. In the photo you will see most of the trim done but I waited to finish it so you could see that I first padded the area with a bit of leftover Impressions, then did straight stitches on top to make the gold brass trim slightly rounded.


WIZARD’S STAFF

The next photo shows the sleeves, the Earth under the wizard’s arm, and his staff. My kit came with a crystal to attach to the top of the staff, and like the trunk’s brass lock, I needed to decide if I wanted to use the crystal bead or not. I decided not to, and instead stitched the oval area at the top of the staff with more Fyre Werks, this time the Hologram Ribbon in FH2, which is very shiny silver with green and gold highlights. I tried to use an oval-shape Jessica stitch but my shape wasn’t regular. I ended up abandoning the Jessica in the bottom half and just doing long stitches that went around the perimeter and ended in the center hole. I have a dimpled center, which will be the perfect place for a bead later. Once most of the canvas is done, I’ll decide whether to us a smaller crystal there or a colored bead. I don’t have enough of the design done to know how colors will interact so I can’t make a good choice here yet.

SLEEVES

I have continued to work on the sleeves, although I haven’t managed to couch the silver lines across the right sleeve. See the dark purple shadow inside the lighter purple sleeve? That is the darker plum purple impressions in tent stitches. After I did both sleeves, I added slanted long stitches in the lighter purple Impressions. That was harder as I needed to do the lines slanting at the correct angle. That took some planning, some lines in pencil on my black and white copy of the canvas and a few lines pulled out when they didn’t look just right. But I’ve achieved what I wanted—a sleeve that has three levels of dimension (and will have four when the blue outside robe is stitched. You have the least prominent dark shadow in purple, the lighter purple inner sleeve more dominant and then the arms in their fancy blue and silver which are the most raised of all.

GLOBE

The Wizard carries a globe under his arm along with a sliver of moon and some stars. I have charms for the moon and stars, so I decided I needed to do the earth in something that could hold its own against all that shine of gold and silver attachments. I wanted to bead the earth but didn’t have the petite sized beads in the right colors. Instead I ended up tent stitching the earth in Kreinik metallics, size #8 Fine Braid. The green is the very pretty 008C and the blue water is 006. I stitched the grid lines on top using black Coronet Braid, size 4. (The color is 51B.) I think perhaps this thread is a bit heavy but I like the subtle metallic shine, so I’ll leave this for now.

I like how the wizard is shaping up, but I still have a lot of work to do on him. I've been trying to do more stone wall behind him occasionally and I must finish the flagstone floor and the right sleeve, then start on the next step for the purple robe. Stay tuned!

Main blog at
http://blog.360.yahoo.com/chillyhollow

Saturday, August 16, 2008

Silver Threads and Golden Needles Cannot Mend This Heart of Mine!


However, I wouldn't mind stitching this as I cried along to the music. LOL

Familiar with the Linda Rondstadt version of this country song? Here are the full lyrics so you can sing as you take this Carole Lake cyberclass through the Shining Needle Society.

http://www.cowboylyrics.com/lyrics/ronstadt-linda/silver-threads-and-golden-needles-1663.html

or Tiny URL

http://tinyurl.com/5nmg9b

It's a needle case. Pretty thing, especially if you plan to travel and want something glamorous to carry the spare needles you have to have with you.

You can see the front, back, various colorways and the inside on Carole's website, or

http://www.carolelake.com/TeachingPieces/SilverThreads.htm

you can learn about the cyberclass by visiting the link via the Shining Needle Society.

http://groups.yahoo.com/group/SNS_Home_Room/files/

Look for the "Silver Threads and Golden Needles" folder once you arrive. Please note that if you don't belong to the Shining Needle Society, you will need to join (no charge and no obligation) at Yahoo Groups.

Now, anyone want to stitch to my favorite country western tune?

http://www.41051.com/xmaslyrics/grandma.html


Jane, exits humming happily (believe you me, you don't want me singing!)

Main blog at http://blog.360.yahoo.com/chillyhollow

We Are Busy

I'm working away on Joan Thomasson's wizard but I don't have enough progress to show just yet. I pulled out all the purple robe stitches I'd done since I realized that area wouldn't look good with the blue over-robe area and tried again. I've also started stitching the wizard's trunk in tent stitches but I haven't gotten very far.

We went to the county fair briefly after work this week and my Autumn Leaves and goldfish pieces won blue ribbons. Sadly, I didn't notice any other NP submitted at all. There were lots of pieced large block quilts and crocheted afghans and a little XS and an embroidered flower piece from a kit won a special award. The Best in Show winner was machine embroidery but I never managed to find it in the shelves of pieces. The items are jumbled along rows. A larger framed piece that didn't win anything hides all but the top of my goldfish's head and my Autumn Leaves purse is in the far corner where it is in shadow. Sadly, most of the pieces are treated this way. The only things you can actually see are a few quilts that are hung on a clothes line. I guess I should be thrilled crafts still draw enough pieces that there's a good showing, even if the categories are based on 1960s-style stitching, the displays a disgrace and the judges don't have a clue what they are looking at. [Jane, please tell us how you really feel!]

I will take photos of the finished Autumn Leaves purse when the fair is over. I ran out of time to take them before I had to have it at the fair.

I'm thinking about how to finish the Gay Ann Rogers Challenge Ornament and I have an interesting idea I'll share later on once I try it.

Somehow while I was busy with all of the above, we passed the 600,000 page views mark and are approaching 602,000 pages viewed. That's a lot of needlepoint people!

Thanks for your support, Dear Readers.

Main blog at http://blog.360.yahoo.com/chillyhollow

Friday, August 15, 2008

August 2008 Chilly Hollow Newsletter Article

If you belong to the Shining Needle Society and sit in on the open email classroom Gay Ann Rogers holds through SNS, you might have seen the new small Challenge Ornament or the Twilight Angel design that she is selling. Act now if you are interested because this is a limited time offer.

http://www.gayannrogers.com/ site_2/Small_Designs_.html

I personally think five Challenge Ornaments would make a spectacular box like Jocelyn has done (for for the diameter of the box and one for the lid). She has posted several box photos on her blog and also written complete and detailed instructions for making your own box here.

http://pinsneedles.wordpress. com/needlepoint-box/

Note that Jocelyn used Smyrna stitches to seperate various areas. I've read someone else used tent stitches to separate areas in a canvas and that tent is just too small in scale to divide areas well. Interesting point!

Talking about new designs that are available, here is a fascinating free one based on Celtic Medieval designs. It's really cross stitch but because the pattern uses full XSs only, it could easily be stitched on NP canvas.

http://www.inkcircles.com/html/Book_of_IC.html

Finally, I have a new eBay store for you to explore. This is Squiggee Designs. You can buy directly from the artist at a fixed price and there is a large variety of items to admire.

http://stores.ebay.com/ Squiggeeland-Needlepoint

Hope everyone is enjoying stitching these last few days of August!

Jane, waving from Chilly Hollow

Main blog at http://blog.360.yahoo.com/chillyhollow

Wednesday, August 13, 2008

Are you bidding on the wizard on eBay? UPDATED

Are you one of the folks bidding on the Joan Thomasson Holiday Spirit Wizard canvas I'm stitching that is on eBay?

http://cgi.ebay.com/Handpainted-Needlepoint-Wizard-kit-by-Joan-Thomasson_W0QQitemZ320284522672QQcmdZViewItem?hash=item320284522672&_trkparms=39%3A1%7C66%3A2%7C65%3A16%7C240%3A1318&_trksid=p3286.c0.m14&timeout=1218633572619

or Tiny URL
http://tinyurl.com/5hvhs4

If so, stop it right now! Buy from Joan herself. Even with $10 shipping you can get the full kit for almost half what the price is now. Click on Catalogue on the left, then look for Holiday Spirits and click there.

http://www.stitchinstuff.com/

I might be a Master Enabler but I also want you to buy wisely.

UPDATE: This canvas sold for $96.99 plus shipping which probably was $5-6. Joan Thomasson sells the full kit for $56 and the painted canvas alone for $40 plus shipping.

Main blog at http://blog.360.yahoo.com/chillyhollow

Tuesday, August 12, 2008

Hello/Goodbye

Many of you passed me Kleenex when you heard that the little counted thread shop I patronize on the weekends is closing due to the owner's move deep into West Virginia. (I live 8 miles from the WVA line but she's going hundreds of miles away!) Now my only shopping option is to drive 75 minutes one way to visit Needlewoman East. [Jane bursts into tears again.]

However, Sherry's sampler business is online and will still be around.

http://www.thegatheringplacedesigns.com/AboutUs.html

Check out her newest sampler design, Rabbit Run, by clicking on the Newest Designs link and then the photo of Rabbit Run. I'd file that under Modern Medieval Charming, wouldn't you?

While I'm thinking about new designs, Robin at Amy Bunger's website emailed me to say that Amy's latest class, the Halloween bear, is ready for viewing. Click on the link and then again on the little bear's front and back pictures to see larger images. We have another thing to label Charming!

http://www.amybunger.com/home_study_all.html

Fortunately, a new needlepoint shop is opening in the neighborhood of Needlewoman East so I'll have another place to visit occasionally when I do get in the area. It's called the Waste Knot. Here's their new website.

http://www.wasteknotneedlepoint.com/

Shops do come and go as things change and folks who spend so much time running a business for our benefit decide to go into other directions. We appreciate all that! So hello to the new folks (and items) and goodbye to those who are leaving the business behind and doing other things.

We love you all.

Main blog at http://blog.360.yahoo.com/chillyhollow

Monday, August 11, 2008

Insanity Improv


It is very hard to photograph metallics and beads but I hope you can get a sense of how nicely Insanity Improv turned out.

The challenges were many on this piece as Gay Ann Rogers deliberately omits any hints as to what colors to put where, or even what threads to use beyond starting with Watercolours or an overdye. I deliberately went with threads I could ply, even unraveling the four plies of the strand of Pebbly Perle to do the lace outline with only one ply. The original outlines were the entire strand of Pebbly Perle covered with four plies of silk to raise them a lot but the corner lines were only two strands of silk covered with metallic. I doubled the blending filament to couch those corner lines but only used one strand of blending filament to do the side stars. I ended up doing opposite corners with two colors of silk and metallic, changing one to more blue and one to more green. I wasn't thrilled with either but together they worked so I left those colors to vary. I did add black beads to the center around the edges of the waffle stitch. It needled something there.

It was a fun challenge and a nice break from the wizard. Thank you, Gay Ann!

Main blog at http://blog.360.yahoo.com/chillyhollow

Sunday, August 10, 2008

Jane Goes Insane


So I was walking around the Internet one day, minding my own business, when I discovered the Shining Needle Society. It's a Yahoo Group that organizes cyber classes from various famous teachers in the NP world. You join the group and you get the announcements of upcoming classes which you can take or not, as you please. One of the classes has an "open" classroom, which means you can sign up for the emails from the class whether you actually are stitching it or not. The class is for Mystery in a Corner by Gay Ann Rogers. It's a big piece and I know my limits but I signed up for the emails so I could listen in. I have a lot to learn about counted thread and Ms. Rogers is a dynamite teacher.

I've enjoyed watching the photos of the mystery piece appear and hearing about the choices people have made while stitching this piece. I've been thinking it would be fun to try some of the same things on a small piece, and Gay Ann Rogers has been reading my mind. She's got a new little ornament chart package available. It's called The Challenge Ornament. You can see it here.

http://www.gayannrogers.com/site_2/Small_Designs_.html


Yes, I bought the design. (Gasps of horror from the peanut gallery!) It arrived in the mail Friday and yesterday (Saturday) I made a trip to the little counted thread shop that is closing. Most things are half price so I thought I'd kit out this piece from whatever they had left. The closing sale has been going on for a while and I'd be scraping the bottom of the barrel in some respects but that just added to the Challenge.

The first challenge on the spot at the shop was when I realized that overdyes aren't on sale. No way am I paying full price for them, so I decided I would just wander around the shop and find the three types of thread I need (an overdye, some perle, and a thin metallic) for the project in colors that would coordinate well. I can fake an overdye quite well. Remember the Sundance Indian Woman in a Blanket canvas? All the "overdyes" there were faked.

But before threads, I needed NP canvas. I've been watching the Mystery in a Corner canvas photos from a ton of people doing that piece and I preferred the bright colored ones (particularly the one on black canvas) that have a lot of contrast between colors and the muted ones that are all shades of one colorway.

I gave up on shades of one color right away as I didn't find enough variations on a single color I liked to make this work for me. As I said, the shop thread choices are limited as stock is sold off. So it was high contrast colors for Jane! And you know what that means--black canvas. (More gasps of horror.) You know how much trouble I have counting charted designs and black canvas is hard to see on. BRING ON them challenges!

Ok, black canvas in hand, I wandered around. The threads above are what I came up with. I have --left to right--Petite Treasure Braid metallic in light green (PB57), Pebbly Perle in lavender (P50), three cards of Splendor silk floss in teal blue S865, teal green S880, and light lime S1058, and a spool of Kreinik blending filament in blue 006. I've got two thin metallics, three silk flosses, and a cotton perle. The colors blend well with the purple for a muted background and the lime for a punch. I may not use both metallics or I may mix them.

Here's what I've done with my threads.


My challenges here were figuring out what colors to put where. I studied the finished photos of this piece on GAR's website and blog, deciding what patterns seems to stand out and what didn't, then decided I wanted the muted purple in the center and on the lacy sides. The middle box seems to be prominent on all the stitched samples, so I mixed my teal colors there to fake an overdye. The lime is the middle part of the center block of three squares to add a bit of punch. By the way, this piece has a name. It is now called Insanity Improv.

This really is going to be a challenge and a nice break while I figure out what I want to do with the Joan Thomasson wizard robes. Prayers are gratefully accepted!

Main blog at http://blog.360.yahoo.com/chillyhollow

Saturday, August 9, 2008

Speaking of eBay

Mentioning Squiggee's eBay store reminded me that I noticed the Joan Thomasson Holiday Spirits wizard canvas I'm stitching for sale on eBay this week. I don't know if anyone wants to pick this up and stitch along with me, but here's the link--

http://cgi.ebay.com/ws/eBayISAPI.dll?ViewItem&rd=1&item=320284522672&ssPageName=STRK:MEWA:IT&ih=011

or Tiny URL

http://tinyurl.com/5cjlnm

Signed,
Your Master Enabler, whose main blog is at http://blog.360.yahoo.com/chillyhollow

Introducing the Squiggee Koi Framed


I took photos of my little goldfish in his shadowbox frame this morning. I had trouble with reflections on the glass even on a cloudy morning in the shade with the camera flash turned off. Makes me wonder if the glass is UV protective--in my experience that glass is hard to photograph well. I didn't notice anything on the label when I bought the shadowbox. Oh, well, at least you can see the pattern on the fabric that covers the foam core mat in this photo.


Thanks very much for custom painting this for me, Gail. It's now available through Squiggee's website to anyone who needs a little koi in their life.

http://www.squiggeedesigns.com/

You might find it in the Squiggeeland Needlepoint eBay store occasionally, too.

http://stores.ebay.com/Squiggeeland-Needlepoint

Or bookmark this page and come visit anytime!

Main blog at http://blog.360.yahoo.com/chillyhollow
Friday, August 8, 2008

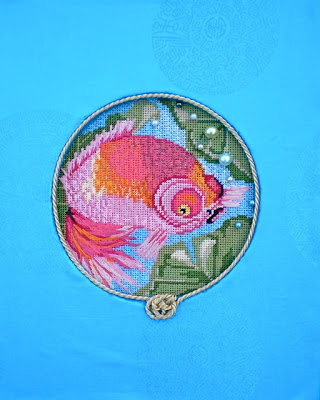
Goldfish Primps for the Fair


I haven't stitched anything this week on the wizard because the county fair starts Sunday night. This means I am busy putting the finishing touches on the two projects I'll exhibit at the fair--Squiggee's goldfish piece and Lani's Autumn Leaves.

The photo above is all the framing supplies for the goldfish. You can barely see the gold shadow box that he will go in on the left. On top is the spool of metal braid trim right above the paper xerox of the canvas I cut out to use as a pattern, the acid free foam core mat with a hole in the middle that will be covered in the blue fabric you see, and a piece of craft foam and a very thin sheet of metal that will go under the canvas.

Let me explain further. Framing is expensive so I headed to the local crafts emporium to pick up supplies in a standard size. The goldfish has pearls for his bubbles, so any frame needs to have depth so I can put glass over them. (I always glass my framed pieces since we live on a dirt road and don't have air conditioning. Dust is constantly coming in the open windows in nice weather.) So I bought an 8x10 shadow box frame, picked up an 8x10 scrap of acid free foam core, a spool of thin gold metal braid, and bought a packet of thin metal for embossing in the scrapbook section. I had the shop cut a hole in the middle of the foam core the size of the goldfish. All this cost me about $36, not too bad for framing.

I lugged it all home and got to work. First I cut a piece of fabric about 12x14, large enough to cover one side of the foam core, ironed it well, and glued it right over the foam core (I put glue only on the back as it bleeds through the fabric). Then I took my best embroidery scissors and poked a hole in the fabric over the hole in the foam core. Cutting carefully from the center of the hole towards the outside edge, I made an X and then more cuts to have a series of petals I could fold to the back side and tape down. Once that was done, I had to let everything dry (it's all glued to the back of the foam core) overnight.

I concentrated on making a very nice Chinese knot in one end of my trim. The trim I choose is made from real wire bits and it unravels itself if you don't put Scotch tape over the ends, so this was a bit tricky. The best instructions for a simple knot I found are here.

http://www.satincord.com/knots/buttonknot.htm

The next night was gluing the braid all around the center of the hole and then cutting my metal sheet (with scissors you use for paper, it is very thin aluminum that cuts but will dull your good scissors) to the size of the design. I also cut out a piece of acid free foam that is used for signs (cut red letters from it and glue to a green sheet of it and you have a sign for a kid's bedroom door) to the same size. Then I glued the metal circle to the foam circle. This will go behind the goldfish to give a mirror-like effect behind him with a lot less weight and expense than a real mirror. The foam is padding that raises the "mirror" and holds it in position against the NP.

The next step will be to tape the NP canvas to the foam core covered in fabric, put the mirror and its padding behind the canvas, then drop the mat/goldfish/mirror with padding stuff in the back of the shadow box frame and put the cardboard backing on.

And you'll have a goldfish in a frame!

The finished photo will be revealed tomorrow. The sky is too cloudy to take a good photo of the finished piece today. Tonight I'll work on Autumn Leaves.

Main blog at http://blog.360.yahoo.com/chillyhollow

Thursday, August 7, 2008

Stitching a Geisha


This lovely painting by Suzanne Tornquist has been transferred to needlepoint canvas and is for sale on eBay this week. Here's the auction--
She's a beauty but before you buy, read the details and study the photo carefully.
This is sold as a 14 count canvas but you can get larger count, which to me says that this is probably going to be a silk screened or transferred design onto NP canvas.
If you are thinking about picking up a piece on eBay --which is home to a ton of transfer designs--you need to think about several things. The first is how much trouble a silk screened or heat transfer canvas is going to give you. If not knowing exactly what color is on a particular canvas intersection drives you nuts, avoid silk screened canvases like the plague!
Do you like working on 14 count or do you want to try it? If you really need 10-12 count, it looks like you can have this size made for you, which would be a reason to bid.
The auction doesn't say if the 14 count canvas is interlock or Zweigart or another type of NP canvas. You may want to find out before you bid if this is important to you.
The auction does say that this design is an "exclusive copyrighted image" which makes me think the artist licensed this to be turned into a NP canvas. Many silk screened or transferred image canvases don't have permission and very often these turn up on eBay. I've seen rip-offs (or counterfeit) Melissa Shirley designs on eBay and I'm sure that some of the people selling these things ignore copyright. I wouldn't buy anything I thought stolen myself.
How well will the design tranfer to the grid of a needlepoint canvas? Look at her mouth and eyes. Will the curves there translate well to NP?
Only you can answer these questions for yourself, but think about them before buying a silk screened canvas. I'm not saying don't buy something as gorgeous as this. I'm just saying think before bidding.

Bohin Needle Info from Ruth


If you go back two blog entries to "New Website, New Newsletter" you will see mention of Bohin needles from France and my plea for more information about them. Ruth Schmuff has come to my rescue with news about the needles which are carried in her shop. She says,

"I generally tell my customers that I don't really care about needles. Don't have a favorite etc. etc. A needle is a needle right? I had the same ones for years. Lamora from Access Commodities told me about these needles and I tried them. OMG have I mentioned they are wonderful! I immediately threw away every needle in my possession and now only use these. As I tell people this and they try them, they do the same thing. They come back the next day and buy more. Everyone loves them. They glide through your canvas. They make stitching faster and easier.

there's my 2 cents worth :-)"

Unlike Ruth, I don't use the same needle for long as my acid hands--you should see the steering wheel in my car!--eat away the needle surface. I stick to Piecemakers needles which I find both very silky smooth to use and also which seem to resist my body chemicals well. So I asked her if she'd gotten any reports on the Bohin needles from customers with the same hands. Ruth replied that no one had mentioned this problem to her and she thought the Bohins ever smoother and silkier than the Piecemakers needles I use.

Here's Ruth's shop website where you can order the needles if you are closer to Maryland than Texas where Chaparral carries them. After all, you want to get these in the mail right away!

http://www.bedeckedandbeadazzled.com/

Jane, your friendly Master Enabler

Main blog at http://blog.360.yahoo.com/chillyhollow

Wednesday, August 6, 2008

New Website, New Newsletter


Chaparral Needlepoint in Texas has revamped their website and also posted the Summer 2008 newsletter. The newsletter links are right under the box to sign up for the newsletter. You owe yourself a visit to check out the over-the-top finishing style they are famous for!


If there are two items in a photo, often you can see a larger photo of each separately by clicking on the one you want to study in a larger photo. The photograph above is from their 4 piece smaller canvas club series using Melissa Shirley's Circus Dogs designs.


The email I received announcing the newsletter mentions they have a shipment of Bohin needles from France. I am curious about these. Anyone used them?


Baroque Silk


Yesterday I mentioned using the new Baroque Silk to stitch the black felt slipper the wizard wears. Above is a photo of some of the colors available in this thread. I used the black, which is called 1498 Witching Hour. A strand of black runs out of the skein with the end divided into the three plies that make up the perle twist of this thread. You can separate the plies to stitch with this on 18 count canvas. See the tiny crinkly thread that is a short strand cut loose? That is how the thread looks unplied. I didn't dampen the thread to get rid of the kinks and everything looked ok when stitched, but depending on your stitch, you might want to.

My opinion is that this thread has a quiet glow. It's not as shiny as silk floss, but it isn't as matte as wool. It looks like a lighter weight crewel wool to me but it doesn't feel like it. Doesn't feel like silk, either. It's a strange animal, but a nice addition to the stitching basket.

Remember that when I plied my black Baroque I found white areas that the dye hadn't touched. If you are stitching something where this might be a problem on 18 count (you won't see this unless you unravel the thread which you wouldn't do on 13 count), use another thread.

Needle in a Haystack has lovely photos of the colors (which are glorious!) and a link to Pure Palette's website.

http://www.needlestack.com/thread.html


Main blog at http://blog.360.yahoo.com/chillyhollow

Tuesday, August 5, 2008

Wizard Feet on the Floor (and more)


The wizard now has a felt slipper, knit socks, and a good start on his purple under-robe and two undersleeves.

The left undersleeve has a line of couched #16 braid from Kreinik in silver, held down by silver Petite Treasure Braid. I haven't started the right sleeve yet.

Our wizard, who lives in a drafty stone building, now has wool knit socks. I used the knit stitch variation of Kaleem stitch in overdyed Impressions in the same color as the undersleeves. That's the advantage of using a variety of threads from the same company (Caron in this case)--you can get a variety of textures in a similar color. Silk takes color differently than wool and cotton and synthetics, but I have a similar color in various spots, which is good for this design.

He is also wearing black felt slippers stitched in Interlocking Goblein stitch with one ply from a skein of black Baroque silk. This is a perle-type silk thread that is not particularly shiny. It is made for 13 count canvas but you can untwist the perle and use one ply on 18 count. I'm not sure I'd recommend doing this because my black ply had light spots where the dye didn't penetrate. For some things the color variation won't matter (and it won't show unless you untwist a ply from the strand) but it looked a bit odd on the black felt shoe. I had to over stitch some areas. But it looks ok if you do that and I think the overall effect looks like the black felt Chinese slippers. By the way, I chain stitched a line around the shoe top where it met the wool sock so it looked neater.

I've also made a good start on the purple under-robe. Inspired by Whimsey Gini, I made up a stitch similar to what she used on the red pants of her first lady (see the Stitching Club canvas I posted about on Sunday night). I am doing long \ slants over 5 threads in medium plum Impressions (a silk/wool blend) that are tied down with one little backwards tent stitch in my silver Petite Treasure Braid. The effect is sort of like rows of Xs if the NW to SE slant is huge and the NE to SW slant is tiny. If that makes sense.


Here's a close up of the floor. You can see the slipper and sock better and also the mistake I made on the stone flag stitch under the shoe and going left. I am now continually adjusting the stitch on the left in each row but that's ok. I like the irregular area.

But just how do you know when you should rip out a mistake and when it is ok? Well, some of this depends on your personality. Is it going to bug the life out of you forever? If so, rip out the mistake and do it right so you don't have to avert your eyes and shudder every time you look at this piece.
If you are submitting your piece to be judged, you are better off ripping out the mistake and stitching it over. Judges will almost certainly notice and you might have points deducted from the piece.
If you are more easy-going like me (or counting challenged, also like me), then look at the overall design and decide if the mistake is noticeable or not. Remember, NC Pat had to really look to see the mistake. That tells me no casual viewer will notice. I think the stitch's getting larger and more irregular on the left side draws the eye toward the left which is where our wizard is facing and probably walking. So it is ok.
But if the design is like what Jeanne is stitching, you can bet every mistake has to be corrected.

What I'm trying to say is that mistakes aren't fatal. Many stitches are the result of a mistake that looked so good the stitcher kept it. It all depends on your personality and the type of piece you are stitching and why.

Sunday, August 3, 2008

The Second Stitching Whimsey


Today I have another guest visit from one of the Stitching Whimsies. This time Gini is here to treat you with loads of eye candy and great ideas from her version of Melissa Shirley's Stitching Club canvas. You'll remember that the Stitching Whimsies meet weekly at Queen Anne Stitches in Santa Clarita, California, to stitch on the same design. They each interpret their own canvas in their own way and have a blast doing this. The Whimsies are going to visit Blog about every other week to show off their particular take on Stitching Club, which is by Melissa Shirley (as I just said). The canvas is 18 count and about 8 inches tall by 15 inches wide. By the way, the link below has the plain canvas of the Stitching Club at the top of the page and also shows other variations on this charming design.

http://www.melissashirleydesigns.com/gallery/?cat+74

Now, here is Gini to tell you about her Stitching Club ladies who you see in the full photo above.

********************************************************

"My Stitching Whimsies isn't quite finished, but I'm close enough to share.
All the decisions have been made, but there are a few details that haven't
passed from idea to reality yet. First, a huge and very public thank you to
Chilly Hollow Jane. I'd been stitching for more years than I want to count
when I confessed that I was terrified of painted canvases. She 'virtually'
took my hand and walked me through the thought process -- the resulting
'Overcoming Painted Canvas Phobia' is posted on the ANG website FAQs. I
told her she had unleashed a monster, but she just smiled and welcomed me to
her world. This has been a delightful piece to stitch, proof positive that
there are as many ways to stitch a canvas as there are stitchers. It's also
one I never would have chosen on my own. So it has opened my eyes to the
possibilities of designs that are more simply drawn and painted. I did some
painting years and years ago, and I'm drawn to the more artistically painted
canvases. But this was much more simply painted. Oh dear, more horizons
opened.... sigh.

As our Thursday group planned our Whimsies, we discussed the background. We
all knew we wanted it to stay, well, in the background. That meant using a
light weight thread and a stitch that didn't call a lot of attention to
itself. We also decided that it would probably be best if we stitched the
background before stitching the ladies, particularly if we wanted to depict
some of their canvases as works in progress. Doing the background first
would allow us to count the pattern more easily and to avoid carrying
threads behind the stitchers' canvases should we decide to leave those
backgrounds open.

One day, Sharon Quickstitcher called me to say she'd found the perfect
thread to match the paint. Well, I pulled some from my stash and I didn't
agree. Now, Sharon prefers clear, cool colors, while I lean towards warmer
and more muted ones. Sure enough her choice for the background was a cooler
blue while I preferred a warmer aqua. Both of our backgrounds use the
pavilion diamond stitch, and I like its simplicity and non-directional
nature. I used a single strand of Splendor. The background paint would
support either choice, but as we chose other colors, we found that we
continued with our preference for warm v. cool colors. Interestingly, most
of us chose different backgrounds -- either different threads, different
stitches or both.

While the red border is painted on the canvas, I've discovered that I like
doing a solid border around many of my pieces. It seems to ground the whole
design and also eliminates the need for an extra mat when framing. I trame
pad with pearl cotton, then satin stitch around the border using Very Velvet
or Petit Very Velvet.


Now to the stitchers themselves. The lady on the left is very sparkly. Her
blouse is Neon Rays Plus in alternating rows of tent over 1 and tent over 2
creating diagonal stripes that accentuate her small waist. Her blouse is
trimmed in Neon Rays. Her slacks are a tweed Burmilana, in long vertical
stitches couched with #4 Kreinik braid in a diagonal pattern. The vertical
stitches allow the paint to shadow through, making it unnecessary to stitch
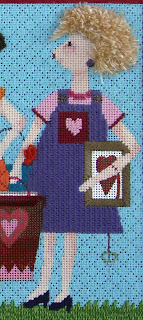
the shading. Her belt is Petit Very Velvet in a dark purple, the same
thread as the center lady's stitching bag. Her liquid silver necklace
finishes off her ensemble. Her hair is stitched with Alpaca, in loose
'slidey bullions' made by holding one ply of the thread and sliding the
other two down so they bunch together, then manipulated so the gathered
plies lie fairly evenly along the single ply core. The curl is finished by
plunging the threads through the canvas and tacking them down, repeating the
process for each curl. Her bag is stitched in floss, Vineyard Silk Classic
and Neon Rays with a large rosebud bead in the lower panel. The threads
spilling from the top are Neon Rays (the same one used for the trim on the
green jacket) and an overdyed Rainbow Gallery silk ribbon. The chick on her
canvas is Fuzzy stuff and the frame is a JL Walsh silk and wool from my
stash, as are the frames on all the stitchers' canvases.

I chose to use the same threads for all the skin, eyes, and mouths so as to
emphasize the women's hair, clothing, projects and bags.


The second lady sports an unconstructed boucle jacket. When I first saw the
canvas, I just knew that was what she was wearing. So, naturally, I used
boucle thread. Finding a stitch was tricky because I wanted the thread
choice to dominate the stitch. I finally decided on a wavy stitch made of
alternating oblique gobelins. It's also one that could be stitched to
indicate a change in direction at the elbow. Her jacket is trimmed with
Neon Rays, and the button on her jacket will be a Chinese frog in a dark
purple metallic. Unfortunately, I don't have the right weight thread in my
stash, so that will have to wait, unless I decide to use Grandeur. Her hair
is two shades of Burmilana, with her curls a combination of French and
colonial knots. I also built up the long stitches so it looks like her hair
is pulled back somewhat loosely. Felt padding would have worked to do that,
but I just overstitched until I had the desired effect. Her skirt is Petit
Very Velvet in encroaching gobelin, and I will add a row of fringe in floss
to match the skirt and jacket once I've taken the canvas off the bars. The
canvas at her feet is a large copper pot, done in beads. The flowers seem
almost an afterthought since they are in such a different scale to that of
the pot, and I'm wishing I had realized that earlier. I must admit that
beading the pot accentuated it far more than it was originally. Lesson
learned. Because they will always bother me, I'm going to paint out the
flowers and leave just the beaded pot. Of course, that will mean taking
those flowers out and redoing the couched background, as well as being VERY
VERY careful with the white paint! The canvas she's working on has several
flowers in a metal bowl. The bowl is cross stitches, which makes the edges
both even and vertical. The rose is bullions, using Silk 'n Colors, the
yellow flower is the same overdyed silk ribbon as the threads in the first
bag, in lazy daisy stitches with a bead for the center, and the purple one
is Grandeur in a Rhodes stitch. Her bag is basket weave, using the same
threads I did for the middle lady, with beads for the checks. The handle is
a piece of Petit Very Velvet, couched down with gold beads sitting donut
style.


Sharon's and my color preferences came through again with the middle lady.
While Sharon used a more raspberry pink, mine is a warmer strawberry pink.
Both are done using Belle Soie. Since the stitch covers the canvas
intersections, I chose a slightly darker color to use for the shading. The
dots on her dress are a scotch stitch in a cotton candy pink Kreinik braid.
Sharon chose white and a heavier weight thread so her dots are more obvious
than mine. This lady's hair is long stitches using Wildflowers in a black
and brown blend. I followed the direction that hair grows to add to the
realistic look. Her glasses have gold frames and Water 'N Ice for the
lenses. Her current project is a plant in a wire basket. I still need to
add beads for the flowers or berries. She has another project, along with
various supplies in her bag. There is a piece of canvas rolled up, along
with a measuring tape that I got from a miniature shop. Her stitching bag
is really eye-catching, but it's the result of several false starts.
Initially, I used a brick stitch in purple pearl cotton, but it just seemed
blah. I had some dark purple Petit Very Velvet in my stash, and a bit of
purple and green Watercolors left over from a previous project. The purple
in the Watercolors blended beautifully with the Very Velvet, and the green
added a wonderful contrast. It seemed like some of those gorgeous tapestry
bags to me. I used a byzantine stitch, outlined in tent, and the reverse
side of the strap shows the lining fabric. I love the effect. That bag
became the focal point of the canvas -- the spot your eye returns to in its
travels over the entire piece.


The orange lady's bottom half unfortunately shows the effect of too much
sitting and stitching... Her pants were another challenge for me. In this
case, I wanted to accentuate their voluminous nature. The stitch and thread
choice took several tries. Initially I tried Grandeur, but it was heavier
than the soft, billowy look I wanted, and it didn't come in the darker color
for the shading. So I decided on Splendor and balloon stitch, with a darker
shade for the waist band, the dots on her top, and the shading; needle
blending smoothed out the center demarcation. Her hair is stitched with
Medici. Her curls are bullions, and her scrunchi is Splendor. The dots on
her top are smyrnas while the background is basketweave. It must be a really
hot day, because the shading under her arms really shows a lot. LOL


The purple lady on the right is a bit of a rebel. There's definitely a part
of my inner self in her. She's not as dressed up as the others, choosing
instead a corduroy jumper and a tee shirt for the occasion. And then there's
her hair. Rather than curly, it seemed spiky to me. So I did turkey work,
cut the loops, and left it rough, using a combination of two strands of
Crescent Colours floss and one strand of Burmilana. I considered trying to
work diluted glue into it like hair gel but decided to leave well enough
alone. This would have been the time to have traced the shape of her hair
onto another canvas and practiced, but by the time I realized that, I'd
already stitched it. I don't want to trim the turkey work because that will
spoil the texture. I did remember to make a photo copy of her bag. I'm
going to try something on it that I've never tried before. I hope it works!
I'm going to trace the pattern onto Congress cloth, basketweave it, turning
the upper edge under. Then I'll cut it out leaving at least a 1" margin on
the remaining three sides, fringe that back to the stitched area, and attach
it by plunging the fringe to the back and securing it. I'll make the top
edge a few stitches wider than the original to allow it to project from the
canvas. I've already done a few rows of basketweave where the inside might
show. My fall-back plan is simply to basketweave the bag... Keep your
fingers crossed. And I plan to bead just the top portion of the heart on her
project -- a work in progress. Then, there are a few bag handles, earrings,
adding the miniature scissors, and perhaps more necklaces before my
Stitching Whimsies will be fully completed.

I find that once I get to this point in a canvas, I'm ready to move on. Our
Funky Forest canvases have arrived, and while it's calling my name, I'm
determined to get this one finished first. In truth, I'd also like to
finish two other canvases that are at about the same "almost done" point.
So, I'll try to limit myself to making a photocopy, pulling the beads I
still want to use on it, and planning stitches and threads... Will I be
able to resist? We'll see."


****************************

Thanks, Gini! This is so much fun. Now I can't wait to hear from the next Whimsey. Is it two weeks from now yet?

Jane, writing from Chilly Hollow
with mirror blog at http://chillyhollownp.blogspot.com


Main blog at http://blog.360.yahoo.com/chillyhollow