Turtle Bags with their windows on the side for installing needlepoint panels are a fun way to show off your stitching. You can buy all sorts of fun designs sized to fit, too.
But what do you do after you stitch the canvas? This posting will answer that question in two ways. But first, some background:
The inserts need to be roughly 5 1/2 by 7 inches. It doesn't matter if you buy the slightly larger tote bag (with two panels for needlework) or a cross body bag (only one side panel), the opening is roughly the same dimension. I strongly advise you make yourself a paper pattern that is 5 1/2 x 7, cut it out, and stick in in the window of the bag to make sure that will work. REMEMBER: You need more canvas than what shows through the window. Take your cutout and trace around it on another sheet of paper, then measure a border of half an inch wider all the way around. Cut that out and stick it in your bag to make sure that this is enough margin for the needlepoint to not shift around. You want your canvas to fit snugly in the opening.
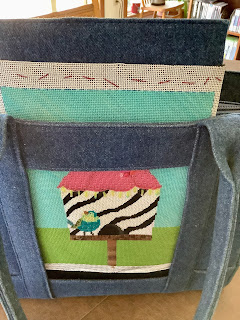
Turtle Bags are made with a zipper at the top of the side where the windows fit. See the photo above. Inside is a stiff fabric panel that comes with the bag.
This photo shows the stiff fabric panel behind the first needlepoint panel I stitched. I like to insert my panel and then carefully slide the stiff fabric panel back behind the stitching. It helps keep the needlepoint from shifting around while I'm carrying it. You don't have to do this, however. It's optional.
But how do you finish the needlepoint before you insert it? The answer is you don't have to. What you see is the needlepoint panel I am removing after carrying the purse for six months. The raw edges are simply trimmed to the size that fits in the panel. They are turned under a bit because the bag mashed them that way while I carried it. The stitched area is 1-2 rows larger than the 5 1/2 x 7 inch window. The entire canvas's outside dimensions are nearly an inch wider than the design. The basting stitches you see are because I basted a layer of black tulle over my stitching as I had beads and ribbon flowers I wanted to protect.
But what if you want a more finished look? I'll talk about how to achieve that tomorrow.
Blogging at http://chillyhollownp.blogspot.com
and at http://chstitchguides.blogspot.com
© Copyright May 18, 2022 Jane M. Wood. All rights reserved.


