Showing posts with label Melissa Shirley. Show all posts

Thursday, April 9, 2026

Bird Needlepoint Art

One of Carolyn Hedge Baird's students allowed Carolyn to photograph and show off her collection of Melissa Shirley bird canvases.  They are amazing!

These are large canvases, all on 13 count from what I remember.  Many have stitch guides available.  Here are a few examples currently in stock at Melissa Shirley Designs.


Written by Jane/Chilly Hollow
Blogging at http://chillyhollownp.blogspot.com
and at http://chstitchguides.blogspot.com
© Copyright February 4, 2026 Jane M. Wood. All rights reserved.

Friday, November 28, 2025

BREAKING NEWS: Melissa Shirley Retires

Melissa Shirley just posted on Facebook that she is retiring.

Melissa Shirley Designs will continue, run by Melissa's long time manager, Jo Lottrell, so shops can still order Melissa Shirley canvases as always.  It's just Melissa herself is going to go have some fun!

Written by Jane/Chilly Hollow
Blogging at http://chillyhollownp.blogspot.com
and at http://chstitchguides.blogspot.com
© Copyright November 28, 2025 Jane M. Wood. All rights reserved.

Sunday, December 24, 2023

The Advent Calendar Christmas Tree

Carolyn Hedge Baird shows off a student's Advent Calendar, shaped like a Christmas tree.  The canvas and ornaments are from Melissa Shirley.

The finishing is superb on this, with the nice touch of a magnetic Ultrasuede box with a quilted lining to display each ornament on until it is time for it to be stuck to the magnetic Christmas Tree.  

Written by Jane/Chilly Hollow
Blogging at http://chillyhollownp.blogspot.com
and at http://chstitchguides.blogspot.com
© Copyright December 11, 2023 Jane M. Wood. All rights reserved.

Tuesday, February 21, 2023

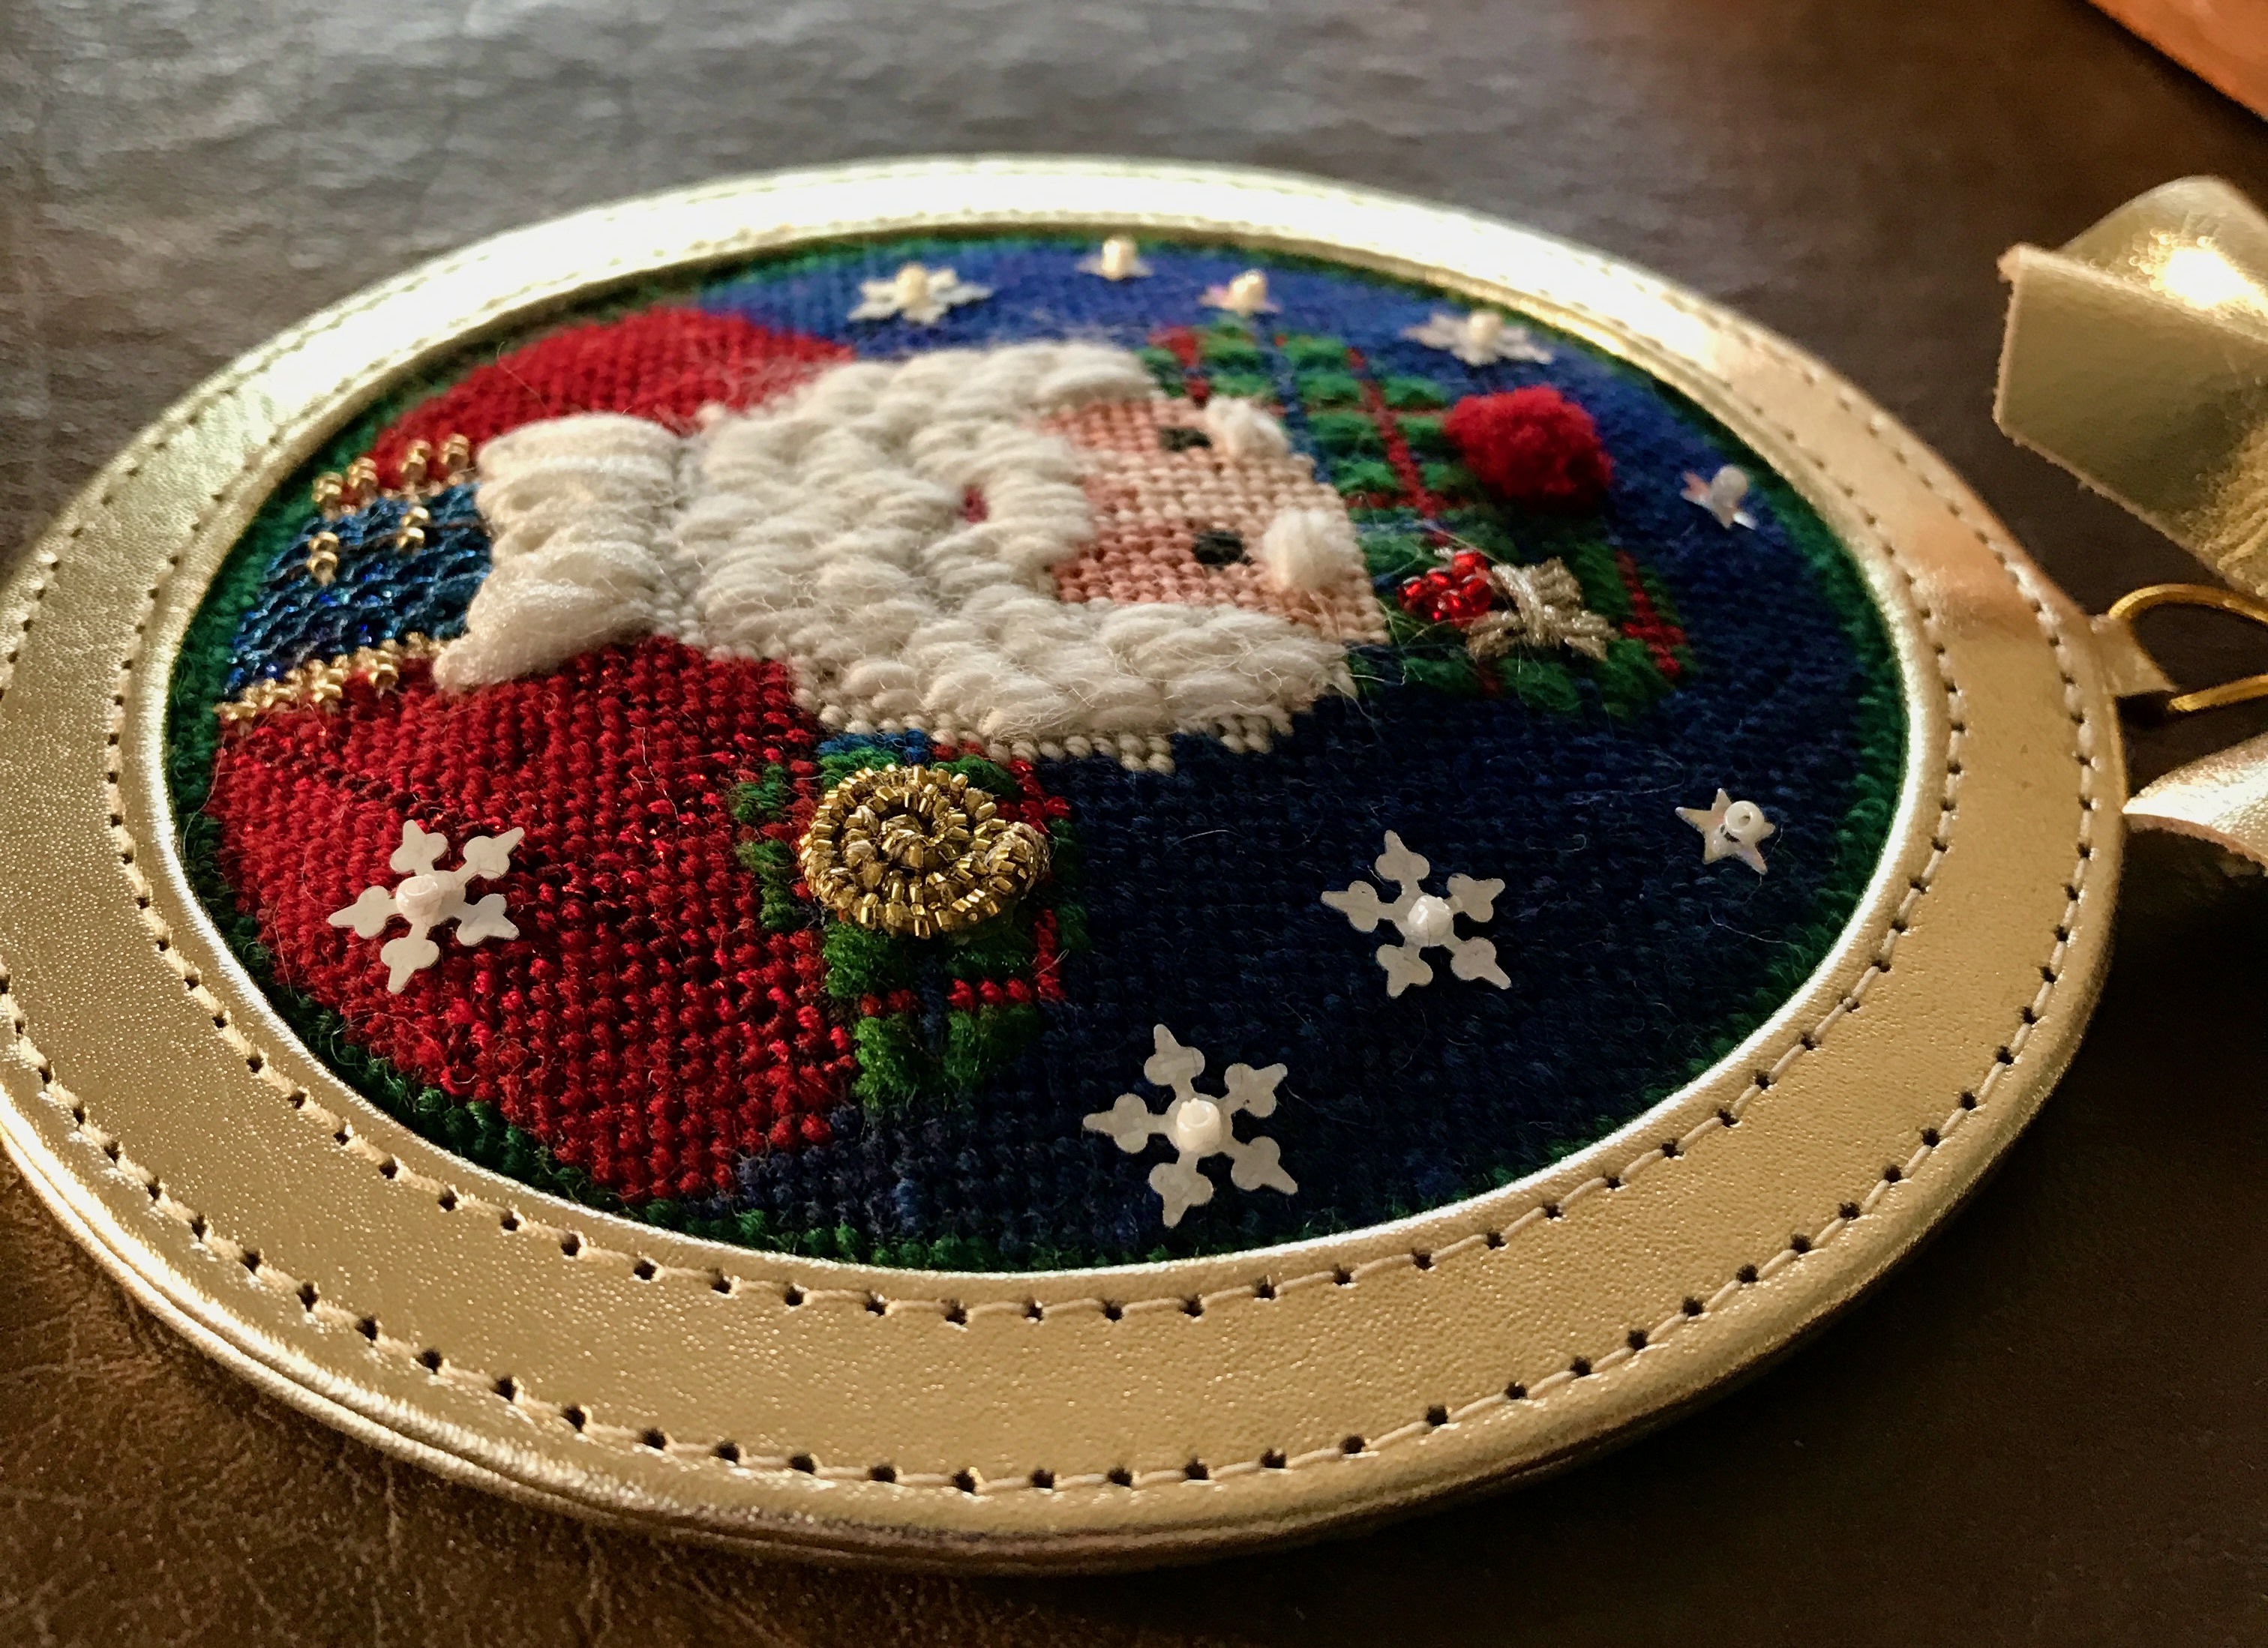
Scottish Santa and Planet Earth's Self-Finishing Ornament

Melissa Shirley's "Scottish Santa"


I started stitching on Melissa Shirley's "Scottish Santa" at Christmas.  I think this series is discontinued but he was fun to work on.  Also at Christmas I bought one of Planet Earth's self-finishing ornament holders.  Scottish Santa is almost four inches around.  The Planet Earth ornaments come in two sizes: one to hold designs three inches in diameter and one that is for ornaments that are four inches in diameter.  Both sides are identical except for the dimensions.  They are well made of good quality leather.  The bow is removable-- if you aren't a bow person just slide it off the loop.  Here you can see the colors currently available.  

Because Scottish Santa wasn't quite four inches around, I had to add three rows of background all the way around.  It pays to copy both the ornament holder and the finished piece and compare them.  That's how I knew I needed to add three more rows along the outside edge to make Scottish Santa big enough to fit.  


Planet Earth includes a card of instructions with each ornament holder. You can see it in the photo below.  


You'll need scissors to cut out your design and to score the waxed paper that covers the sticky middle of the ornament holder so you can peel the paper away from the sticky center.  Tweezers come in handy to get all the paper from under the leather lip of the ornament holder.  I also use a butter knife to lift the leather edge, then help push the needlepoint under the lip.  I also use my fingernail to push the needlepoint down and under but you'll need something flat and blunt like a butter knife.


In the above photo you see my tools and the waxy paper that's been removed plus the bits around the perimeter I need to pull out with the tweezers.  You don't have to expose the sticky stuff--you can insert your ornament without sticking it down--but it'll be puffed up a bit and for anything that will be handled a lot you probably need the safety of the glue to hold it in position.  


Be careful about beads and sequins.  They can't be too close to the edge or you might damage them trying to pry the lip up with your blunt butterknife and shoving the outside edge of the needlepoint under the lip.  In the above photo, one sequin is really close to the edge.  My background was tent stitches, which are very sturdy.  I wouldn't use a tender thread or a stitch easily damaged for the background if you plan to insert the finished piece in a self-finishing item.


I really like how Scottish Santa looks.  Kudos to Planet Earth for a nice ornament holder!

Written by Jane/Chilly Hollow
Blogging at http://chillyhollownp.blogspot.com
and at http://chstitchguides.blogspot.com
© Copyright February 11, 2023 Jane M. Wood. All rights reserved.

Tuesday, January 17, 2023

Breaking News: The Last Melissa Shirley In Person Trunk Shows

Family Arts is having a Melissa Shirley trunk show now and in their newsletter this week they state Melissa Shirley Needlepoint is ending in-person trunk shows.  They will be virtual in the future after the ones already scheduled in 2023.

Nothing beats seeing the canvases in person but then I don't have to pack, insure, ship these things, or unpack them at a shop and put them out for display, then pack, insure and return them.  I also don't have to worry about damaged or stolen canvases.  I can see why this is happening. 

But not being able to see great art in person is sad.  If you are a Melissa Shirley fan, hurry over to Family Arts in Phoenix to see her work in person while you still can.

Written by Jane/Chilly Hollow
Blogging at http://chillyhollownp.blogspot.com
and at http://chstitchguides.blogspot.com
© Copyright January 9, 2023 Jane M. Wood. All rights reserved.

Sunday, November 27, 2022

Challenges from Red Devil

Red Devil, by Melissa Shirley

The above canvas is "Red Devil," a discontinued Halloween design by Melissa Shirley.  I started working on him last spring and just finished.  This is a 5 inch diameter circle, painted on 18 count canvas. It presented a lot of challenges, such as how to stitch the leaves, deciding what the orange area around his feet was, how to differentiate the black boots from his black gloves, and how to stitch his horns so they stood out against the orange pumpkin in the wreath.  Luckily I love challenges like this!

Of course every challenge you solve immediately causes more challenges.  For example, I decided I would applique Ultrasuede on the leaves.  I have a canvas I want to use a lot of applique on, so this was a practice run of a sort for me.  Of course, then I had to decide how to create the veins, if I was going to ignore the oak leaves' shading, and what to do about Red Devil's trident which is on top of a leaf and a small pumpkin?  Finally I decided to ignore the shading on the leaves, use a sharp needle to create the veins with stem stitches and to work the trident in tent stitch through the Ultrasuede leaf using that same sharp needle.  

I also decided to make the circle a rectangle so I tent stitched a rectangular area as well as the blue painted background.  Of course the join between the areas shows, so I had to create a second "twisted grapevine" style wreath outside the first wreath to hide the slight difference in color.  

To make the gloves different than the boots, I choose different threads.  The boots are all brick stitch in perle cotton while the gloves are also brick stitch using a blend of Wisper and Petite Silk Lame Braid.  The gloves were lightly brushed after stitching to make them even fuzzier.

The orange area I decided was the lining of Red Devil's cloak.  I had to use light coverage stitches there because his clothes were done with light coverage stitches or using only one ply of silk.  The clothing had to be the same depth although I did make his cloak collar stand out with the use of couched metallic around bullions.  

To make the large pumpkin stand out, I beaded it.  The smaller pumpkins in the wreath were done in Double Stitch using beads for the second step so that they looked a bit like the big pumpkin but were not as prominent as the large one, which is the focal point of the design.


Red Devil's Done!


Bringing Red Devil to life has been a fun journey.  Now to figure out how to finish him!

Written by Jane/Chilly Hollow
Blogging at http://chillyhollownp.blogspot.com
and at http://chstitchguides.blogspot.com
© Copyright November 7, 2022 Jane M. Wood. All rights reserved.

Saturday, July 24, 2021

Amy's Newest Home Study

The fabulous Amy Bunger may have closed her shop in Memphis, but she's still teaching her Home Study classes.  The next one will be based on Melissa Shirley's new Gardening Bookshelf design.

It will be a while before Amy gets her canvas but you can email her to get on her mailing list once this Home Study starts.  She's working with Needle Works in Austin, TX to kit everything.  You can also browse older Home Studies to see more of Amy's work.

Written by Jane/Chilly Hollow
Blogging at http://chillyhollownp.blogspot.com
and at http://chstitchguides.blogspot.com
© Copyright July 5, 2021 Jane M. Wood. All rights reserved.

Thursday, October 29, 2020

Mr. Cat, Mr. Bat and Mr. Pumpkin Are Ready for Halloween~


My Debbie Mumm Halloween ornament is nearly done.  All that remains are the cat's features.  Since the face is three layers of satin stitch over four layers of felt, you need a sharp needle to add those.  I used a beading needle but an embroidery sharp or a crewel needle will also work as long as it will go through the bead holes.  (I used beads for the eyes.)

First I looked at my zerox of the canvas and the bits of orange I could see through the background stitching and placed the orange whiskers.  I used one ply of some orange Gloriana silk I had.  I copied the slant of the original painting as best as I could.  Next I did the nose and mouth.  I thought about using using three stitches for the nose/mouth, but I ended up breaking up each line a bit.  This area is the most raised and to get a smooth look over all that padding, I had to break up the two horizontal lines that make up the nose and mouth.  It is a little wonky but that suits Mr. Cat I think.  

If your first attempt doesn't go well and you have to rip out, you are going to disturb the smooth satin stitches that over the face a bit but that's not a big deal.  Rip out, add another layer of satin stitch with your black floss over the area you disturbed, and tray again.  


The eyes are entirely beaded with white pearls and black rounds that are all the same size, 15/0.  These are pretty tiny beads.  I used black floss to attach them as I was afraid the clear beading thread I used elsewhere might show against all that black.  I looked at my xerox again for reference.  The eyes are painted in five rows (top to bottom) of three white stitches, four white stitches with a black one in the middle, five white stitches, five white stitches and three white stitches.  

I copied that exactly.  In the top photo you can see the eyes underway.  I could have stopped right there but I wanted Mr. Cat to look like he was looking at Mr. Bat who had just landed on his head.  The moral is stitch this to suit yourself.  One stitch (or bead) can make a big difference in the expression.  The second photo shows my first attempt at the beading.  It's not easy to get beads to lay evenly over the curve of a heavily padded area.  I ended up taking them all out and trying again.  My second attempt worked much better.  

To make sure that both eyes were even, I did them at the same time, working the top row in both, then the second row in both, etc.  This helped me level the eyes as much as possible.  The photo at the top is me working both eyes simultaneously.


And here is the finished design again.  It was a lot of fun to work.  I hope you enjoyed it and will try some of these raised techniques on your own designs.

By the way, The Needleart Nut has also stitched her cat, bat and pumpkin.  Hilarious and different than mine.  I want to pet her cat.  I want to avoid being trapped on a desert island with mine.  LOL

Happy Halloween!

Written by Jane/Chilly Hollow
Blogging at http://chillyhollownp.blogspot.com
and at http://chstitchguides.blogspot.com
© Copyright October 3, 2020 Jane M. Wood. All rights reserved.

Thursday, October 22, 2020

The Cat in Stumpwork: A Tutorial

The final area of my Debbie Mumm Halloween ornament was the cat.  I decided I'd heavily pad the cat's face and its hind leg with layers of felt to raise it off the canvas.  I briefly considered padding the tail by doing satin stitches over some perle cotton or perhaps using repousse to make the tail very prominent but eventually I decided to let the tail be just in tent stitches. 

Before doing padding you have to do items around that area.  My cat ears and the collar were done first, as was the background around these areas and the tent stitches on the parts of the cat's body that weren't going to be padded.  I did check the body tent stitches after the padding was done to see if there were any stitches that needed to be done that the padding didn't cover.  I found several bare spots I had to cover.  It can be hard to judge this so always check later on to see if there are places you need to stitch.

The first step of heavily padding areas on a canvas is to make a copy of the canvas via your xerox machine to use as a pattern.  In the photo on the left you see the paper pattern of the cat's face and the four pieces of felt I cut out using the paper pattern.  I did this for the cat's hind leg, too, but I didn't show that for clarity's sake.  The process is the same.  I choose to make four layers of felt.  You will work from the small layer to the largest, attaching the tiny piece first, then the next largest, etc., ending with the biggest piece of felt on top.


Here you see the smallest piece of felt tacked into position.  Each layer of felt is larger and the last is slightly larger than the space you are covering.  The top layer has to be a tad larger because it'll be raised by the underlying layers of felt.  Normally you'd use the same color of felt as the thread that will go over it as the top layer, but I choose red for demonstration purposes so you could see what I'm doing.


You should baste each layer of felt into position, then go around the perimeter with tiny stitches to secure it.  As you can see, it's all too easy for this to get wonky!  I did better with the hind leg since I learned if you baste a layer first, it's easier to make it all stay where you want while you add the outside stitches that secure the felt over the previous layers.  Mary Corbet has a nice tutorial about beading over a felt pumpkin that shows the basting stitches and stab stitches around the perimeter well.  She's only doing one layer of felt but the principal is the same.


Here all four layers of felt are in position over both the cat's face and its hind leg.  Note that I used black felt for the top layers.  The next step is to cover the felt with black satin stitches.  Start by doing a layer of \ and / stitches that cover the area in an X shape.  (I used two plies of DMC cotton floss for my layers of satin stitch.  A laying tool is mandatory to keep the satin stitches smooth.)  

Once the first layer of satin stitch is done, do a vertical layer of satin stitches.  I worked from the middle out to one side, then worked from the middle to the other side, always using my laying tool.  


The final layer is a horizontal layer of satin stitches.  I worked these the same way, starting in the middle and working to the top, then from the middle toward the bottom, always using my laying tool.  In the above photo, the cat's hind leg is covered with satin stitches but the face hasn't been covered with DMC cotton floss yet.

Next time we'll talk about the final touches to give Mr. Cat personality.

Written by Jane/Chilly Hollow
Blogging at http://chillyhollownp.blogspot.com
and at http://chstitchguides.blogspot.com
© Copyright September 29, 2020 Jane M. Wood. All rights reserved.
Thursday, October 15, 2020

The Cat Needs a Name Tag and Ears Tutorial


Moon Name Tag in Or Nue'

The next part of my Debbie Mumm Halloween ornament is the cat, which has a lot of interesting techniques.  I decided that I wanted the cat's name tag to be in Or Nue' which is a technique of couching a metallic thread using silk  Jane Zimmerman has a good tutorial for doing Or Nue' on needlepoint canvas but before you read it, you should know this technique is essentially couching metallic thread (often in pairs) in a spiral from the center of a focal point out using a colored silk to add a pattern.  


If you want to see more, Rachel Wright has a great series of videos on Vimeo that shows her stitching a whole piece on linen using Or Nue.

The way I worked the name tag was to basketweave the area around the name tag first.  Then using a strand of Kreinik gold in size 4 braid in my needle, I came up in the center of the name tag.  Then I started to spiral the thread around the center.  I used clear beading thread to couch the thread in the moon area because the clear thread didn't show.  I used two plies of purple Splendor silk to couch the Kreinik in the purple areas.  It's easy to do but fiddly as you have to park the couching thread you aren't using out of the way and keep the gold metallic spiraling tightly as you couch it.  I used magnets a lot to keep tension on the gold thread and to keep the needles I wasn't using out of the way.  It's not easy to get a smooth curve where the purple area covers the gold to make the background of the name tag but if you do multiple stitches in areas, it works.  


Needle Weaving Wire

Once I had a name tag, I could work the cat's ears. I wanted dimension in the ears, more dimension than the name tag, because I plan to use felt padding on the cat's face and hind leg to raise them quite a bit.  So the ears have to be prominent. I decided to use needle weaving to create ears with wire and thread.  In the photo above you see my 28 gauge black wire.  I cut off a three inch length (DON'T use your good embroidery scissors to cut wire!) and bent it in a sort of hairpin shape.  That's the basis for one ear.

Poke the ends of the wire into a canvas hole at the base of the painted ear on your canvas.  Secure on the back.  It doesn't have to be really secure, just enough that it won't wiggle as you weave your ears.  I used a little brightly colored thread to tack the tip of the ear to the canvas.  You cut this later so the ear can stand up.  It just makes it easier to weave the thread around the wire if it's not moving so much.  

I used black Pepperpot silk to create my ear.  Come up at the base of the ear with your needle, then you start to weave the thread around the wire in a figure 8 shape.   Go under the wire with the needle pointing left, then point the needle right.  You will go over the wire on the left side and under the wire on the right.  Point the needle left.  Go over the wire on the right and under the wire on the left.  Repeat endlessly, working left to right, right to left, and the weaving will start to create your ear.  You'll have to push the thread down toward the ear's base with the needle periodically.  When your weaving is close to the tip of the ear, cut the thread that secures the tip of the ear to the canvas to finish it.  To end the thread you are weaving with, run it down behind the ear to the base where you can take the thread to the back side and secure it.  Then bend the loose ends of the wire into a curve and secure to the back side well.

This is hard to visualize but Ruth of Bedecked and Beadazzled has a great video on needle weaving.  Note that Ruth is doing a long feather shape that's flat to the canvas so she used thread instead of wire and she needed three supports, not two.  My ears are TINY so I couldn't use three supports.  I just used two.  What she's doing is very similar to what I did.  She started at the tip; I started at the base.  The procedure is very similar but using wire means the my ears are dimensional.


My cat's ears were painted with orange centers so I used a ply of orange Gloriana silk in a straight stitch to create the inside.  Note that the ears don't quite match.  I could have removed the left ear and made it a little narrower but I decided I liked the cat having ears that weren't exactly the same.  You can bend the ears a bit to position them as you like.  I stitched over the painted ears with my background stitch so that any bit of the paint that shows looks like a shadow, by the way.

No laughing at the red clown nose on Mr. Cat—that's next week's lesson.  

Written by Jane/Chilly Hollow
Blogging at http://chillyhollownp.blogspot.com
and at http://chstitchguides.blogspot.com
© Copyright 2020 Jane M. Wood. All rights reserved.

Thursday, October 8, 2020

The Bat Needs a Body: Needle Felting Tutorial


Last week I talked about my Debbie Mumm Halloween ornament.  I'm working from the background forward, playing with various dimensional techniques and trying to balance the elements of the design.  Mr. Pumpkin is beaded so he draws the eye, but the bat who has just landed on the cat's head needs to be prominent, too.  I decided I would needle felt Mr. Bat.

Needle felting is quite easy but you do need special supplies.  In the photo above you see a felting needle, a felting block (it's just a square of heavy foam), and some purple wool roving.  If you need to buy supplies, your local big box crafts store may have what you need but I recommend you buy from Sandy Arthur's Etsy shop.  She teaches a lot of needle felting on needlepoint canvas and likes the Clover brand of needle felting tools and felting blocks.

When I wrote this Sandy was temporarily out of the Clover tools.  Here is what they are like—

It doesn't matter what brand of felting needle and block you buy in my opinion.  You can get single needles, multiple needles in a handle, two different kinds of blocks.  The important thing is to use only a wisp of roving.  Put the felting block on a table (with some sort of protection), put your canvas on top of the block, pull a tiny tiny wisp of roving from the mass of wool, and use the needle perpendicular to the canvas to poke the roving through the holes of the canvas.  Go slowly and be careful.  The needles are SHARP and they are barbed.  You don't want to poke yourself by mistake.  In the photo below you see how much roving I used—and it was nearly too much for this small a space.


You don't need much wool roving.  The bat's purple head and body are smaller than my smallest fingernail and my thumbnail, after all.  Cover up his eyes, mouth and fang with roving.  Keep poking it.  On the back side the roving will start to show through and you'll have fuzz front and back.  Keep poking it, remembering to keep the needle perpendicular to the canvas.  Don't worry about damaging the canvas.  As long as you work slowly you won't.  


Here I'm working on the bat's face.  The needle is slanted a bit to show you how this is done, but remember to keep your needle perpendicular to the canvas as you work.  The body isn't finished but I worked body-face-body-face alternatively, just trying to shape the two round areas so that there was a little gap between them.  

I ended up with this—


Doesn't look like much but it's featureless right now.  I added a long bullion for his ears, I padded the wings with long stitches in perle cotton that I covered with black Flair, and I gave the bat two red Swarovski crystals for eyes and a silk ribbon orange bow tie since I decided (the bat's head is tiny, remember?) I didn't have room for eyes/mouth/fangs.


Here is Mr. Bat, all finished.  Next time I'll talk about Mr. Cat who is going to be heavily padded in a stumpwork technique using layers of felt covered with satin stitches.

By the way, if you want to try needle felting on your own canvas, I have more information about it in a separate tab.  

 
Written by Jane/Chilly Hollow
Blogging at http://chillyhollownp.blogspot.com
and at http://chstitchguides.blogspot.com
© Copyright September 22, 2020 Jane M. Wood. All rights reserved.

Thursday, October 1, 2020

The Cat, The Bat and the Pumpkin


The above design is what I've been working on during the last month.  This is Debbie Mumm's "Cat and Bat."  It's on 18 count and the ornament is three inches in diameter.  

I choose it as Halloween and autumn are in the air here in Chilly Hollow and I wanted something to try various stumpwork techniques on.  Can you tell how raised the cat's face and leg are?


Stumpwork techniques are becoming more popular in needlepoint.  Kimberly's "Dragon and Son" design is a great example.

So is what Kelly Clark is doing with her canvases.  Click on Stumpwork to see closeups.

These techniques can be used on any type of canvas whither it is painted, line drawn or charted.  All you need is a little imagination and some idea how to go about it.  You have to supply the imagination but I can tell you how I did this, to help you get started.

Using several raised elements on one design is always a challenge because some things need to be more prominent than others.  The first thing you have to decide is what is most prominent, what is less so, and what is receding into the background?  For me, the cat is the most prominent thing, then the bat, and finally the pumpkin.  Not every canvas has such obvious focal points, though.  


The first item I want to talk about is Mr. Pumpkin.  I decided to bead him.  I like brick stitch beading for solid areas.  It's fast and easy and works well for size 11 beads.  Luckily I had just the right shade of orange beads in my stash.  Unluckily, I only had black in size 14.  So the eyes and nose and mouth of Mr. Pumpkin were also brick stitch beaded with black beads, then I added beads here and there in the somewhat empty black spaces to fill in.  It's easy to just add a bead with a tent stitch if necessary.   I suggest if you have to mix sizes like I did, that you check after each new bead to see what you think.  It's easy to remove a bead if it's not working after each stitch.  The pumpkin stem is stem stitch using Straw Silk, by the way.  

I like the subtle sparkle of the pumpkin.  He doesn't overwhelm but you won't overlook him, either.

Next time, I'll talk about creating Mr. Bat.

Written by Jane/Chilly Hollow
Blogging at http://chillyhollownp.blogspot.com
and at http://chstitchguides.blogspot.com
© Copyright September 20, 2020 Jane M. Wood. All rights reserved.

Friday, September 4, 2020

Horse Country Chic Talks Handbags

If you want a real statement needlepoint piece, stitch a handbag.  Horse Country Chic has a lovely posting up with great photos of various handbag styles.
https://horsecountrychic.blogspot.com/2020/08/creating-needlepoint-handbag.html

I'm partial to Melissa Shirley's purse designs which are usually based on the natural world and to…
http://melissashirleydesigns.com/galsearch/?searchstring=purses&Search=Search&dosearch=

...the big carpet bag styles from Julie Pischke Designs.
https://juliepischkedesigns.com/product-category/carpet-bags/

All these are best done in tent stitches in my opinion.  Otherwise your beautiful stitching will snag as you carry these.

Written by Jane/Chilly Hollow
Blogging at http://chillyhollownp.blogspot.com
and at http://chstitchguides.blogspot.com
© Copyright August 14, 2020 Jane M. Wood. All rights reserved.

Sunday, November 3, 2019

Yet Another Writer Discovers Needlepoint

Thanks to Melissa Shirley (who alerted Facebook to this), we can read yet another article about needlepoint making a comeback.
https://www.flowerpowerwithjill.com/needlepoint-makes-a-comeback-and-its-a-whole-new-ballgame/?sfns=mo&fbclid=IwAR2seQwek9gd2Q-YXse-i5jWeum1R6rF0ZG7okAId6e-kg4LWlM0A564itY

I'm not sure I agree with the author that needlepoint should be meditative.  I often find it so but the world of needlepoint is wildly diverse in both the stitcher and the design he or she chooses.  And I like it that way.

Written by Jane/Chilly Hollow
Blogging at http://chillyhollownp.blogspot.com
and at http://chstitchguides.blogspot.com
© Copyright July 15, 2019 Jane M. Wood. All rights reserved.

Thursday, September 26, 2019

About John Johannsen

Fans of the artwork of John Johannsen that Melissa Shirley Designs adapts to needlepoint will enjoy reading a bit about his life.  Many thanks to Scrim Needlepoint for the information!
https://www.facebook.com/scrimdiscovery924/photos/a.1053431794673096/2727315380618054/?type=3&theater

If you haven't seen much of his work on needlepoint, take a browse through the Melissa Shirley Designs website.
http://melissashirleydesigns.com//galcol/?col=110

Written by Jane/Chilly Hollow
Blogging at http://chillyhollownp.blogspot.com
and at http://chstitchguides.blogspot.com
© Copyright June 5, 2019 Jane M. Wood. All rights reserved.

Wednesday, July 24, 2019

Pastel Pencil Shading

Susan Johnson of SJ Designs just posted an antique needlepoint piece for sale on her website, making special note of the pastel shading on the faces.
https://sj-designs.net/product/c1900-tea-time-needlepoint-tapestry-with-hand-painted-faces/?fbclid=IwAR0xYvPBYA5RIM_y8_wEhtJcReNNYgL_9jLLdZIPSKASyunbGVeZqaH3VsU

Both Melissa Shirley and Lisa at BeStitched Needlepoint do this on their stitching.
https://vimeo.com/148802688

Lisa also uses fabric markers to shade silk ribbons.
https://vimeo.com/164029492

It can be done.  I would not do it on pieces that need to be wet blocked but it's perfect for some situations.

Written by Jane/Chilly Hollow
Blogging at http://chillyhollownp.blogspot.com
and at http://chstitchguides.blogspot.com
© Copyright May 24, 2019 Jane M. Wood. All rights reserved.

Wednesday, June 26, 2019

Pears Everywhere!

Stephanie loves pear ornaments and has stitched a lot of them. She posted a few on her blog recently. These are from HeartStrings and Kelly Clark. Melissa Shirley has quite a few pear canvases as well.
http://stephsstitching.blogspot.com/2019/05/pears-everywhere.html

Written by Jane/Chilly Hollow
Blogging at http://chillyhollownp.blogspot.com and at http://chstitchguides.blogspot.com
© Copyright May 6, 2019 Jane M. Wood. All rights reserved.

Monday, December 10, 2018

How to Make a Christmas Bow

Ruth Schmuff taught Melissa Shirley's "Santa's Books" over the Thanksgiving holiday at her shop, Bedecked and Beadazzled. Part of the decoration is a pretty red bow, which Ruth explains how to create in this tutorial. It's easy if you use Wired Lace, which is a type of wire-edged mesh ribbon used in beading.
https://bedeckedandbeadazzled.com/2018/11/its-a-pretty-bow/

You can see more about Ruth's class here.  The canvas, the threads kit and/or the stitch guide are available from Bedecked and Beadazzled.  Just follow the links.
https://bedeckedandbeadazzled.com/2018/11/santa-likes-to-read/

Written by Jane/Chilly Hollow
Blogging at http://chillyhollownp.blogspot.com
and at http://chstitchguides.blogspot.com
© Copyright November 27, 2018 Jane M. Wood. All rights reserved.

Friday, September 21, 2018

Frida in Needlepoint UPDATED

Thorn Alexander's Frida Portrait

Bobbin and Fred is in love with needle art portraits of Frida Kahlo.  One of her favorites is available as a printed canvas from Art Needlepoint.
https://www.sewingwithbobbinandfred.co.uk/2018/08/frida-fever-five-fantastic-kahlos.html

The first Frida Kahlo portrait in painted canvas I know about is Melissa Shirley's from her Wild Women series.
https://rittenhouseneedlepoint.com/canvas/people/frida-kahlo-wild-woman.html

Melissa also has the Frida chick from Vicki Sawyer, which makes me smile every time I see it.  Bet this hen rules the roost!
https://www.annieandco.com/products/melissa-shirley-vs146

Lulu My Pink Turtle has several Frida portraits for those who are more whimsical.
https://bedeckedandbeadazzled.com/product/frida-dia-de-los-muertos/

http://www.stitchtherapyneedlepoint.com/feature.php?id=46736&title=Frida%20Mermaid&itemtype=hand%20painted%20canvases

http://www.stitchtherapyneedlepoint.com/feature.php?id=32762&title=Viva%20Frida&itemtype=hand%20painted%20canvases

Bailey Jack (distributed by And More) has a butterfly portrait of Frida.
http://yarntree.typepad.com/needlework_news/2017/05/frida-and-butterflies.html

Maren Devine has my favorite Frida portrait.  Kate Dickerson distributes her work.
https://www.louisesneedlework.com/shop/NEW/p/Frida-Kahlo-x34538040.htm

I'm sure there are more Frida needlepoint canvases available.  If you know of one, please tell me in the Comments or email me at chillyhollow at hot maildotcom if Google won't let you comment today.

UDPATE:  Mary Ann found this limited edition Frida pictured above from Thorn Alexander.  It's not on their website so it may no longer be available.  So I posted the photo Mary Ann found for us.  Thanks, MA!

Written by Jane/Chilly Hollow
Blogging at http://chillyhollownp.blogspot.com
and at http://chstitchguides.blogspot.com
© Copyright August 8, 2018 Jane M. Wood. All rights reserved.

Tuesday, July 10, 2018

A Peek Inside The Needlepointer

The Needlepointer has started doing video tours of the shop occasionally. These are always fun to watch but this time they have a Melissa Shirley trunk show, some lovely tote bags and the Leigh Designs ice cream social models to show off.
https://vimeo.com/277722963

Now I'm hungry!  Who wants to share a banana split with me?

Written by Jane/Chilly Hollow
Blogging at http://chillyhollownp.blogspot.com
and at http://chstitchguides.blogspot.com
© Copyright July 3, 2018 Jane M. Wood. All rights reserved.