Ruth Schmuff has expanded her offerings of overdyed floche and shows off the lovely eleven colors (and a complementary tin if you order an entire set) on her blog. Of course you can order just one color if you prefer, but Ruth reminds you that you need to get enough of a dye lot for your project.
http://www.notyourgrandmothersneedlepoint.com/2016/10/whats-my-favorite-thread.html
The special tins are going to be available for a short time only so get your orders in now.
By the way, if you've never stitched with floche, here is what Mary Corbet says about it, with links to further information at the end of the article.
http://www.needlenthread.com/2010/01/cotton-floche-whats-not-to-love.html
Written by Jane/Chilly Hollow
Blogging at http://chillyhollownp.blogspot.com
and at http://chstitchguides.blogspot.com
© Copyright October 26, 2016 Jane M. Wood. All rights reserved.
Wednesday, October 26, 2016
Bitchy Embellishment UPDATED
Labels:
bitch,
Bloomin Stitches,
embellishment,
satin stitches,
stitches
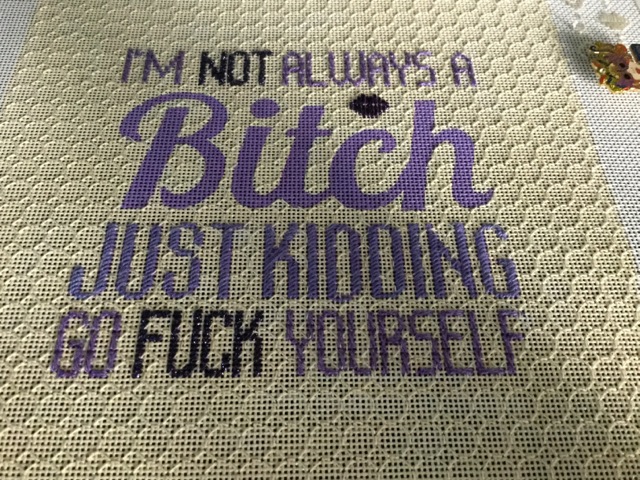
Once the top and bottom rows of lettering were stitched on my Bitch canvas, I started to think about the middle two rows. "Bitch" has very large letters while "just kidding" has smaller lettering. Because I emphasized one word in the top row and one in the bottom row, I thought I should also emphasize "kidding" in some way so that the eye travels from the left top to the middle right to the bottom left side again. Did I want to use the very dark Silk Lame Braid again to add that emphasis? I laid the card of thread on the canvas, stepped back and looked at it, then decided not. I would need to emphasize "kidding" in another way. But what?
After looking carefully at the colors in my various threads, I decided that I liked the purple of the Finca perle cotton the best. It's a good match to the painted lettering and it also would make lovely satin stitches. I worked "just kidding" in padded satin stitches, working each letter with horizontal straight stitches, then going back over them with diagonal tent and longer stitches to create a raised effect. You can't tell the raised texture from the photo but it lifted the letters up and made them prominent. I like the effect.
But it is rather plain. I decided I would add bling to "kidding" by adding various shapes and sized of beads and by adding a stitch over my diagonal satin stitches in my very pretty light gold, purple and blue mix of metallic Kreinik 2094HL. So that's what I did. Here is the result.
I hope you can see the beads, flower shaped sequin, and metallic threads I added either on top or next to the letters in "kidding." By the way, I decided I liked the flower sequin enough that I took out the large bead on the letter N and replaced it with a second flower sequin.
Next week we'll talk about the largest word on this canvas. Stay tuned!
UPDATE: Pat used padded satin stitches on her Just Kidding row, too! Great minds think alike. LOL
http://needleartnut.blogspot.com/2016/10/the-third-and-fourth-line.html
Written by Jane/Chilly Hollow
Blogging at http://chillyhollownp.blogspot.com
and at http://chstitchguides.blogspot.com
© Copyright October 14, 2016 Jane M. Wood. All rights reserved.
 |
| Padded Satin Stitches for "Just Kidding" |
After looking carefully at the colors in my various threads, I decided that I liked the purple of the Finca perle cotton the best. It's a good match to the painted lettering and it also would make lovely satin stitches. I worked "just kidding" in padded satin stitches, working each letter with horizontal straight stitches, then going back over them with diagonal tent and longer stitches to create a raised effect. You can't tell the raised texture from the photo but it lifted the letters up and made them prominent. I like the effect.
But it is rather plain. I decided I would add bling to "kidding" by adding various shapes and sized of beads and by adding a stitch over my diagonal satin stitches in my very pretty light gold, purple and blue mix of metallic Kreinik 2094HL. So that's what I did. Here is the result.
 |
| Embellishment On Satin Stitches |
Next week we'll talk about the largest word on this canvas. Stay tuned!
UPDATE: Pat used padded satin stitches on her Just Kidding row, too! Great minds think alike. LOL
http://needleartnut.blogspot.com/2016/10/the-third-and-fourth-line.html
Written by Jane/Chilly Hollow
Blogging at http://chillyhollownp.blogspot.com
and at http://chstitchguides.blogspot.com
© Copyright October 14, 2016 Jane M. Wood. All rights reserved.
Mounting on Stretcher Bars Before Stitching
Labels:
DebBee's Designs,
Debbie Rowley,
evertites,
stretcher bars,
tips
Debbie Rowley of DebBee's Designs shows how she attaches her canvas to stretcher bars on her blog today. Debbie is getting ready to create an original design on blank canvas instead of stitching a painted canvas and she is using Evertites instead of regular stretcher bars, but otherwise what she does is exactly what folks using stretcher bars do.
http://debbeesdesigns.com/DDWrdPrs/?p=1794
I happen to use a heavy duty staple gun because my thumbtacks come out regularly (no idea why but neither the dogs or I want to step on a thumbtack!) but otherwise I do what Debbie does, with the single exception that I staple my corners if I am not using Evertites.
Not familiar with Evertites? You can read more about them here.
https://chillyhollownp.blogspot.com/2009/11/evertites-review.html
(Here is what happens when you don't retract your Evertite screws before taking them apart. This is why Debbie reminds you to do so in her article.)
https://chillyhollownp.blogspot.com/2010/01/evertites-warning.html
Written by Jane/Chilly Hollow
Blogging at http://chillyhollownp.blogspot.com
and at http://chstitchguides.blogspot.com
© Copyright September 27, 2016 Jane M. Wood. All rights reserved.
Subscribe to:
Posts (Atom)