Showing posts with label Turtle Bags. Show all posts

Saturday, June 25, 2022

How to Insert a Canvas in a Turtle Bag Part Two


Yesterday I showed how to stick a canvas with raw edges into the window of a Turtle Bag.  Today I'll show how to turn under and baste the edges before you insert the canvas in case you want a more finished panel.  

I strongly advise you make a paper pattern before you do any stitching or before cutting your finished canvas to insert in the bag.  That way you know your canvas will fit without anything showing you don't want to show.  You can fold or trim the paper pattern until you know what works, then use it to draw or baste where the stitching should stop.  In the example below, my canvas was stitched half an inch beyond the 5 1/2 x 7 inch space.  The entire front of the canvas is stitched but not all of that is visible through the window on the front of the Turtle Bag.


If you are certain about the correct size, trim the canvas around the outside margin.  I normally leave half an inch of raw canvas all the way around.  Finger press the raw edges back all around the outside.  Now trim the corners somewhat to reduce the bulk.  In the above picture, I've finger pressed the sides, then cut the corners off.  


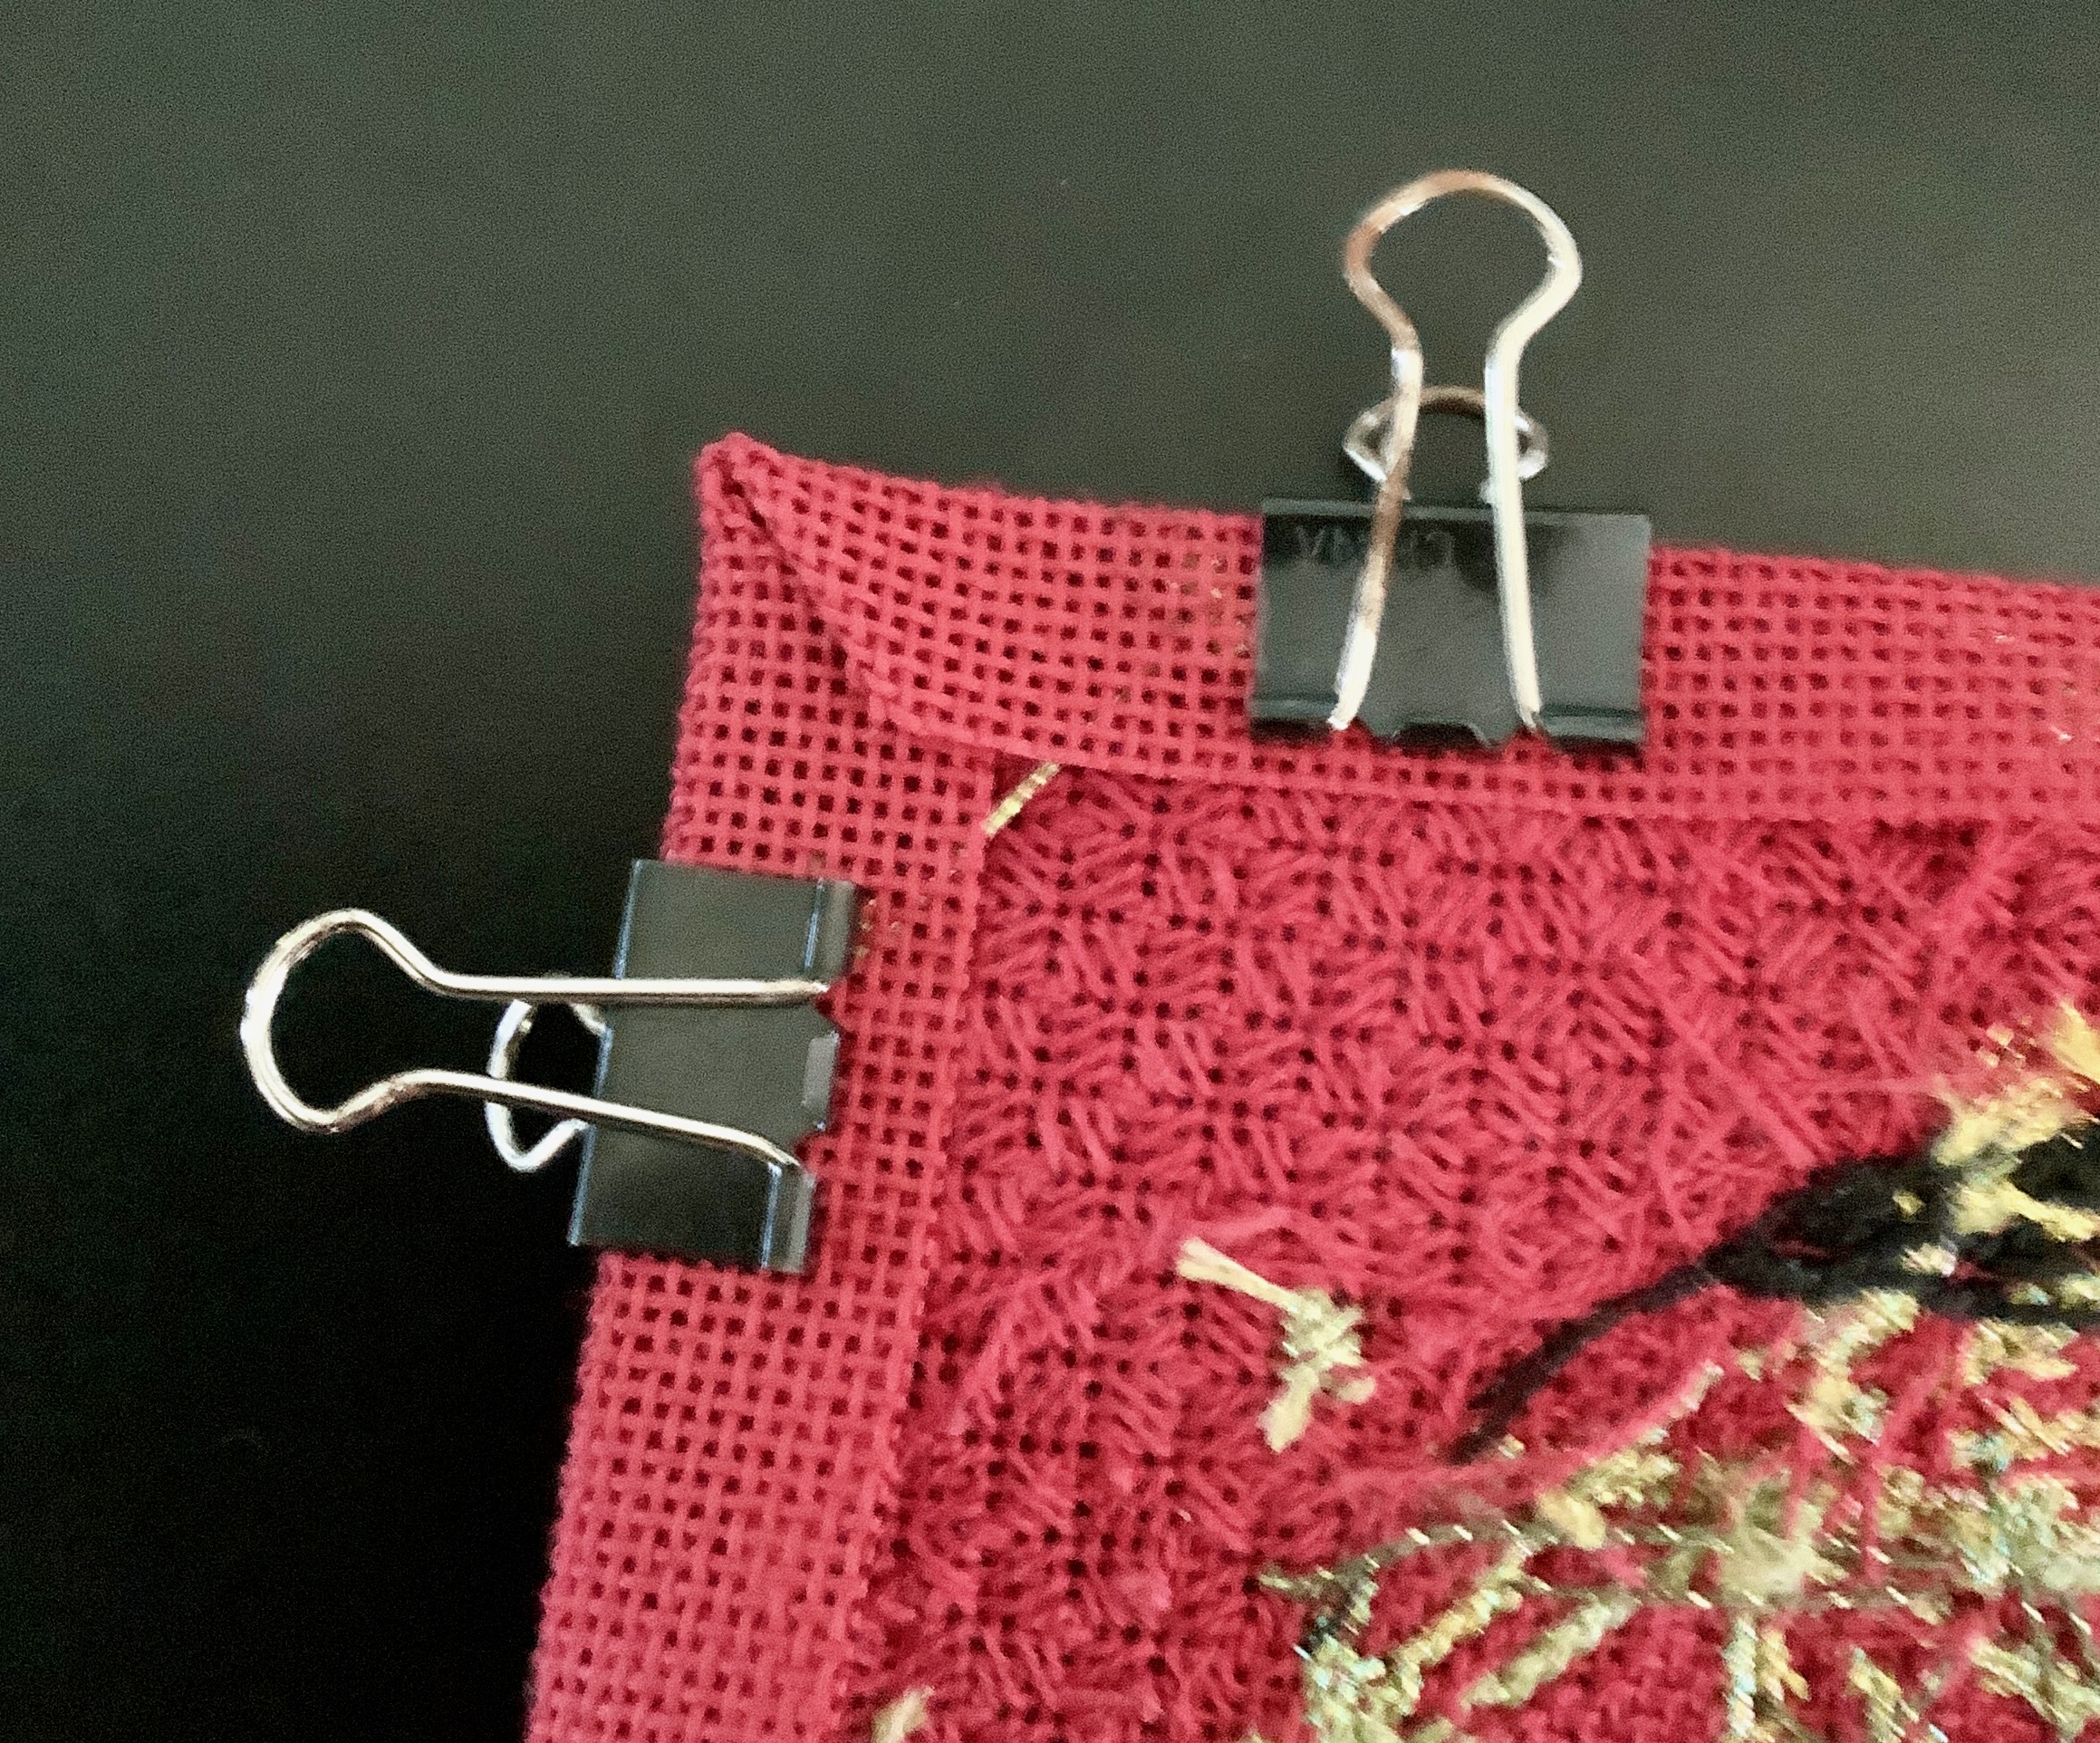
Now press the raw edges to the back again.  If you have clips of some kind, you can carefully fold the corners under so that they meet and use clips to hold the corners in position.


Now baste the corners together.  In the above example I'm using a doubled strand of sewing thread in a contrasting color so you can see.  Normally I use a color similar to the background color but that won't show up in a tutorial.  It doesn't have to be really neat.  I'm not the neatest when it comes to hand sewing but no one is going to see it.

Once all four corners are done, lay your canvas on a table and put a few books on top to help it stay flat.   (If your canvas has beads or ribbon work you might want to skip this step or use padding.)  This step is optional, but my canvas has no beads or very raised stitches and I wanted it flat.


Now just slide the canvas in the window pocket.  Add the stiff fabric panel if you wish.  Zip the top of the side panel closed and there you go.

The final step is to go shopping for the next canvas for your Turtle Bag!


Written by Jane/Chilly Hollow
Blogging at http://chillyhollownp.blogspot.com
and at http://chstitchguides.blogspot.com
© Copyright May 18, 2022 Jane M. Wood. All rights reserved.

Friday, June 24, 2022

How to Insert a Canvas in a Turtle Bag Part One

Turtle Bags with their windows on the side for installing needlepoint panels are a fun way to show off your stitching.  You can buy all sorts of fun designs sized to fit, too.


But what do you do after you stitch the canvas?  This posting will answer that question in two ways.  But first, some background:

The inserts need to be roughly 5 1/2 by 7 inches.  It doesn't matter if you buy the slightly larger tote bag (with two panels for needlework) or a cross body bag (only one side panel), the opening is roughly the same dimension.  I strongly advise you make yourself a paper pattern that is 5 1/2 x 7, cut it out, and stick in in the window of the bag to make sure that will work.  REMEMBER:  You need more canvas than what shows through the window.  Take your cutout and trace around it on another sheet of paper, then measure a border of half an inch wider all the way around.  Cut that out and stick it in your bag to make sure that this is enough margin for the needlepoint to not shift around. You want your canvas to fit snugly in the opening.


Turtle Bags are made with a zipper at the top of the side where the windows fit.  See the photo above.   Inside is a stiff fabric panel that comes with the bag.


This photo shows the stiff fabric panel behind the first needlepoint panel I stitched.  I like to insert my panel and then carefully slide the stiff fabric panel back behind the stitching.  It helps keep the needlepoint from shifting around while I'm carrying it.  You don't have to do this, however.  It's optional.


But how do you finish the needlepoint before you insert it?  The answer is you don't have to.  What you see is the needlepoint panel I am removing after carrying the purse for six months.  The raw edges are simply trimmed to the size that fits in the panel.  They are turned under a bit because the bag mashed them that way while I carried it.  The stitched area is 1-2 rows larger than the 5 1/2 x 7 inch window.  The entire canvas's outside dimensions are nearly an inch wider than the design.  The basting stitches you see are because I basted a layer of black tulle over my stitching as I had beads and ribbon flowers I wanted to protect.  

But what if you want a more finished look?  I'll talk about how to achieve that tomorrow.

Written by Jane/Chilly Hollow
Blogging at http://chillyhollownp.blogspot.com
and at http://chstitchguides.blogspot.com
© Copyright May 18, 2022 Jane M. Wood. All rights reserved.

Monday, January 31, 2022

Homestead Has Turtle Bags

Homestead Needle Arts has a nice selection of Turtle Bags, plus a description of both the tote and crossbody in the shop e-newsletter.

Written by Jane/Chilly Hollow
Blogging at http://chillyhollownp.blogspot.com
and at http://chstitchguides.blogspot.com
© Copyright January 26, 2022 Jane M. Wood. All rights reserved.

Friday, October 1, 2021

My Turtle Bag Insert UPDATED


I finally broke down and ordered a tote from Turtle Bags Inc.  

This Florida company sells both cross body and tote bags. They come with fabric-covered stiff inserts for the window(s) on one (cross body) or two (tote bag style) sides of the purses.  You can buy extra inserts from the company to change the look of your purse.  

My tote isn't as heavy as it looks but the sides are stiff so it stands up on its own.  Here is a peek at the inside.  The cross body doesn't have the zippered center and only has a display window on one side.  The other side has a zippered pocket.  I like being able to carry a lot of stuff and so far I've not had pilling issues on the handle and the fabric doesn't seem to attract pet hair.  By the way, I'm five feet, four inches tall, so this is a fairly big tote but the handles are the right size for carrying or over the shoulder wear.


In the photo to the right I unzipped the zipper at the top of the display window and pulled the fabric insert that came with my denim bag out partway so you can see it.  You might be able to see the zipper for the other side's display window at the bottom of the picture.  Again, this is the tote bag.  The cross body is slightly different.  Check the company's website for further information and the current colors available.

Of course needle artisans can stitch things for the inserts!  I stitched a Tapestry Fair birdhouse design by Pat Scheurich for mine.  If you are going to stitch your own, the tote bag style display window is roughly 5 3/4 inches wide by 6 3/4 inches tall.  I'm told the cross body bag window is slightly narrower but I don't have those dimensions as I only ordered the larger size.  The outer dimension of the canvas you put in the window should be roughly 7 1/4 inches wide by 9 5/8 inches tall.  I recommend you stitch 2-3 more rows than the window dimension in case the stitched canvas moves a bit or you want to take it out of the  cross body bag and use it in the tote bag.  All I did was fold the raw edges under to fit and stuck the canvas in the window.  

I did cover it with a layer of black tulle first. I had not planned to use this canvas as a purse so it has beads and ribbon embroidery, not the best idea for a purse that will see wear!  The tulle (an idea from Ruth Schmuff of Bedecked and Beadazzled) will help prevent snags but I will replace the canvas with a more sturdy one later once I get it stitched.  

A member of NP Nation recommended putting the fabric insert that comes with the bag in the display window behind the stitched canvas.  This works well to keep the needlepoint from bending away from the sides of the display window or shifting.  

If you aren't good at measuring, Mindy's Needlepoint designs canvases to fit the bags and Mindy also sells the tote bags.  There are six designs available currently.

Stitch by Stitch in Larchmont, NY also sells the bags and has plenty of inserts that fit from a variety of designers.  Your favorite shop can help you pick a canvas as well, even if they don't stock the bags.

This is a fun way to use needlepoint when you are running out of wall or couch space for your stitching.


UPDATE:  I've done two articles about inserting a design in a Turtle Bag. 


Written by Jane/Chilly Hollow
Blogging at http://chillyhollownp.blogspot.com
and at http://chstitchguides.blogspot.com
© Copyright September 27, 2021 Jane M. Wood. All rights reserved.

Monday, June 28, 2021

Finding a Canvas to Fit a Turtle Bag UPDATED

The latest rage in the Needlepoint World are the Turtle Bags, which come with windows to insert panels of fabric.  Needlepointers are naturally inserting canvases in the openings instead of the fabric panels that Turtle Bags Inc. sells.

But how do you choose a canvas that will work?  The openings on both the tote bag and the cross body style are approximately 5 1/2 inches wide by 7 inches tall, so you will need a canvas with a design that is either that size already or that you can add background around to make it that size.  

The pre-made fabric inserts that Turtle Bags Inc. sells are 7 inches wide by 9 1/2 inches wide so you will need to cut down your canvas to be that size or perhaps a tad smaller before you slide it into the pocket.  That means you have to buy a canvas which has an outer dimension at least 7 x 9 1/2 inches or that you can cut to that size.  

Let's say you have a canvas in your stash that you think would look good in a Turtle Bag.  How do you check this?  First, you need a piece of paper that is 5 1/2 inches by 7 inches.  Using a ruler, cut a piece of paper that size.  Now, using magnets, position the paper behind your canvas to see if it will work.  


Above you see my birdhouse canvas from Tapestry Fair with a piece of 5.5x7 inch paper behind it.  The paper shows what will be visible on the front of a Turtle Bag.  As you can see, I'm going to have to add background around the birdhouse, so I basted a line all around the canvas about half an inch away from the edge of the paper so that I have a margin of background in case the canvas shifts a bit.  The outside overall dimensions are 8x10 inches so I will cut down the canvas to approximately 7x9.5 inches once I get the background stitched and am ready to insert the canvas in the window on the front. 

What if you don't have a suitable canvas in your stash?  What should you shop for?  First, I'd recommend you pick a canvas you can do entirely in basketweave.  My birdhouse piece has beads and ribbon embroidery, both of which will snag if it is used on the front of a purse that I carry, even if I only use it occasionally.  An all-tent stitch piece is the best choice for you as it is the most durable stitch.  

Now let's go shopping!  I browsed the Stitching Destashing website for canvases that were the right size and that were all under $40.  This charming daisy canvas is 4 1/2 x 4 and is slightly offset so adding background outside the border won't look odd.  You can do two different background colors, too, one inside the square and one outside it, to add interest.  

You could stitch the Chinese "good fortune" character in metallic.  The design is small at 3.5x3 but has high impact against the dark green background.  You could even add a gold border if you wanted to this one.  

Another high impact design is this red shoe which is 3.5 inches square.  The one drawback of this design is that the outside dimensions of the canvas are slightly smaller than the 7x9.5 inches we are looking for, but I think you could make it work if you used double sided tape to make sure the needlepoint canvas doesn't shift around in your opening.

Want a real charmer?  How about this rabbit?  This is a larger design at 5x7 inches and has the merit of the background being easy to make wider by just adding a bit of branch on the left side.

SharonG's perfume bottle is 3.75x6 inches, and will be easy to add background to.  Designs that are vertical like this one make really good choices for a purse insert as they look natural with a background added.

Square designs like Melissa Shirley's five inch square vase with flowers isn't quite as easy to use but you can make the red border as wide or tall as you need.  

Still, dede's elephant (which is also five inches square) will look more natural with additional background as the design itself is offset.

Finally, consider designs that coordinate if you are buying a Turtle Bag in the tote style as it has a window for displaying needlepoint on both sides.  This SharonG bra and tap pants set would work nicely.  Of course if you are going for the cross body style of bag, it only has a window for display on one side.  And there is no rule you have to have a needlepoint panel on both sides anyway.

Is all this too much for you?  Stitch by Stitch in Larchmont sells the bags and will find you a canvas that will work if your local shop can't help.  They recommend the Colors of Praise initial canvases but I'm sure they can find something else for you if that doesn't appeal.  

Good luck stitching something totally fun for your next purse adventure.  

UPDATE:  Mindy's started painting designs to fit in the openings of Turtle Bags.


UPDATE #2:  This posting on NP Nation has lots of information about the right size canvas for your Turtle Bag, whether it is a tote or cross body style.  Read all the comments.

UPDATE #3:  Needlepoint Alley has inserts.

Written by Jane/Chilly Hollow
Blogging at http://chillyhollownp.blogspot.com
and at http://chstitchguides.blogspot.com
© Copyright June 26, 2021 Jane M. Wood. All rights reserved.

Tuesday, April 27, 2021

Turtle Bags

Mona found these Turtle Bags for her needlepoint canvas.

She suggests you order the bag and measure the opening before you buy a canvas.  The website may be able to furnish this if you ask.  The bags come in two styles.  The "shells"are fabric covered stiff boards made to be inserted in the window(s) on the side.  Each shell is 7 x 9 1/2 inches.  I'm guessing that some of the shell is covered by the fabric window.  The crossbody bag has one window, the totes have two windows.  

Apparently the openings are 5 1/2 inches by 7 inches and you should allow a half inch selvage all around.    Note that the style of the linen fabric totes is changing in June and they will be more expensive.  A denim style should be available in June.


UPDATE:  Mindy has started painting designs sized for Turtle Bags.


UPDATE #2:  Dianne Decker Bomar says "The size of the crossbody window is exactly 4 1/2" x 6 3/8" and I would recommend keeping your canvas 7"x9 1/2" so it fills the pocket and your stitching will remain centered in the pocket and visible in the window. The size of the tote windows is 5 1/2" wide by 7" tall."

UPDATE #3:  Needlepoint Alley has inserts that fit the bags, too.

UPDATE #4:  Homestead Needle Arts has a nice desciption of their shipment of both sizes of these bags plus pictures.

Update #5:  Here is Mindy's latest--the seashore initial series.

Update #6:  Mindy has two new canvases sized for the Turtle Bag side windows.  The first is Asian-inspired, in muted colors.  The second is sunflowers and bright with color.


UPDATE #7:  Pepita Needlepoint has Turtle Bag insert canvases, designed as pairs on one canvas so you can switch out the design or use both on a two sided tote.  Some can be purchased as a single design.


UPDATE #8:  Colors of Praise has a section of 5 1/2 x 7 inserts that fit Turtle Bags and they are lovely.  Thanks to NJNA's blog for the tip!

Written by Jane/Chilly Hollow
Blogging at http://chillyhollownp.blogspot.com
and at http://chstitchguides.blogspot.com
© Copyright March 24, 2021 Jane M. Wood. All rights reserved.