Showing posts with label Bloomin Stitches. Show all posts

Wednesday, November 9, 2016

Bitch Background is Beaded UPDATED


Background Bead Choices
The final touch on my Bitch canvas was to add beads in the middle of all those darning circles in the background.  But what color?   I laid out three shades and sizes/shapes of gold beads, the purple beads I used on the word "bitch" and the ivory beads I originally picked as the best choice on the background.  That's what you see above.  Which would you have chosen?

I finally decided on the ivory beads.  The beading seemed to take FOREVER!  But beading always does. As I worked I realized that I could add some of the tiny gold beads to the diamond shapes in the background if I wished for an even richer look.  But in the end I decided against that.

Here is the final result.


Done!

Now that I have finished stitching this piece, I will put it safely away until after the Christmas finishing rush.  I plan to have it made into a pillow but this is the wrong time of the year to send finishing in if you don't need it made up for a Christmas present.

Looking back on this piece, I realized it is the first monochromatic piece I've ever stitched.  The lettering was all shades of purple and the background was cream with iridescent gold paint to add sparkle.  I ended up adding touches of gold to echo the sparkle paint and I think that worked well, particularly on the word "bitch."  Working essentially with just one color I felt I needed a lot of texture on the letters and the contrast of another color to make the purple really the focus of this piece.

I'll finish up the stitch guide this week.  It's available as a free PDF file for the asking--just email me at sgfromchnp at gmaildotcom-- but you need to promise to send photos when you are done.  We all want to see the endless variations of color, stitches and textures that make this a really interesting design to stitch.

By the way, Laura at Bloomin' Stitches has some great ideas for customizing your Bitch canvas.  Check them out on her shop blog--
http://www.laura-loves.com/2016/09/laura-lovescustom-orders.html

UPDATE:  Pat has finished her version.  It's gorgeous!
https://needleartnut.blogspot.com/2016/11/this-one-is-finished.html

Written by Jane/Chilly Hollow
Blogging at http://chillyhollownp.blogspot.com
and at http://chstitchguides.blogspot.com
© Copyright October 29, 2016 Jane M. Wood. All rights reserved.

Wednesday, November 2, 2016

Emphasizing the Bitch UPDATED

Step One

Now that all the words except for "bitch" are stitched, it's time to embellish the heck out of the most important and largest word on my canvas.  I decided to use a stitch called Two Color Keenen from Ruth Schmuff's Stitches Four.  The first step is to do vertical columns of slanting stitches using my size 8 Finca perle cotton.  The photo above shows that this creates a sort of striped effect.


Step Two
The second step is to add tent stitches with the very dark purple Silk Lame Braid that was used in the work "not" in the top line.   Reusing a thread in various areas in a design unifies it in my opinion.


Step Three


Then I added purple beads (used in the dot over the eye) to add dimension and sparkle.  This photo is slightly tilted to help show the dimension.  By the way, to add depth to all this purple I threw in some gold hex beads at random.


Step Four

The fourth step is to outline each letter by couching the deep purple Kreinik used in the Smooch stitch above the "c" in "bitch."  More design unification!  The outlining raises the letters visually.


Step Five
The final step is to attach a deep purple Swarovski bicone crystal to the middle of the "B" and to toss on some gold star sequins for emphasis.

Next time we'll move on to the background's final touches.

UPDATE:  Pat is brick stitch beading her B and I.  Pretty!
http://needleartnut.blogspot.com/2016/11/bi.html

Written by Jane/Chilly Hollow
Blogging at http://chillyhollownp.blogspot.com
and at http://chstitchguides.blogspot.com
© Copyright October 25,  2016 Jane M. Wood. All rights reserved.

Thursday, October 27, 2016

Turning in the Margins

Pat is working away on a darning stitch background for her Bitch canvas from Bloomin' Stitches.  The pretty pink heart stitch she is using is done with horizontal stitches worked across the row, left to right or right to left.  It takes seven passes across the width of the canvas to create a row of hearts.  To have the threads lay flat without twisting, Pat has to work a little pin stitch outside the margin of her design.    I thought you'd like to see how she is doing it in case you want to use a darning stitch yourself and need a smooth look.
http://needleartnut.blogspot.com/2016/09/more-background.html

Written by Jane/Chilly Hollow
Blogging at http://chillyhollownp.blogspot.com
and at http://chstitchguides.blogspot.com
© Copyright September 29, 2016 Jane M. Wood. All rights reserved.

Wednesday, October 26, 2016

Bitchy Embellishment UPDATED

Once the top and bottom rows of lettering were stitched on my Bitch canvas, I started to think about the middle two rows. "Bitch" has very large letters while "just kidding" has smaller lettering.  Because I emphasized one word in the top row and one in the bottom row, I thought I should also emphasize "kidding" in some way so that the eye travels from the left top to the middle right to the bottom left side again.  Did I want to use the very dark Silk Lame Braid again to add that emphasis? I laid the card of thread on the canvas, stepped back and looked at it, then decided not.  I would need to emphasize "kidding" in another way. But what?


Padded Satin Stitches for "Just Kidding"

After looking carefully at the colors in my various threads, I decided that I liked the purple of the Finca perle cotton the best.  It's a good match to the painted lettering and it also would make lovely satin stitches.  I worked "just kidding" in padded satin stitches, working each letter with horizontal straight stitches, then going back over them with diagonal tent and longer stitches to create a raised effect.  You can't tell the raised texture from the photo but it lifted the letters up and made them prominent. I like the effect.

But it is rather plain.  I decided I would add bling to "kidding" by adding various shapes and sized of beads and by adding a stitch over my diagonal satin stitches in my very pretty light gold, purple and blue mix of metallic Kreinik 2094HL.  So that's what I did.  Here is the result.

Embellishment On Satin Stitches
I hope you can see the beads, flower shaped sequin, and metallic threads I added either on top or next to the letters in "kidding."  By the way, I decided I liked the flower sequin enough that I took out the large bead on the letter N and replaced it with a second flower sequin.

Next week we'll talk about the largest word on this canvas.  Stay tuned!

UPDATE:  Pat used padded satin stitches on her Just Kidding row, too!  Great minds think alike.  LOL
http://needleartnut.blogspot.com/2016/10/the-third-and-fourth-line.html

Written by Jane/Chilly Hollow
Blogging at http://chillyhollownp.blogspot.com
and at http://chstitchguides.blogspot.com
© Copyright October 14, 2016 Jane M. Wood. All rights reserved.

Wednesday, October 19, 2016

Fat, Thin, In Between (Bitch) UPDATED

With the background stitching in place on Bitch (remember, I plan to add beads to the darning circles when everything else is stitched), it's time to look at the lettering on the design.   This canvas is somewhat unusual in that the lettering varies in size a lot, which will allow me to try various stitches and threads in different places.  The top and bottom rows are all one thread wide while the letters on "bitch" are huge and the "just kidding" row letters vary in width a great deal.

I can treat the various rows as samplers of many threads and stitches, but I do want to make choices for each row that looks good with the other rows.  Using shades of a blue-purple will help unite the rows.  Repeating the same thread or stitch across multiple rows will also unite them.  "Bitch" is already prominent due to its size.  What other words do I want to emphasize?  I decided to work the top and bottom rows the same way and to emphasize one word in each row.  Rummaging in my stash of threads, I choose a size 8 perle cotton from Finca and Silk Lame Braid (for size 18 count) from Rainbow Gallery.  I'll use the very dark purple Silk Lame Braid for my emphasis words and the more matte perle cotton for the rest.  

 I ended up using tent stitches in the dark purple Silk Lame Braid and tall, skinny cross stitches of various heights on the other letters. Here is the end result--


Top and Bottom Rows of Words Finished

It's hard to tell from the photos but the perle cotton cross stitches give a nice texture to the letters while the Silk Lame Braid is smooth.  A really dark color doesn't show much texture so plain tent stitches worked best for those words.   I'm debating whether to add purple beads to the spaces where the cross stitches meet on the letters but I'll wait to decide about that.  Now I'm turning my attention to the second row from the bottom.  I've started working padded satin stitches using one ply of High Cotton on "kidding" and will work "just" the same way.  The texture of High Cotton is matte, making it a nice contrast to the perle cotton and silk-metallic mix of Silk Lame Braid.  The padding also raises the letters to add texture that is hard to capture in photographs.  (Click on the small photograph for a better look.)

Once I finish stitching "just kidding" I plain to embellish the letters slightly.  You'll have to stay tuned to see that....

UPDATE:  Pat's working on her lettering, too.  She's finished the top row in all tent stitches but with sparkly Silk Lame Braid.
http://needleartnut.blogspot.com/2016/10/the-first-full-line.html

Written by Jane/Chilly Hollow
Blogging at http://chillyhollownp.blogspot.com
and at http://chstitchguides.blogspot.com
© Copyright October 10, 2016 Jane M. Wood. All rights reserved.

Wednesday, October 12, 2016

Bitchy Background Done UPDATED


Background Almost Done! 

I finally managed to finish the background stitching on Bitch.  This isn't a large piece, 8 inches square on 18 count, but that's still a lot of background for a slow stitcher like me.

I used a darning stitch that makes circles, covering all the lettering except for the largest word.  I compensated around that.   I am using Finca perle cotton in size 16, which is a fairly fine thread, and my plans for stitching the lettering will work over the darning stitches nicely.

I did add one special touch to the background.  I added my Smooch Stitch in purple Kreinik to the background before I worked darning circles around it.  Originally I used the size 16 pale yellow perle cotton used for the darning circles for Smooch and didn't work the darning circles up to the Smooth (look at the top photo again) but I decided I wanted it to stand out more.  Here's the final version--


What do I plan to do with the letters?  Well, you'll have to wait until next Wednesday to find out!

UPDATE:  Pat's finished her background, too!
http://needleartnut.blogspot.com/2016/10/the-final-rows.html


Written by Jane/Chilly Hollow
Blogging at http://chillyhollownp.blogspot.com
and at http://chstitchguides.blogspot.com
© Copyright October 4, 2016 Jane M. Wood. All rights reserved.

Wednesday, October 5, 2016

Bitch with Circle Darning Stitch

Background Stitching
I've been stitching my brains out on Bitch, trying to get at least half the background area covered with my chosen background stitch.   As you can see, I choose the darning circles stitch to give a lacy effect to the design.    If you double-click on the photograph, you can see I am covering the skinny letters, not compensating around them.


I wanted something feminine and I think this works nicely.  Once I got enough circles added to the background, I tested adding beads, sequins, and stitches to the centers.  I like the plain ivory beads the best so once I have the rest of the design finished, I'll put them in the centers of some of the circles, but probably not all. 

Next time I hope to have completely covered at least the bottom two rows of text with background stitches so I can start stitching the lettering.  Stay tuned!

Pat's background is much further along than mine.  It's so pretty!
http://needleartnut.blogspot.com/2016/09/more-background.html

http://needleartnut.blogspot.com/2016/10/wednesday-progress.html

Katherine is trying to decide which "potty mouth" design she wants to stitch.  Potty mouth?  LOL  Pretty appropriate since if my mother were still alive and saw what I was stitching, well, she's think I was a very potty-mouthed kid!
http://bootsandbeads.blogspot.com/2016/09/potty-mouth-stitching.html

P.S.  Looks like Bitch is now available from Bloomin' Stitches in blue on a white background.  Of course the shop will order any two colors you want but it's nice to see what various combinations look like first.  That always gives me ideas.
http://www.bloominstitches.com/product-page/eb05793d-78b6-67b6-2d42-05b53859dd75

Written by Jane/Chilly Hollow
Blogging at http://chillyhollownp.blogspot.com
and at http://chstitchguides.blogspot.com
© Copyright September 25, 2016 Jane M. Wood. All rights reserved.
Wednesday, September 28, 2016

Bitchy Backgrounds

As you probably know, I usually do my background stitching before I tackle the main parts of my design. This is a personal quirk, although sometimes there are good reasons to do a background in a certain order.  Often it doesn't matter, but sometimes it is just good sense to do the background first--or last.  In the case of my current project, I think it will be easier to do all the background stitching first so I can count across the lettering without any distractions.  I don't know about you, but counting seems harder to me when I have a stitched area in the way.

So I need a background stitch, which means time for Mad Scientist Testing Mode!  If you want to pour yourself a cup of your favorite beverage, I'll get out the white lab coat, the protective gloves and the goggles.  Meet you back here in a minute....

Ready?  Ok, here we go.

Pale Purple Test Stitches

I thought at first that the pale purple perle cotton (size 16) would look best as a background so I did a lot of test stitching in the margins with that thread.  As you can see, it's quite pale.  I decided that if I used pale purple thread on a cream background it would be even paler.  The photo above is greatly enhanced so you can see it, in fact.


Medium Dark Purple Test Stitches

Of all the stitches I like the Smooch lips and the darning circles the best so I did a second series of tests, using the medium dark perle cotton in size 16 again.  I started to feel like the porridge at the Three Bears' house--too light and then too dark!  I was afraid that the dark purple (and this wasn't the darkest shade of thread I had) was going to overwhelm the letters.  I did more stash-diving and came up with all the size 16 perle cottons I had--ecru, white and pale yellow.  White was too light and ecru looked dirty on the cream background.  I thought I was going to have to order more threads when I used pale yellow (Finca's 1211 pale yellow) on the cream.  PERFECT!

Who knew that a pale yellow thread would turn cream on a cream background?  It's color magic!

Pale Yellow Test Stitches
Here is the final test result.  Next time I'll show you the stitch I choose and how the background stitch is starting to look once I got quite a few rows in position.

But before I forget--here's Pat's progress on her version of this canvas.  She's powering along on her pretty darning heart background!
http://needleartnut.blogspot.com/2016/09/week-two.html

Written by Jane/Chilly Hollow
Blogging at http://chillyhollownp.blogspot.com
and at http://chstitchguides.blogspot.com
© Copyright September 5, 2016 Jane M. Wood. All rights reserved.

Wednesday, September 21, 2016

Bitchy Bling

Bling for Bitch

I'm not quite ready to start working on my Bitch canvas from Bloomin' Stitches but I raided my stash, hereafter to be referred to as Aladdin's Cave, for bling. 

I pulled metallics, sequins, Swarovski crystals and beads and then added a lot of Petite Silk Lame Braid to the pile.  Not all of this will work but I like to have a range of possibilities by my stitching chair so I can choose from them as I work each section of a canvas.

What do you think?  

I think I'd rather play with stash than tackle the sample stitching I need to do before I finalize a background stitch!

Written by Jane/Chilly Hollow
Blogging at http://chillyhollownp.blogspot.com
and at http://chstitchguides.blogspot.com
© Copyright September 4, 2016 Jane M. Wood. All rights reserved.

Thursday, September 15, 2016

The Red Bitch has a Background

Pat has come up with a stylish and pretty background for her red and white Bitch canvas.
https://needleartnut.blogspot.com/2016/09/a-decision-made.html

Love the irony!

UPDATE:  Here is Pat's finished version.
https://needleartnut.blogspot.com/2017/03/profanity-is-finished.html


Written by Jane/Chilly Hollow
Blogging at http://chillyhollownp.blogspot.com
and at http://chstitchguides.blogspot.com
© Copyright September 14, 2016 Jane M. Wood. All rights reserved.

Wednesday, September 14, 2016

Finca Perle Cotton Sources UPDATED

Perle Cottons and Cotton Flosses for Bitch
I've gotten my threads together to stitch Bitch.  As you can see I have perle cotton from Finca and cotton floss skeins from DMC.  The colors are not all good matches to the lettering, but I am hoping to mix and match shades of lavender and lilac on the design.  The Finca perle cotton colors and sizes are (top to bottom):  2720 (size 16), 2711 (size 16), 2699 (size 8), and 2687 (size 12).  The DMC cotton flosses are (left to right):  240, 210 and 211.  In person the best match to the lilac paint on the painted canvas is the Finca 2699.

For those who aren't familiar with Finca perle cotton, it is Egyptian cotton from Prescencia SA in Spain that is available in five sizes-- 3, 5, 8, 12 and 16.  (The larger the number, the smaller the diameter of the thread).  Currently there are 122 solid colors and 33 variegated color sets for the perle.  Finca's Mouline Embroidery Floss is available in the same colors if you need a combination of perle and floss style threads.  Note that Mouline Embroidery Floss has over 300 colors, though.  So not every floss is available as perle cotton.   This thread is distributed in the USA by Colonial Needle.
http://colonialneedle.com/Perle-Cotton/

Although you can order straight from the Colonial Needle website, quite a few shops carry Finca perles.  Among the shops stocking Finca needlepointers are familiar with are Amy's Golden Strand, Come to the Point, KC Needlepoint, Needle in a Haystack (the one in Alameda, California) and Needlepoint Land.  Here are their websites (in alpha order).  If you know of other shops that carry Finca perle cottons, please let me know so I can add the shop to this listing.
http://www.amybunger.com/home.html

http://www.cometothepoint.com

https://www.kcneedlepoint.com

http://www.needlestack.com

https://needlepoint.land

Many thanks to the King of Threadaholics--Michael Boren--for help assembling the shop list above.  And now, I need to start thinking background and embellishments....

UPDATE:  Blog's readers have come up with additional good sources for Finca's perle cottons and flosses (and their metallics and more).  If you are Canadian, Erica says you can stock up using Sew Fancy.
http://www.sewfancy.com/threads-finca.htm

If you live close to Northern Virginia, Sara Leigh recommends a visit to Web Fabrics.  They carry all the colors of size 8 and 12 Finca perle cottons and she says their Cosmo embroidery floss is really silky and comes in 422 colors.
http://www.webfabrics.net/cgi-bin/Store/store.cgi?.s0&lastmenu=&menu=submenu-1100.html

Kathleen says Silk Road Needle Arts carries Finca. too.
http://www.silkroadneedle.com

Thanks folks!

Written by Jane/Chilly Hollow
Blogging at http://chillyhollownp.blogspot.com
and at http://chstitchguides.blogspot.com
© Copyright August 31, 2016 Jane M. Wood. All rights reserved.

Thursday, September 8, 2016

Another Bitch

Apparently I'm not the only stitcher who has lost her mind (I'm quoting Beloved here) and is stitching Bloomin' Stitches' Bitch canvas.  The Needleart Nut has the same canvas but featuring sparkling red lettering on a white canvas.  You can see that she plans to use red Silk Lame Braid on hers.
http://needleartnut.blogspot.com/2016/09/sense-of-humor-please.html

I'll keep you updated on her progress.  Already we are facing some of the same issues--what background color and stitch to use, for example.  Stay tuned!

Written by Jane/Chilly Hollow
Blogging at http://chillyhollownp.blogspot.com
and at http://chstitchguides.blogspot.com
© Copyright September 7, 2016 Jane M. Wood. All rights reserved.

Wednesday, September 7, 2016

Introducing Bitch

My latest, courtesy of Bloomin' Stitches

Today I thought I'd show off my next project--Bitch, an exclusive canvas from Bloomin' Stitches.  This is in stock in the black on cream version, but the purple on cream (or any other version you want--the Needleart Nut owns this in red on white) is available if you don't mind waiting for Bloomin' Stitches to have it painted for you.
http://www.bloominstitches.com/#!bloomin-stitches-exclusive-canvases/c1hcs

This design is 8 inches square on 18 count canvas but with all the blank margin around the outside it's on 12 inch stretcher bars.  By the way, the cream background has a touch of gold sparkle in it that adds a bit of elegance to the overall design if you choose an open stitch for the background.

This canvas was a gift from a dear friend and has been claimed by a relative of mine who thinks it is hilarious.  Tasteful?  Well, no, but sometimes one has to run wild and how better to do that than in needlepoint?  I'll have it finished as a pillow with a monogram or something on the back so that the eventual owner can show off this side of her personality or not as she chooses, just by flipping the pillow over.  The tread toward "cheeky" needlepoint is explained here.
http://www.theglampad.com/2016/08/cheeky-needlepoint.html

This also is a great item to blog-stitch because the background is a totally blank slate and the lettering varies in width so much.  I'll be able to explore all sorts of ways to create lettering.  I hope you enjoy watching me figure out how best to stitch this (and how to hide it from my husband so I don't have to wash my mouth out with soap).

I've already gotten threads together for this, but that's another posting.

Stay tuned for another Chilly Hollow Needlepoint (blog-stitching) Adventure!

Written by Jane/Chilly Hollow
Blogging at http://chillyhollownp.blogspot.com
and at http://chstitchguides.blogspot.com
© Copyright August 26, 2016 Jane M. Wood. All rights reserved.

Wednesday, August 31, 2016

My Next Project

I've been rummaging in my stash, trying to see what I want to blog-stitch next.  But before I reveal my next public project, I thought I'd tell you about something that I've never stitched but that has started to intrigue me--projects with lettering.

I'm sure you've seen those signs from & More with a striped background.  They are always popular.
http://www.andmorethreads.com/andmorethreads.com/Sayings.html

Of course many designers have saying canvases.  How about "Mermaid My Day" from CBK?
http://www.needlepoint.com/mermaid-my-day-19115.html

Or maybe Zecca's "Just Be Kind" will speak to you.
http://needlepointalley.com/site/?page_id=7#!/Just-Be-Kind/p/35573110/category=8327483

The sky's the limit when it comes to styles that word canvases come in as these postings by Pocket Full of Stitches of the range of sayings they had in the shop in July demonstrate.
http://pocketfullofstitches.blogspot.com/2016/07/christmas-in-july-letters-words-sayings.html

http://pocketfullofstitches.blogspot.com/2016/07/christmas-in-july-letters-words-sayings_19.html

With all these sayings so popular, of course bloggers have talked about their current canvases and how they stitched them.  Suzanne in particular loves sayings canvases and has lots of great ideas for them.  She likes to use metallic and tent stitches for skinny lettering to make it pop off the background.
http://suzannehicks.blogspot.com/2016/04/rub-some-dirt-on-it.html

She loves large expanses of blank background so she can use complex, compound stitches in multiple threads there.
http://suzannehicks.blogspot.com/2016/05/mother-darling.html

And she just figured out a way to make the slightly larger words raised.
http://suzannehicks.blogspot.com/2016/05/exciting-new-stitch-for-lettering.html

 I'm sure I'll at least think about all these ideas as I start work on my new piece.  (Hint:  the color scheme of my new canvas is cream and lilac.)

I'll show you once I find stretcher bars and get it attached to them.

Written by Jane/Chilly Hollow
Blogging at http://chillyhollownp.blogspot.com
and at http://chstitchguides.blogspot.com
© Copyright  August 16, 2016 Jane M. Wood. All rights reserved.

Tuesday, March 8, 2016

My Newest Canvas

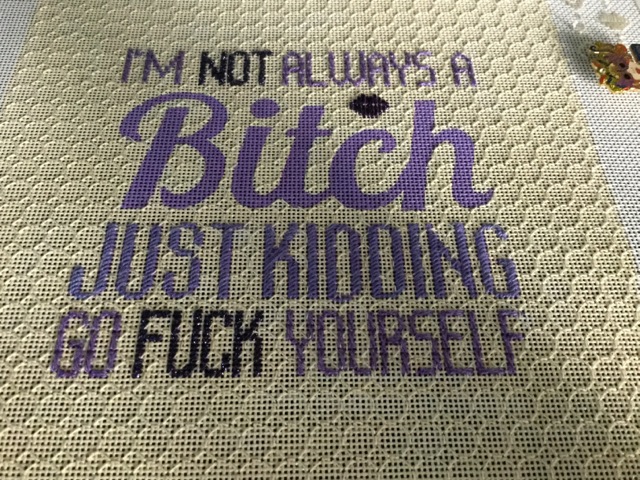
Courtesy of a dear friend who maybe knows me a little too well, I have a new canvas in my collection.   It is eight inches square on 18 count canvas.  My version has purple letters on an ecru background, although you can purchase black lettering on ecru from the Bloomin Stitches store.  (This is a shop exclusive so this is the only place to pick it up.)
http://www.bloominstitches.com

A friend saw my present and ordered red letters on a white background, so you can get this customized to your preferred colors.  So what is my newest treat, you ask?

CENSORED CENSORED CENSORED

Scroll down at your own risk!

It cracks me up every time I look at it.  Many thanks to Laura at Bloomin Stitches and especially my friend who obviously are as strange as I am.  Now I need to assemble purple threads, beads and sequins and a very feminine background stitch so this will be as ladylike as possible until one reads the text.


Written by Jane/Chilly Hollow
Blogging at http://chillyhollownp.blogspot.com
and at http://chstitchguides.blogspot.com
© Copyright March 7, 2016 Jane M. Wood. All rights reserved.

Sunday, December 6, 2015

Designs By Heidi's Trunk Show UPDATED

I don't usually post links to trunk shows as I don't like to encourage folks to only shop sales instead of finding and then supporting a great local shop. But because Ridgewood is showcasing Heidi's designs, I am making an exception. Designs By Heidi does wonderful painted canvases, full of detail and originality but she doesn't have a website so you won't see many of her things online.   Take this opportunity to enjoy her work and perhaps place an order for something special.
http://ridgewoodneedlepoint.blogspot.com/2015/11/new-trunk-show.html

http://ridgewoodneedlepoint.blogspot.com/2015/12/heidi-designs-trunk-show.html

http://ridgewoodneedlepoint.blogspot.com/2015/12/trunk-show.html

Heidi does have photos of her designs on Flickr.  You may not be able to see this if you don't log into Flickr with your Yahoo email account but it shows things you don't see on Ridgewood's blog entries, so try it.  If you find something you want, you can email Heidi at jonrheidir@gmail.com to order.
https://www.flickr.com/photos/134616350@N05

UPDATE:  Needle Bug posted a photo album of Heidi designs on their Facebook page.
https://www.facebook.com/artistscollection.needlepoint/photos/a.174416246093000.1073741829.174411102760181/593522747515679/?type=3&theater

UPDATE #2:  Bloomin' Stitches now stocks Heidi canvases.
http://www.bloominstitches.com/copy-of-dede-ogden

UPDATE #3:  Heidi Stanley Designs has an Instagram page where you can see a lot of her current work.
https://www.instagram.com/heidistanleydesigns/

Written by Jane/Chilly Hollow
Blogging at http://chillyhollownp.blogspot.com
and at http://chstitchguides.blogspot.com
© Copyright November 29, 2015 Jane M. Wood. All rights reserved.