Thursday, March 25, 2010

Beads, Glue and Wire

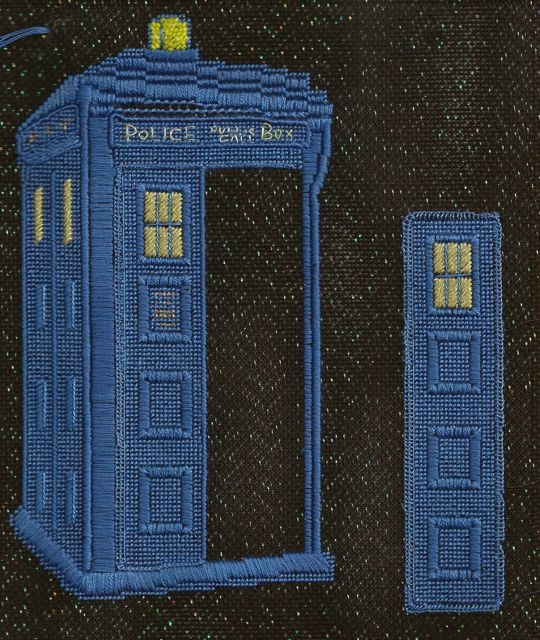
I've been pretty busy with little things on the Tardis ornament.  I've beaded the light on the top (size 15 yellow hex beads that a friend sent me), added a bit to the roof line on the left above the side wall, added tent stitches at the top and bottom of the ornament to make finishing easier, and carefully stitched letters on the sign above the doors.  I used the same thread (Finca's Prescencia overdyed cotton floss in shades of yellow #9025) for the lettering and to attach the beads except I doubled my single ply for the beading but used just one single ply to stitch the letters.  I used the same sharp beading needle for both tasks.  A sharp needle makes free hand lettering like this easier as you can put the needle through a NP canvas thread if necessary. You aren't limited to just using the holes.

I've also done some things you can't see.  I put glue (Aileen's Tacky Glue) around the back side of the right door along the edge.  It'll have dried well by the time I cut out this piece to attach it.  I added another piece of wire to the door's hinge edge as well so there are four attachment places instead of just two.  It seemed more secure that way.

I've taken an old advertising magnet down from the refrigerator (one with a 2009 calendar on it) and cut two strips of magnet from it.  I'll use those to make the door stay closed.  And I went fabric shopping.  I picked up a bit of pale blue chiffon with silver dabs of paint on it to back the right door's underside so it doesn't show off the back side when open.

I just need to do a bit more on this piece before I can trim the canvases for finishing.  I am finishing up the area just below the roof line with a couched line of #8 perle held down by long and narrow cross stitches.  After that I need to add a few more tent stitches above the roof, but I think the stitching will be done by then.

This is on track to be finished this weekend.  HURRAH!

Written by Jane/Chilly Hollow
Blogging at http://chillyhollownp.blogspot.com
Archived Yahoo 360 postings at http://profiles.yahoo.com/chillyhollow

Wednesday, March 24, 2010

Woodlawn 2010 People's Choice Award?

I got an email last night from Amanda who was told at the Woodlawn exhibit that Catherine Jordan's little tree set has won the People's Choice Award.  I am not sure the docent who told Amanda this is right--surely the People's Choice voting has not closed so soon?--but I am sure Catherine Jordan's work is fabulous!  Here is the set in question.  There are more photos of these pieces from other angles in the photo set.
http://www.flickr.com/photos/preservationnation/4417592876/in/set-72157623455198693/

Here is Catherine's website.  Many of the designs shown there have won at Woodlawn in the past.
http://www.catherinesdesigns.net/index.htm

Written by Jane/Chilly Hollow
Blogging at http://chillyhollownp.blogspot.com
Archived Yahoo 360 postings at http://profiles.yahoo.com/chillyhollow

The Roof Is On


The Tardis has a roof now, plus a place for its light.  I used tent stitches in my perle cotton to sketch out the light and long vertical satin stitches for the stepped roof line.

See the new line of the roof started on the left?  I'm going to pull that out as I think I need to do a horizontal stitch there.

Written by Jane/Chilly Hollow
Blogging at http://chillyhollownp.blogspot.com
Archived Yahoo 360 postings at http://profiles.yahoo.com/chillyhollow

Tuesday, March 23, 2010

Two Door Tardis


Even though I've been posting here about other things, I have been stitching my Tardis ornament each night and have the tent stitched walls finished.  I also replaced the mutins (just long stitches in perle cotton couched with a ply of DMC floss where the horizontal and vertical stitches cross) in the windows.  You'll remember I had to rip out the windows and door panels to get them all sized and positioned correctly.

I started working long stitches over the front left corner but stopped when I ran out of time last night.  I will count (shudder) the threads the free standing right door covers and then count (shudder) the same amount of threads over from the center where the two doors meet and then add horizontal satin stitch on the right side corner today.

After that I will need to work on the roof.  Once I know exactly where and what the roof stitches are, I can continue working horizontal satin stitches up the front corners toward the roof line.

The end is in sight!

Written by Jane/Chilly Hollow
Blogging at http://chillyhollownp.blogspot.com
Archived Yahoo 360 postings at http://profiles.yahoo.com/chillyhollow

Kimono Cyberclass Updated Again

Remember that I mentioned the three mini cyberclasses that Janet Perry is offering?  I have an update for you--a photo of the first class's finished kimono.   The painted canvas is from Patt and Lee Designs.  Janet has chosen the stitches.  The first class starts April 1 so if you want to learn a bit more about fancying up your needlepoint, or if you know a beginner who'd enjoy this class, head over to Janet's blog to sign up.
http://www.nuts-about-needlepoint.com/textured-stitch-cyberclass


UPDATE #2 - Here is the stitched second kimono for class #2 which is going to be about shading.


Update #3:  Below is the third kimono finished.


More details can be found on Janet Perry's blog.
http://www.nuts-about-needlepoint.com/cyberclass-on-needlepoint-shading-starting-may-15


Written by Jane/Chilly Hollow
Blogging at http://chillyhollownp.blogspot.com
Archived Yahoo 360 postings at http://profiles.yahoo.com/chillyhollow