Sunday, March 28, 2010

Throwing Rocks, Making Ripples


I am sure you have heard the debate about patronizing local needlework shops versus spending money online or in the big box craft stores to buy supplies we need for our stitching at a better price.   You have never heard it described this way, though.  Before you head off to read the article in the link below, the Thistle Threads blog is written by Tricia Wilson Nguyen and all the other folks deeply involved in recreating a17th Century embroidered jacket they have named Faith.  Recently Tricia has been talking about the costs of mounting a museum exhibit, how publishing a book about needlework is done,  and other topics about the business of needlework and museums.  It's a fascinating discussion.  If you want to start reading other articles about this topic, click on the header title to go to Home, then look for the March 18, 19 and then 23rd blog articles.
http://thistle-threads.com.mytempweb.com/blog/index.php/2010/03/last-word-on-pennies/

Every time I mention a new tool, book or thread, talk about some of the lovely designs I've seen here and there, every time I add to my Master Enabler points,  I am sending ripples out into the stitching world, ripples you see and react to as we all bob on the ocean called the Internet.  Hopefully the shops, tool and thread manufacturers, teachers, designers and writers feel the ripples I have made and benefit from them.

Now go make some ripples of your own....

Written by Jane/Chilly Hollow
Blogging at http://chillyhollownp.blogspot.com
Archived Yahoo 360 postings at http://profiles.yahoo.com/chillyhollow

Saturday, March 27, 2010

Tardis Door Attached


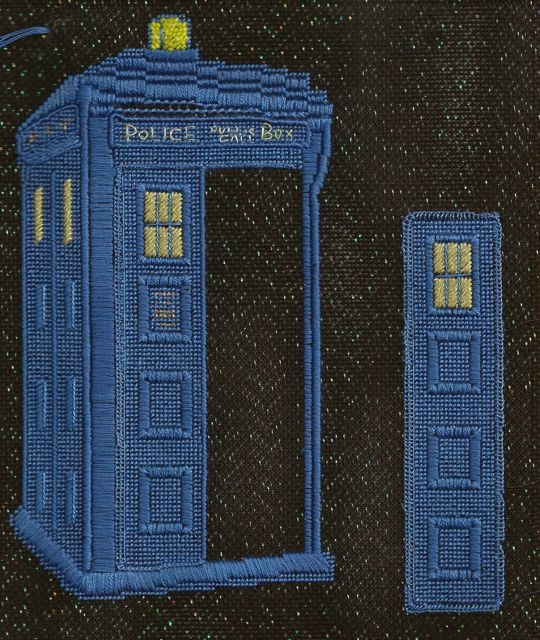
The Tardis' right door is attached!  I poked the four beading wires that were stitched to the hinge side of the door through the main canvas' holes, then twisted the two wires from the top half of the door together on the back side.  After twisting the two bottom wires together, I stitched each pair to the rear of the main canvas.

You may remember I'd planned to use magnets to make the door stay closed but the advertising magnets that are easy to cut aren't strong enough.  I decided I would have to use a pair of my rare earth magnets.  While I looked for them in my stitching tool box, I left the ornament sitting on the table and noticed that the door when it is partly open, looks quite inviting.  So I decided I would let the door be partly open rather than sacrificing magnets to let it open and close. I'm a bit worried that the door handle beads won't stay attached if they are tugged on constantly to open the door. So my Tardis ornament doesn't have a locked door.

Last night I turned under the raw edges of the main ornament and tacked the corners in place.  The untacked edges are sticking out some because I pushed down on the ornament on the scanner bed.  I will spend the rest of the weekend hand sewing the backing on the ornament.  I need to add a loop of #8 perle cotton to hang the ornament with but that'll wait for a while. I plan to start stitching the backing on at the base of the Tardis so I will wait to add the loop so that it is not in my way while I do some of the hand stitching.  I have black velvet for the backing and will use black thread to attach it.  Hopefully the edge will look clean enough I don't need to put trim around it.

Wish me luck.  Finishing is not my favorite part of the process.

Written by Jane/Chilly Hollow
Blogging at http://chillyhollownp.blogspot.com
Archived Yahoo 360 postings at http://profiles.yahoo.com/chillyhollow

Friday, March 26, 2010

Tardis Door UPDATED

Hurrah!  The Tardis ornament stitching is finished!  Now all that remains is the finishing.  I hope to be able to upload an image of the finished design shortly.  UPDATE:  Blogger allowed me to upload images normally after I posted this blog entry without photos and went back to edit.  If you are having trouble with photos today, try doing your blog entry first, then edit it to add photos.

Yesterday I trimmed the canvas around both pieces, leaving a margin of bare canvas to turn under on the Tardis itself but trimming right up to the stitching on the right hand door.  I had to be careful not to cut the door attachment wires as I worked but otherwise this is easy to do, even with my regular (not my stitching) scissors.

Using my paper pattern, I cut a piece of finishing foam slightly smaller than the main canvas.  I used the self stitch finishing foam so I could put the sticky side down onto a piece of gold lame, then cut it out to the right size.  I will put the finishing foam in the middle between the large Tardis and the velvet backing, with the gold lame facing out.  This way when the door to the Tardis is opened, the unstitched black canvas will be even more sparkly than it already is.  This is why I choose black canvas with green and gold metallic specks woven into it.  I was already planning to have a black and sparkling emptiness inside the Tardis when the door was opened.  I didn't want to stitch the interior or the Doctor as what I think of when I remember the interior and my favorite Doctor actor isn't what my niece remembers as she's only seen the current programs with the 10th Doctor.

However, using the finishing foam covered with gold lame is today's chore as I assemble the ornament.  Before doing that, I had to finish the door.

I'd forgotten that I needed to add the door handle and brass lock before I cut out the little door piece but not to worry--all I did was stitch a crystal round sequin held in place by a tiny gold bead in the right area for the lock.  The faceted glass sequin is diamond-like but having the gold bead on top makes it reflect gold so it does look like a brass lock if you aren't looking too closely.  Above the lock I used three beads (a yellowish-brown regular size 11 bead, a gold faceted dimensional bead from Mill Hill's findings, and then a second yellowish-brown bead) to indicate the handle.  These are all stitched on as well as I can, using a doubled and waxed ply of my yellow Finca cotton floss that I ran through the beads multiple times.

My next step was to print out a message to the recipient of this gift that was smaller than the right hand door.  This was going to go under a piece of pale blue chiffon so that the door's back side was lined.  The chiffon is see-through, although it does have specks of silver dotted on it.

The photo on the right shows the back side of the door with the message and chiffon.  I hand sewed the chiffon to the door with whip stitches and more of my DMC cotton floss.  The chiffon's raw edges were turned under, I stitched one long side down, inserted the message, turned under the other edges and pinned them in place, then stitched all around the other three sides.  It's not hard, just time-consuming to do this.

By the way, the saying in the message is one I saw on a Dr. Who t-shirt once.  Let me see if it's still for sale....

Yes, here it is.
http://www.thinkgeek.com/tshirts-apparel/unisex/popculture/988c/

Written by Jane/Chilly Hollow
Blogging at http://chillyhollownp.blogspot.com
Archived Yahoo 360 postings at http://profiles.yahoo.com/chillyhollow

Thursday, March 25, 2010

Beads, Glue and Wire

I've been pretty busy with little things on the Tardis ornament.  I've beaded the light on the top (size 15 yellow hex beads that a friend sent me), added a bit to the roof line on the left above the side wall, added tent stitches at the top and bottom of the ornament to make finishing easier, and carefully stitched letters on the sign above the doors.  I used the same thread (Finca's Prescencia overdyed cotton floss in shades of yellow #9025) for the lettering and to attach the beads except I doubled my single ply for the beading but used just one single ply to stitch the letters.  I used the same sharp beading needle for both tasks.  A sharp needle makes free hand lettering like this easier as you can put the needle through a NP canvas thread if necessary. You aren't limited to just using the holes.

I've also done some things you can't see.  I put glue (Aileen's Tacky Glue) around the back side of the right door along the edge.  It'll have dried well by the time I cut out this piece to attach it.  I added another piece of wire to the door's hinge edge as well so there are four attachment places instead of just two.  It seemed more secure that way.

I've taken an old advertising magnet down from the refrigerator (one with a 2009 calendar on it) and cut two strips of magnet from it.  I'll use those to make the door stay closed.  And I went fabric shopping.  I picked up a bit of pale blue chiffon with silver dabs of paint on it to back the right door's underside so it doesn't show off the back side when open.

I just need to do a bit more on this piece before I can trim the canvases for finishing.  I am finishing up the area just below the roof line with a couched line of #8 perle held down by long and narrow cross stitches.  After that I need to add a few more tent stitches above the roof, but I think the stitching will be done by then.

This is on track to be finished this weekend.  HURRAH!

Written by Jane/Chilly Hollow
Blogging at http://chillyhollownp.blogspot.com
Archived Yahoo 360 postings at http://profiles.yahoo.com/chillyhollow

Wednesday, March 24, 2010

Woodlawn 2010 People's Choice Award?

I got an email last night from Amanda who was told at the Woodlawn exhibit that Catherine Jordan's little tree set has won the People's Choice Award.  I am not sure the docent who told Amanda this is right--surely the People's Choice voting has not closed so soon?--but I am sure Catherine Jordan's work is fabulous!  Here is the set in question.  There are more photos of these pieces from other angles in the photo set.
http://www.flickr.com/photos/preservationnation/4417592876/in/set-72157623455198693/

Here is Catherine's website.  Many of the designs shown there have won at Woodlawn in the past.
http://www.catherinesdesigns.net/index.htm

Written by Jane/Chilly Hollow
Blogging at http://chillyhollownp.blogspot.com
Archived Yahoo 360 postings at http://profiles.yahoo.com/chillyhollow