Showing posts with label Christmas ornaments. Show all posts

Wednesday, July 1, 2026

Christmas in July

Pocket Full of Stitches is just now getting around to posting about their annual Christmas ornamnet exchange.   As usual, all the ornaments are charming.

Written by Jane/Chilly Hollow
Blogging at http://chillyhollownp.blogspot.com
and at http://chstitchguides.blogspot.com
© Copyright April 15, 2026 Jane M. Wood. All rights reserved.

Thursday, December 25, 2025

Mrs. Bush's White House Christmas

The White House Historical Association has posted a look back at the needlepoint ornaments and Noah's Ark set Barbara Bush displayed at Christmas during her husband's term in office.

Written by Jane/Chilly Hollow
Blogging at http://chillyhollownp.blogspot.com
and at http://chstitchguides.blogspot.com
© Copyright December 24, 2025 Jane M. Wood. All rights reserved.

Wednesday, December 17, 2025

Needlepoint Ornaments from Furbish Studio

Furbsh Studio in Raleigh, North Carolina sells a ton of needlepoint Christmas ornaments.  Already stitched, most of these are quite simple and inexpensive.  Have fun browsing!


Written by Jane/Chilly Hollow
Blogging at http://chillyhollownp.blogspot.com
and at http://chstitchguides.blogspot.com
© Copyright November 7, 2025 Jane M. Wood. All rights reserved.

Tuesday, October 7, 2025

Caroline's Mini Lights (Sally London)

The Sun City Stitcher used an old chart from Sally London of Rainbow Gallery to stitch this string of Christmas lights piece.

Rainbow Gallery's website has free cross stitch and needlepoint charts from well known designers to download and use.  "Christmas Light Bulb Ornament" by Susan Portra is similar to what the Sun City Stitcher used.

They also used to distribute free charts to the shops.  Ask your favorite shop if they have these tucked away anywhere.  

Written by Jane/Chilly Hollow
Blogging at http://chillyhollownp.blogspot.com
and at http://chstitchguides.blogspot.com
© Copyright July 30, 2025 Jane M. Wood. All rights reserved.

Saturday, September 27, 2025

A Trumpet for the Holidays

The Sun City Stitcher is getting ready for Christmas with a new ornament, showcasing a trumpet.  

She used Marion Scoular's corded edging technique to finish it.  I might have to track down Ms. Scoular's book Advice is for Listening To--Not Necessarily Taking to figure out how this is done.

Written by Jane/Chilly Hollow
Blogging at http://chillyhollownp.blogspot.com
and at http://chstitchguides.blogspot.com
© Copyright July 23, 2025 Jane M. Wood. All rights reserved.

Monday, April 28, 2025

Susan Portra Holiday Ornaments

Brenda has been stitching Susan Portra's "Holiday Ornaments" since 2017.


Some of the charts were published in Needlepoint Now but some weren't.  


And Brenda is done!  Now for the finishing....

Written by Jane/Chilly Hollow
Blogging at http://chillyhollownp.blogspot.com
and at http://chstitchguides.blogspot.com
© Copyright January 8, 2025 Jane M. Wood. All rights reserved.

Thursday, October 10, 2024

A Fun Magnetic Finishing Idea

The Needle House shows off a really clever finishing idea for this Studio Midwest dimensional ornament of a red Christmas car--the hanging loop is attached via a magnet so you can remove the loop and use the car as a standup!  Use the right side arrow to see the video where the loop comes off.

Written by Jane/Chilly Hollow
Blogging at http://chillyhollownp.blogspot.com
and at http://chstitchguides.blogspot.com
© Copyright July 19, 2024 Jane M. Wood. All rights reserved.

Wednesday, May 15, 2024

Kam Wenzloff's Layers of Leaves as Christmas Ornaments

Clever Brian has taken Kam Wezloff's "Layers of Leaves" designs from Needlepoint Now magazine and turned them into round Christmas ornaments!  Is that smart or what?!

Written by Jane/Chilly Hollow
Blogging at http://chillyhollownp.blogspot.com
and at http://chstitchguides.blogspot.com
© Copyright April 7, 2024 Jane M. Wood. All rights reserved.

Saturday, December 30, 2023

NJNA Christmas Ornaments

ANG's New Jersey Needle Artists Chapter participated in The Festival of Trees, contributing ornaments to decorate the display of many Christmas trees.  Lucky for us, Melita was there and took photographs.

Written by Jane/Chilly Hollow
Blogging at http://chillyhollownp.blogspot.com
and at http://chstitchguides.blogspot.com
© Copyright December 15, 2023 Jane M. Wood. All rights reserved.

Wednesday, December 27, 2023

The Pocket Full of Stitches Ornament Exchange

Pocket Full of Stitches just had their shop Christmas party and ornament exchange.  The ornaments are lovely and I bet they had great fun.

Written by Jane/Chilly Hollow
Blogging at http://chillyhollownp.blogspot.com
and at http://chstitchguides.blogspot.com
© Copyright December 21, 2023 Jane M. Wood. All rights reserved.

Saturday, December 23, 2023

A Barbara's Needlepoint Christmas

Barbara's Needlepoint is starting to show off customer's holiday stitching.  (You'll need to log into Facebook to see these lovely pictures.). First, the shop shows off a customer's garland of Kelly Clark handbell canvases.  Make sure you check the comments for most photos of similar garlands.

Next is Ginny's Christmas tree, full of Ann Hanson limited edition Santas and Melissa Shirley ornaments.  I think I spotted Joy Jurich and Kirk and Bradley designs on the tree as well as a small Lee kimono.

Written by Jane/Chilly Hollow
Blogging at http://chillyhollownp.blogspot.com
and at http://chstitchguides.blogspot.com
© Copyright December 14, 2023 Jane M. Wood. All rights reserved.

Friday, December 15, 2023

Christmas Ornaments from Hand and Lock

Looking for something extra special for your Christmas tree this year?

There are embellished totes and broaches as well as ornaments, all made with Hand and Lock's wonderful metallic threads.  Or you can search the "By Hand and Lock" section for other wonderful treats available from their online shop.

Written by Jane/Chilly Hollow
Blogging at http://chillyhollownp.blogspot.com
and at http://chstitchguides.blogspot.com
© Copyright December 3, 2023 Jane M. Wood. All rights reserved.

Monday, December 4, 2023

Melita Decorates Her Trees for Christmas

Melita has pulled out her Christmas ornaments and decorated her trees.  

I just love seeing everyone's Christmas needlepoint, don't you?

Written by Jane/Chilly Hollow
Blogging at http://chillyhollownp.blogspot.com
and at http://chstitchguides.blogspot.com
© Copyright November 27, 2023 Jane M. Wood. All rights reserved.

Tuesday, February 21, 2023

Scottish Santa and Planet Earth's Self-Finishing Ornament

Melissa Shirley's "Scottish Santa"


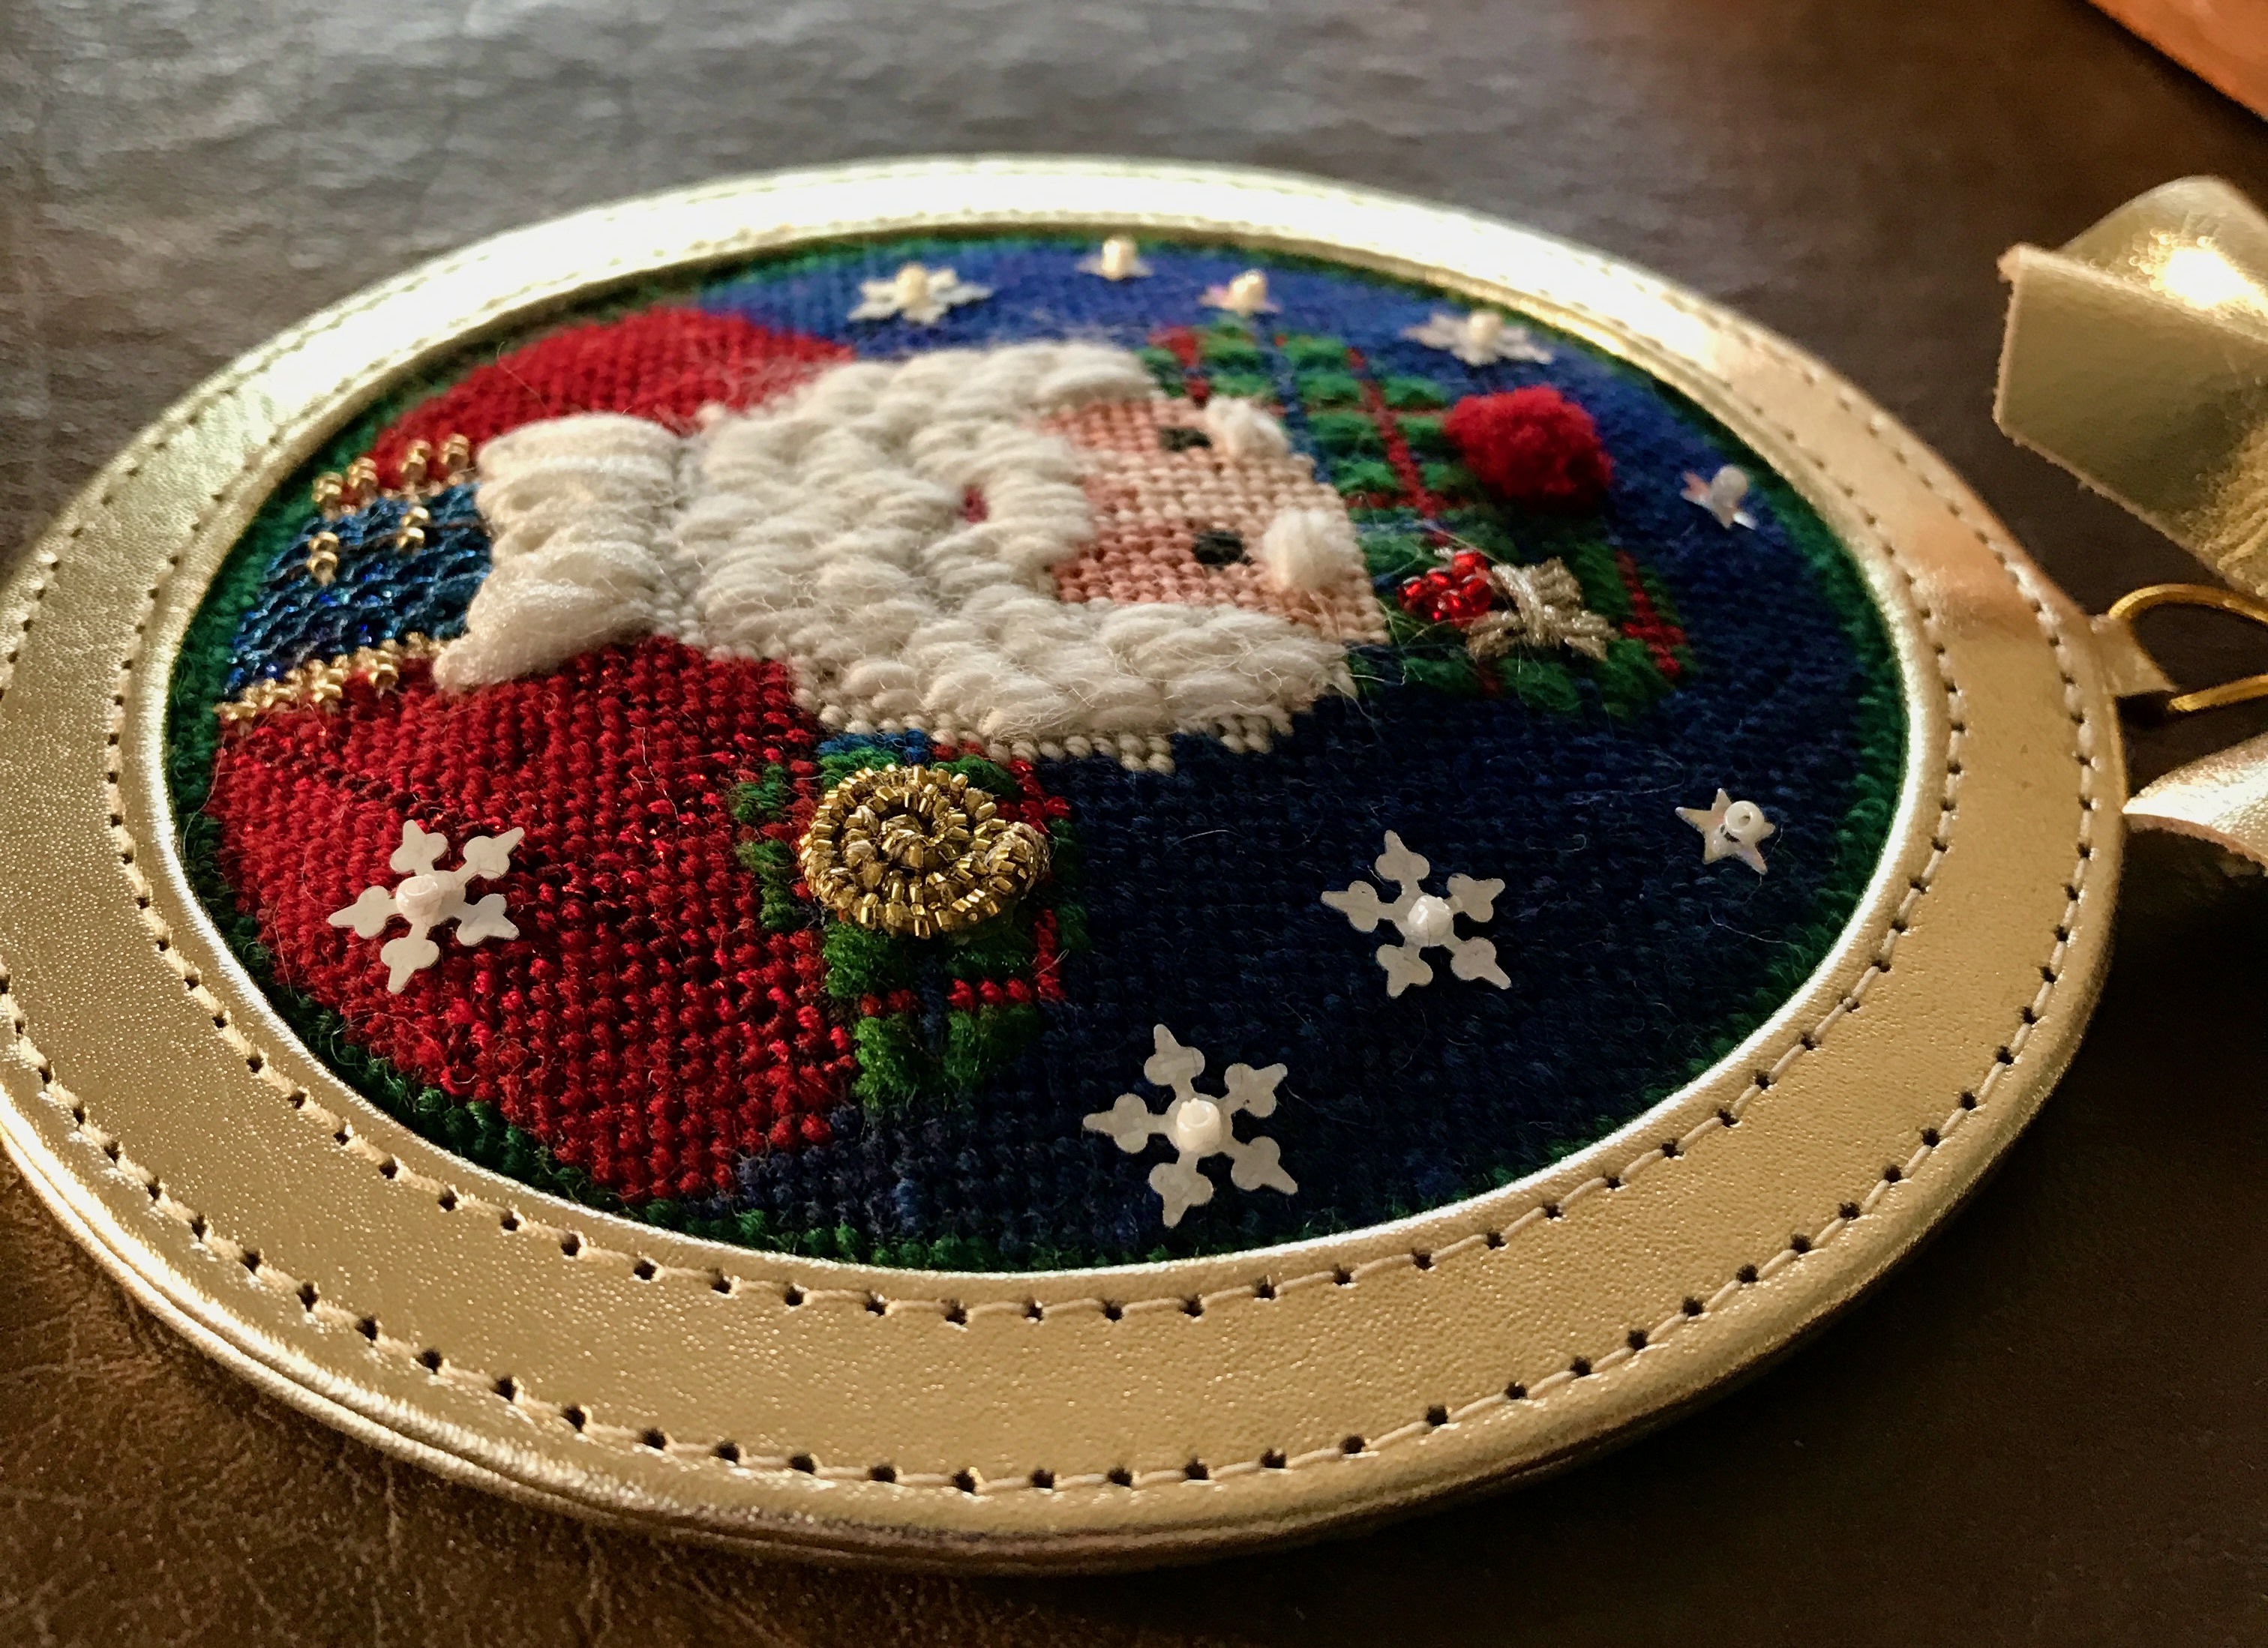
I started stitching on Melissa Shirley's "Scottish Santa" at Christmas.  I think this series is discontinued but he was fun to work on.  Also at Christmas I bought one of Planet Earth's self-finishing ornament holders.  Scottish Santa is almost four inches around.  The Planet Earth ornaments come in two sizes: one to hold designs three inches in diameter and one that is for ornaments that are four inches in diameter.  Both sides are identical except for the dimensions.  They are well made of good quality leather.  The bow is removable-- if you aren't a bow person just slide it off the loop.  Here you can see the colors currently available.  

Because Scottish Santa wasn't quite four inches around, I had to add three rows of background all the way around.  It pays to copy both the ornament holder and the finished piece and compare them.  That's how I knew I needed to add three more rows along the outside edge to make Scottish Santa big enough to fit.  


Planet Earth includes a card of instructions with each ornament holder. You can see it in the photo below.  


You'll need scissors to cut out your design and to score the waxed paper that covers the sticky middle of the ornament holder so you can peel the paper away from the sticky center.  Tweezers come in handy to get all the paper from under the leather lip of the ornament holder.  I also use a butter knife to lift the leather edge, then help push the needlepoint under the lip.  I also use my fingernail to push the needlepoint down and under but you'll need something flat and blunt like a butter knife.


In the above photo you see my tools and the waxy paper that's been removed plus the bits around the perimeter I need to pull out with the tweezers.  You don't have to expose the sticky stuff--you can insert your ornament without sticking it down--but it'll be puffed up a bit and for anything that will be handled a lot you probably need the safety of the glue to hold it in position.  


Be careful about beads and sequins.  They can't be too close to the edge or you might damage them trying to pry the lip up with your blunt butterknife and shoving the outside edge of the needlepoint under the lip.  In the above photo, one sequin is really close to the edge.  My background was tent stitches, which are very sturdy.  I wouldn't use a tender thread or a stitch easily damaged for the background if you plan to insert the finished piece in a self-finishing item.


I really like how Scottish Santa looks.  Kudos to Planet Earth for a nice ornament holder!

Written by Jane/Chilly Hollow
Blogging at http://chillyhollownp.blogspot.com
and at http://chstitchguides.blogspot.com
© Copyright February 11, 2023 Jane M. Wood. All rights reserved.

Friday, December 30, 2022

The PFOS Ornament Exchange

I love seeing photos of shop and guild ornament exchanges this time of year.  Pocket Full of Stitches in Texas posted this.  Doesn't it look like fun?!

Written by Jane/Chilly Hollow
Blogging at http://chillyhollownp.blogspot.com
and at http://chstitchguides.blogspot.com
© Copyright December 23, 2022 Jane M. Wood. All rights reserved.

Sunday, December 26, 2021

A Clever Idea for Christmas Stockings

It's too late for Christmas 2021 but Sarah Marie has come up with a genius way to use ornaments on top of plain stockings so that you can change the decoration as children grow and their interests change.  

Written by Jane/Chilly Hollow
Blogging at http://chillyhollownp.blogspot.com
and at http://chstitchguides.blogspot.com
© Copyright December 22, 2021 Jane M. Wood. All rights reserved.

Monday, November 23, 2020

Trapunto and the Stork


I've been working on a Christmas ornament called "The Stork and The Baby" by the late Boots Bailey this month.  This piece had a lot of similar colors which meant all the elements of the design melted together, so I used various techniques to separate the elements  Above is the original unstitched canvas.  


The first thing I did was to change the heart shape in the middle of the canvas.  As you can see, the heart originally had a blue top half and a brown bottom.  I made it all blue to help keep the background in the background.  

Then I did a ton of outline stitch on the blankets, around and on top of the stork's wings, etc. to delineate the various sections.   (I use one ply of cotton floss for this with a beading needle to make it easier to get through the areas which have already been stitched.)  The final touch was to use trapunto on the stork so that it would loom over Baby Jesus.  What is trapunto, you ask?  It's a very simple padding technique.  Let me explain.


First I cut a small piece of muslin a bit larger than the bird's head, neck and body and put it on the back side of my stitching, held in place behind the stork's head and neck with magnets.  Then I turned the canvas over to the front again and started outlining the bird's head and neck (still with one ply of cotton floss and a beading needle to get through the layers of tent stitch from the front).  


I went around the bird's head and neck twice, making sure that I had a dark line. In the photo above, all the top stitching is done. I added ray stitches on the wing to make feathers on the wing, too.


I trimmed the muslin on the back side before I did some of the wing outline and the feathers, though. That way I cut the bulk away some. In the photo above you can see the bird's head on the upper left and the neck on the lower right.

Then I stuffed the neck from the open bottom of the neck area with quilt batting using my big plastic needle. You wrap a bit of batting around the eye end of the needle and push it inside untll the area is puffy. I ended up using the point of my scissors occasionally to stuff but you don't want to do that much. It's too easy to rip through the canvas or the muslin if you push the batting into the muslin pocket with something sharp.


To stuff the head you cut a slit in the muslin which you can see in the photo above on the right side showing the puffy neck. Stuff as before, then sew the slit closed once you are happy with how it looks on the front.  


How do you know when it is done?  It will look good to you, smooth and raised on the front—and a mess on the back!


Here is the finished trapunto dimension.  See the shadow along the back of the stork's head, neck and body?  That's what we are aiming for.

Now to assemble the ornament.  I hate finishing, so wish me luck!

  
Written by Jane/Chilly Hollow
Blogging at http://chillyhollownp.blogspot.com
and at http://chstitchguides.blogspot.com
© Copyright November 18, 2020 Jane M. Wood. All rights reserved.

Sunday, October 18, 2020

Horse Country Chic Loves Christmas Ornaments UPDATED

Horse Country Chic is in love with these Christmas ornaments.  Most are horse-themed but all are perfect for the elegant country house even if you don't ride.  

UPDATE:  She's added a new series of ornaments, many brand new, and a recommendation to get yourself a copy of Mary Legallet's book.

UPDATE #2:  More!

Written by Jane/Chilly Hollow
Blogging at http://chillyhollownp.blogspot.com
and at http://chstitchguides.blogspot.com
© Copyright October 1, 2020 Jane M. Wood. All rights reserved.

Thursday, July 23, 2020

Darling Finishing!

The finishing of Pat's elephants is darling!
https://needleartnut.blogspot.com/2020/07/scott-churchs-elephant.html

Written by Jane/Chilly Hollow
Blogging at http://chillyhollownp.blogspot.com
and at http://chstitchguides.blogspot.com
© Copyright July 12, 2020 Jane M. Wood. All rights reserved.

Sunday, February 9, 2020

A Great Collection of Christmas Ornaments

Stephanie is gradually taking her Christmas decorations down, including this fabulous collection of Nativity ornaments. I love Nativity sets myself so I really enjoyed drooling over hers.
http://stephsstitching.blogspot.com/2020/01/i-am-not-embarrassed.html

Steph also collects Santas, particularly Petei Santas.
http://stephsstitching.blogspot.com/2020/01/more-christmas-tree-love.html

And she has a lot of other pieces, many of them trip mementos.
http://stephsstitching.blogspot.com/2020/02/finally-got-tree-down.html

Written by Jane/Chilly Hollow
Blogging at http://chillyhollownp.blogspot.com
and at http://chstitchguides.blogspot.com
© Copyright January 30, 2020 Jane M. Wood. All rights reserved.