Showing posts with label Brenda Hart. Show all posts

Wednesday, May 27, 2026

Melita Visits Shops and Lives to Tell the Tale

Melita Glavin's on the road again, stopping by various shops on the way.  Her first stop is The Needlepoint Clubhouse in Rock Hill, Missouri.  


Then Melisa moseyed on over to The Sign of the Arrow in Ladue, Missouri.  They donate their profits to charity and are known for their huge stock of belt canvases.  Melita should have gotten that Brenda Hart book (her books are the ones I use most) but not to worry--they do mail order!


Written by Jane/Chilly Hollow
Blogging at http://chillyhollownp.blogspot.com
and at http://chstitchguides.blogspot.com
© Copyright March 20, 2026 Jane M. Wood. All rights reserved.

Friday, August 2, 2024

Covering a Painted Canvas Entirely With Squares

Since Google has decided to remove this article for "violating community guidelines" after I added Mary Legallet's information to it, all I can do is attempt to rewrite it.  Sorry for the inconvenience.  I will continue to protest Google's decision but if they don't answer me, this is the best I can do.  If you have any idea why this would violate any rules, let me know.  

UPDATE:  Google has allowed this posting but not the (identical) posting in the tab.  ????

********************************************

Bobbi Sher's "Orcas,"  printed design by Sandra Greba

The first person I saw do this technique is Brenda Hart.  A very creative stitcher, Brenda probably invented this technique before 2000.  (It is possible that dede Odgen used this technique early on as well but I don't know who was the first.  It could have been either of these inventive stitchers or it could have been they decided to do this simultaneously.) 
http://www.notyourgrandmothersneedlepoint.com/2012/02/too-much-detail.html

You can find the stitch diagrammed as "Squares and Rectangles" in various sizes in Brenda's Stitches for the Millennium, pages 69-70.  

UPDATE:  Mary Legallet has diagrammed a version of Brenda's stitch on her blog.  She does a straight stitch between boxes.
https://www.whimsicalstitch.com/whimsicalwednesdays/2024/07/31

Ruth Schmuff's posting about the technique on her blog includes a stitch diagram but you will have to adjust the size of the boxes to fit in your design.  You should not compensate at the edges.  You can find this stitch diagramed as "Squares-in-Square" in Ruth's iStitches Vol. 3.  "Four Way Hungarian" in Ruth's iStitches Vol. 4 is a much simpler version.
https://bedeckedandbeadazzled.com/2016/10/bunny-bunny-bunny-2/

You will need a canvas with a lot of detail and a thin thread.  I believe Brenda Hart used gold Madeira  or Lacquered Jewels, but Ruth Schmuff has used Accentuate.  Other folks double the Accentuate to use two strands or go with size 4 Kreinik very fine braid.  You could also use a ply of silk but I don't think the look would be as interesting with a matte thread.  Bijoux might create a more muted sparkle.  In the portrait of her dogs below, Liz used four colors of Accentuate, each doubled in the needle.


Liz Watson's custom dog portrait from Nimble Needle, Atlanta


And of course any stitch will work in this technique, but the regularity of the boxes appeals to a lot of people.  It also looks great used on a set of canvases!   Amy Bunger shows off three Leigh Designs tropical fish done in this technique at the bottom of page 18 of her October/November 2017 shop newsletter. 
http://www.amysgoldenstrand.com/uploads/7/2/3/6/72364657/1017.pdf


Courtesy of The Needlepaint Nook

The Needlepaint Nook in Merrick, NY has a customer who did this airplane portrait all in one strand and color of Splendor.
https://www.facebook.com/TheNeedlepaintNook/photos/a.470083973113570.1073741835.371945012927467/1374103826044909/?type=3&theater

Many thanks to Linda and Bobbi and Liz for allowing me to post photographs of their designs using this technique!

You don't have to use the square within a square stitch.  Many others work just as well.  Proof courtesy of Ruth Schmuff of Bedecked and Beadazzled!
https://bedeckedandbeadazzled.com/2018/05/its-all-in-the-interpretation/

Amy Bunger takes this technique further just like Ruth did when she used an all-over leaf stitch for a giraffe canvas.  You can see the diagram here.   You don't have to stick to boxes for an all over stitch, in other words!  Do what Amy did and choose a stitch than refers to the subject matter of the design.
http://www.amysgoldenstrand.com/uploads/7/2/3/6/72364657/0818.pdf

Amy Bunger followed up on her August 2018 newsletter (above) with a more in-depth exploration of using one stitch to completely cover a canvas.
http://www.amysgoldenstrand.com/uploads/7/2/3/6/72364657/1018.pdf

Ruth Schmuff of Bedecked and Beadazzled worked a Kimberly Santini canvas of a little hamster trying on a crown.  Ruth used several open stitches on the canvas, each perfectly suited to their area.  It's a master class on using more than one open stitch on a design to enhance the original artist's intent.  Although this is more than one stitch, it's a good lesson on what is possible.
https://bedeckedandbeadazzled.com/2018/08/the-hamster-has-her-tiara/

Sandra worked this design with the squares turned to make a diamond and put a Smyrna Cross in the center.  Worked in size 4 Kreinik braids.
https://www.facebook.com/groups/NeedlepointNation/permalink/2213284882081991/

Nimble Needle shows off some Judaic canvases that look good covered in a patterned stitch and some blackwork books to help you choose the right pattern.
https://nimbleneedlenj.com/love-it-but-too-much-for-my-current-stress-level/

Sometimes the border needs to be done differently.  Linda handled it beautifully.
https://www.facebook.com/photo.php?fbid=3615445115138896&set=gm.2909549872455485&type=3&theater&ifg=1

Barbara had a series of three Melissa Shirley designs covered in a blackwork pattern.  It looks fabulous.

Mary of Whimsical Stitch used this star pattern on a leopard canvas, changing colors in the Soie d'Alger and Petite Silk Lame Braid picked to stitch it.

Written by Jane/Chilly Hollow
Blogging at http://chillyhollownp.blogspot.com
and at http://chstitchguides.blogspot.com
© Copyright August 2, 2024 Jane M. Wood. All rights reserved.

Google Strikes Again (AND AGAIN AND AGAIN)

Yesterday morning I added a link to Mary Legallet's latest blog article to my summary article on how to cover a painted canvas entirely in one stitch.  Here's the link-

In response, Google removed the article entirely, claiming it violated their policy.  Mary, have you been a very bad girl? 

Seriously, this is beginning to be a serious problem.  Google doesn't like educational articles with a lot of links and information, which is really what Blog is all about--educating needlepointers with information and links to articles that cover the issues needlepointers want to learn about.  

I have, as usual, protested this removal.  So far, I haven't gotten a response so if you click on "Covering a Painted Canvas Entirely With Squares," you'll get a notice that this article doesn't exist.  

Sorry, but Google is a huge bureaucracy, with odd rules and no accountability.  All I can do is try repost the article as a regular one and see if that works.  UPDATE: I tried that and Google removed the reposting a second time for "violating community guidelines."  ?????

I am protesting this.  Again.  

UPDATE:  I have deleted the original Cover a Canvas Entirely in Squares and added it as a new tab.  It was immediately removed.  I have protested that.  Again.  Sigh.

UPDATE #2:  Finally Google has decided that there's nothing that violates their community guidelines and allowed the new version of the Covering a Painted Canvas Entirely With Squares to go live.  I think the problem was the link to ask Google to review such a determination didn't work when I tried it originally.  In that case, copying the offending article, deleting the original, and reposting it again in an identical form was the only way to make the review happen.  It took nearly three days, mind.  I am still annoyed!

Written by Jane/Chilly Hollow
Blogging at http://chillyhollownp.blogspot.com
and at http://chstitchguides.blogspot.com
© Copyright August 2, 2024 Jane M. Wood. All rights reserved.

Thursday, December 29, 2022

BREAKING NEWS: Brenda Hart Died

I was shocked this morning to hear from three different places that Brenda Hart died December 27.


Brenda was always an inspiration to me.  Her light hand and inventive stitches made my stitching much better.  If you don't own her books, you should.  That way a great talent will live on through us.


As much as I will miss Brenda, I'm sure her family and friends will miss her more.


Written by Jane/Chilly Hollow
Blogging at http://chillyhollownp.blogspot.com
and at http://chstitchguides.blogspot.com
© Copyright December 28, 2022 Jane M. Wood. All rights reserved.

Monday, February 14, 2022

Stitches with Hart UPDATED

Brenda Hart has published a fourth book, and I am thrilled.  I am a big fan of her books and use them more than any of the others in my collection.  
But is this a book you'll love as much as I do?  Let's see, shall we?

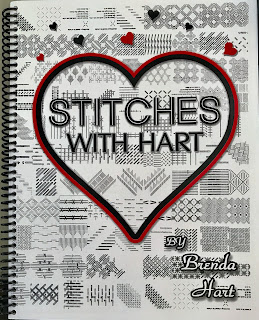
The cover is on the left.  This is a 92 page book, plus three pages of introductory information and a three page index. As you can see from the photo, it is spiral bound with light cardboard covers.  Your local copy shop can remove, laminate and rebind the covers for you to help preserve them.

The cover itself shows what Brenda's diagrams are like--all in black and white with shades of gray.  The diagrams are not numbered, although Brenda sometimes tells you the proper order for multiple steps to execute the stitch.  In other words, this book is likely to be more helpful for the experienced needlepointer or someone who is willing to do a lot of test stitching on scrap canvas to figure out how to execute a stitch.

Brenda has written three other books in the same format.  None of her books repeat stitches, although you may find variations on a stitch you saw in an earlier book.  Most of these stitches are Brenda's creations she has dreamed up during her long teaching career so you won't see them repeated elsewhere often.  Most pages have 3-4 stitches diagrammed on them although some of the larger stitches are on a page by themselves.  I did a quick count to see how many stitches are included and came up with 341 diagrams.  I counted complicated stitches with three diagrams as one and didn't include the two diagrams Brenda added showing how to bead on needlepoint canvas, so this is only a rough estimate, but clearly you get a lot of stitches for your money.


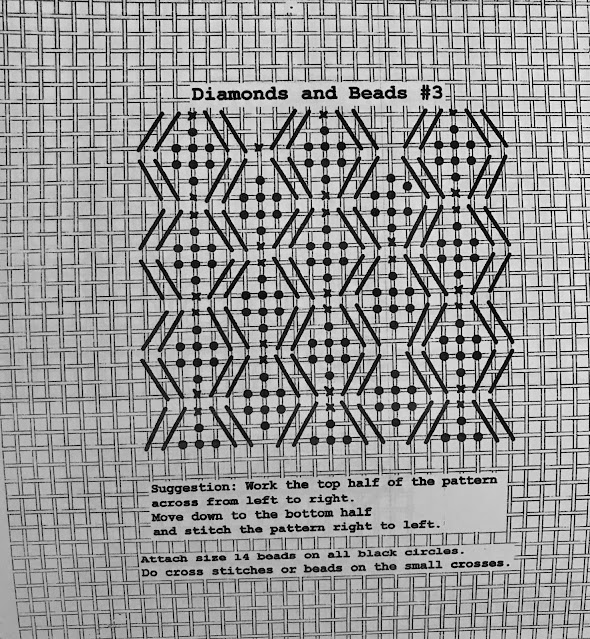
I chose a page at random to show how the diagrams work.  Brenda occasionally adds suggestions for the working order as you can see above.  Most diagrams don't have such notes, however.  

The book doesn't have chapters although Brenda clusters like stitches together (borders, for example, or darning stitches).  The index in the back talks about shapes (diamonds, ovals) or sometimes gives the stitch name (t-stitch).  You can get a general idea if the stitch is what you want from that.

Brenda Hart is a master of light-coverage stitches so most of the stitches in this book are designed for this type of needlepoint.  Many can be adapted to full coverage by using thicker threads or by adding little tent stitches, cross stitches, or beads in the empty areas.  Most will make elegant and subtle backgrounds or complicated borders or scattered motifs.

I plan to use this book a lot!

Happy Valentine's Day to Brenda and of course all of you wonderful blog visitors.  

UPDATE:  Good news for shop owners:  Ruth Schmuff of Bedecked and Beadazzled is now the distributor of Brenda's books.  If you need stock for your customers, check with Ruth.

Written by Jane/Chilly Hollow
Blogging at http://chillyhollownp.blogspot.com
and at http://chstitchguides.blogspot.com
© Copyright January 29, 2022 Jane M. Wood. All rights reserved.

Tuesday, November 9, 2021

Breaking News: A New Book from Brenda Hart UPDATED


I use Brenda Hart's stitch books more than any other I own so I was THRILLED to hear she has a new book out.  I'll do a review once I get my hands on a copy.

UPDATE:  Bedecked and Beadazzled will have copies shortly.  I understand The West in Tucson will, too.

UPDATE #2:  Homestead Needle Arts has posted a short description and a photo of typical diagrams on their website and in their e-newsletter.


Written by Jane/Chilly Hollow
Blogging at http://chillyhollownp.blogspot.com
and at http://chstitchguides.blogspot.com
© Copyright November 9, 2021 Jane M. Wood. All rights reserved.

Friday, September 14, 2018

Brenda Hart's Cross Hatched Background

Ruth Schmuff's mystery class from last year finally came back from the finishers as a lovely pillow.  As usual, I updated the article about this Bedecked and Beadazzled class with the final product but I want to draw your attention to the background stitch.
https://bedeckedandbeadazzled.com/2018/06/a-tiny-bird-flew-home/

Here's the article Ruth posted originally about the random cross hatched background, adapted from an idea from the great Brenda Hart.  Isn't it clever?!  Ruth has used this several times and shows off the stitch on one of the Shelly Penko canvases.
https://bedeckedandbeadazzled.com/2017/03/texture-2/

Brenda's a genius.

Written by Jane/Chilly Hollow
Blogging at http://chillyhollownp.blogspot.com
and at http://chstitchguides.blogspot.com
© Copyright June 29, 2018 Jane M. Wood. All rights reserved.

Thursday, September 21, 2017

A Brief Light Coverage Tutorial, Part One UPDATED

One of today's needlepoint style trends is to not completely cover very detailed and shaded parts of a canvas with thread, but to choose open stitches that allow the shading to show through.   I've noticed people are curious about the technique so I thought I'd give some general  information on light coverage if you want to try it.

First of all, any stitch can be used for light coverage, even tent stitches.  Just use a lighter weight thread than normal.  Think about basketweave on a face—on 18 count one would normally use 3-4 plies of a cotton floss to cover.  Try using 1-2 plies instead.  Often the features (nose lines especially) will show through the thread and you can easily skip stitching those.  In the example pictured above, this discontinued Melissa Shirley 13 count design had the face stitched with one strand of Impressions, which allowed the expressive facial feature lines to shine through.  The nose, ear and neck lines were not stitched in gray.  You simply see the gray paint showing past the white Impressions.

When you use lighter coverage stitches, you are going to have to use different techniques to start or end threads since often there is no good place to tie off your stitches unless a heavier stitched area is next door.  (Red Geisha's face threads could be buried behind the robe area or her wig since those areas were full coverage.  Here is an older Blog article about starting and ending threads for light coverage stitches.
https://chillyhollownp.blogspot.com/2010/06/anchoring-ends-when-stitching-light.html

Here's another, more technical explanation from Joni Stevenson.
http://creative-stitch.blogspot.com/2012/10/those-pesky-ending-threads.html

There are a whole series of books that talk about light coverage stitches. (See above.)  All three of Brenda Hart's books Favorite Stitches, Favorite Stitches II and Stitches for the Millennium (in the back row) feature stitches that work well in light coverage.  dede Odgen calls light coverage stitches Shadow Stitching and she has two books on the topic.  I own More Shadow Stitching but not Shadow Stitching.  The final book I recommend SuZy Murphy's Lite Stitches.  However, you can use any stitch as a light coverage stitch.  If you like darning stitches, the Finger Step Designs books has one you might be interested in.
http://store.apneedlearts.com/045485.html

UPDATE:  SharonG's "It's About Darn Time" is also a great reference for darning stitches.
http://nimbleneedlenj.com/product/its-about-darn-time/

Plus Amy Bunger's "Barely There" DVD is very useful as it is all about light coverage.
https://chillyhollownp.blogspot.com/2009/02/review-amy-bungers-barely-there-dvd.html

If you just want a few stitch ideas, read what Mary Legallet has to say about light coverage stitches, which she calls Open Work.
http://www.whimsicalstitch.com/whimsicalwednesdays/2015/8/19/open-sesame

Tomorrow I'll talk about the problems of mixing light and regular coverage stitches on a canvas.  See you then!

Here's the link to Part Two for those who arrived late to the party--https://chillyhollownp.blogspot.com/2017/09/a-brief-light-coverage-tutorial-part-two.html

Written by Jane/Chilly Hollow
Blogging at http://chillyhollownp.blogspot.com
and at http://chstitchguides.blogspot.com
© Copyright September 20, 2017 Jane M. Wood. All rights reserved.

Wednesday, February 15, 2017

Hummingbird: A New Mystery Class UPDATED

Ruth Schmuff has announced the next mystery class for Bedecked and Beaddazzled--Zecca's "Hummingbird."  You can find out more about the class which will start in March on the shop website (second link below).
http://www.notyourgrandmothersneedlepoint.com/2017/01/it-feels-like-spring.html

https://bedeckedandbeadazzled.com/product/hummingbird-2/

As always, I'll update this article as Ruth posts progress photos.  The first lesson Ruth works on the background, throwing in a twist or two.
http://www.notyourgrandmothersneedlepoint.com/2017/03/texture.html

Then she tackles the poppies.  One stitch for the red poppies, one for the orange.  But Ruth changes the threads around so that the poppies that use the same stitch look different.   Cool!
http://www.notyourgrandmothersneedlepoint.com/2017/03/poppies.html

Now the little hummingbird!  Ruth uses him to show how you can create birds with various sizes of beads. Very clever, as always, Miss Ruth.
http://www.notyourgrandmothersneedlepoint.com/2017/04/he-can-fly.html

The final lesson was mainly about the leaves.  As always, there are many fun touches.
http://www.notyourgrandmothersneedlepoint.com/2017/05/leaves-leaves-so-many-leaves.html

And here is Zecca's Hummingbird as a pillow—lovely!
https://bedeckedandbeadazzled.com/2018/06/a-tiny-bird-flew-home/

Written by Jane/Chilly Hollow
Blogging at http://chillyhollownp.blogspot.com
and at http://chstitchguides.blogspot.com
© Copyright January 18, 2017 Jane M. Wood. All rights reserved.

Thursday, November 3, 2016

Covering a Canvas with Boxes

Ruth Schmuff just showed off a student's new Kimberly Santini rabbit, stitched with a Brenda Hart technique of covering a highly detailed and shaded canvas with little boxes.  This was stitched with a doubled strand of Accentuate.  Ruth even includes a stitch diagram.
http://www.notyourgrandmothersneedlepoint.com/2016/10/bunny-bunny-bunny.html

Here is another canvas stitched using Brenda's simple boxed stitch technique.  This will give you an idea of the type of canvas that looks best stitched this way and shows off how the stitch changes in the light to diamonds instead of squares.  I think this was stitched with a thin gold metallic from Madeira.
http://www.notyourgrandmothersneedlepoint.com/2012/02/too-much-detail.html

Written by Jane/Chilly Hollow
Blogging at http://chillyhollownp.blogspot.com
and at http://chstitchguides.blogspot.com
© Copyright October 13, 2016 Jane M. Wood. All rights reserved.

Tuesday, June 14, 2016

Exploring Surf and Sand with the Experts UPDATED


Seeing Stars Santa (Jane Wood)
This spring I've been busy stitching a Santa from Leigh Designs' Seashore Santa series. I'm not the only one--guides for this set are also available from Sandy Arthur, Pat Miller, Sharon Quick and Carolyn Taggart. All are superb stitchers with their own distinct style so I found it fascinating to see how we all choose to add sand and surf to the blank backgrounds behind these Santas.  This may be because Leigh Designs wanted these all to be made up as stand ups with an oval top to serve as models for trade and trunk shows.  So we all started out with a very similar background shape and size that we had to cover.  I want to talk a bit about the design decisions everyone made.  First, look at the entire unstitched series.  These are all on 18 count "sandstone" canvas, which is an ecru with a yellow cast.
http://www.leighdesigns.com/Grp835x.html

Now look at the photo above.  That's my Seeing Stars Santa.  I decided I wanted sand and ocean in the background because my Santa is a beachcomber, wandering the edge of the surf looking for washed up starfish and pearls.  I offset my Santa to the right so that I could add encroaching waves to the right corner.


It isn't obvious from the photo of the full Seeing Stars, but I used the same stitch, a wavy Bargello, for the entire background.  All I did when I got to the edge of the water is switch colors of silk floss and add pearls, clear beads and Swarkovski crystals to the join to indicate foam and washed up pearls.  The sand is Gloriana's "Honey Bronze 107."  The waves are Classic Colorworks' (formerly Crescent Colours)  Belle Soie "Babbling Brook CCS-027."  I should credit the idea for this to Brenda Hart who came up with something similar for a Melissa Shirley Beach Birdhouses canvas for a Bedecked and Beaddazzled embellishment class.  Here is Brenda's version.
http://www.notyourgrandmothersneedlepoint.com/2016/02/beachy-birds.html


Coral Reef Santa (Pat Miller)

Now let's look at Pat Miller's Coral Reef Santa.  Pat didn't add water to her background but the addition of little shaped beads gives me the impression of foam on wet sand around her Santa's feet.  She used a darning stitch background and an open stitch for the mound of wet sand.  Her Santa is centered.  Love those French knot corals, by the way!
http://www.leighdesigns.com/Mdl8353.html


Catch of the Day Santa (Sandy Arthur)

Next up on the page is Sandy Arthur's Catch of the Day Santa.  Sandy's Santa is centered on the background with his back to the ocean.  She also used an open darning stitch but it creates the sand while the wavy stitch at the top creates a choppy ocean.   While you are looking, check out the mermaid's hair--genius!
http://www.leighdesigns.com/Mdl8354.html


Globe Trotting Santa (Carolyn Taggart)

Carolyn Taggert's Globe Trotting Santa is next.   Her Santa also faces the ocean and is centered on the background.  The sand behind Santa is a  Bargello stitch (which I used) but the water is a random long stitch in an overdyed thread.  Carolyn added movement to the water by staggering the join between sand and surf.  Because both her sand and water stitches are horizontal ones, the join where the two meet is smooth.   By the way, I think the shells, coral and globe Carolyn created in Santa's arms are superb.
http://www.leighdesigns.com/Mdl8355.html


Treasure Island Santa (Sharon Quick)

The final stitch guide in the set is for Sharon Quick's Treasure Island Santa.  Sharon also used a wavy Bargello stitch on the background and her Santa also has his back to the water.  The wave in the stitch creates wavy water.  Her sand is quite unusual. It is a mounded shape like most of the other piles of sand but the mix of an overdyed thread (I think) with an open Staggered Cross (I think) creates a lot of movement in the sand.
http://www.leighdesigns.com/Mdl8357.html

To sum up, use a wavy stitch of some kind for water, overdyes make both great sand and surf, you can go with either an open stitch or a full coverage stitch for water and sand in backgrounds, create movement by staggering the margin between water and land in some way, and don't be afraid to toss beads and other embellishments around.

Many thanks to my fellow model stitchers for the master class in stitching surf and sand!

And now a word from our sponsor--all the stitch guides and canvases above are available for your favorite shop to order from Leigh Designs.


All the Seashore Santa Models (Sandy Arthur's tag is cut off but hers is the left hand Santa.)

UPDATE:  Thanks to Don Lynch of Associated Talents I have all of the Seashore Santa models from Leigh Designs' booth to show you.  Enjoy!


Written by Jane/Chilly Hollow
Blogging at http://chillyhollownp.blogspot.com
and at http://chstitchguides.blogspot.com
© Copyright June 13, 2016 Jane M. Wood. All rights reserved.

Tuesday, November 17, 2015

Baroque Silk in Overdyes

Pocket Full of Stitches shows off the lovely colors of the new overdyed Baroque Silk which came out at the Dallas show.
http://pocketfullofstitches.blogspot.com/2015/10/thread.html

If you aren't familiar with this lovely silk, it comes from Pure Palette at Dream House Ventures.  Its plyable for 18 count or you can use all three plies in one strand for 13-14 count canvases.  The colors are beautiful and I like the feel of this pretty silk.  If you ply it, sometimes you'll find color variation even in the solid colors but this can be used to great effect for a "marbled" look in a border or perhaps a stone floor or in hair for highlights.
http://www.needlepointsltd.com/baroquesilk.html

http://www.dreamhouseventures.com/shop/the-pure-palette/baroque-silk-.htm

Ridgewood shows off the regular colors as part of a trunk show of this thread.
http://ridgewoodneedlepoint.blogspot.com/2015/10/baroque-silk-thread-trunk-show-continues.html

Written by Jane/Chilly Hollow
Blogging at http://chillyhollownp.blogspot.com
and at http://chstitchguides.blogspot.com
© Copyright October 28, 2015 Jane M. Wood. All rights reserved.

Friday, April 3, 2015

Emma's Darling Bird UPDATED

Ruth Schmuff has started Kimberly's darling bird canvas as the next mystery in her ongoing mystery class series.  Naturally, Ruth being Ruth and pretty durn inventive, she is doing an interesting random patterned background based on a pretty floral stitch from Brenda Hart.  I love it!
http://www.notyourgrandmothersneedlepoint.com/2015/03/pretty-bird.html

The bird is mostly stitched, the purple scrolls are done, and Ruth has started on the border and the little flowers.
http://www.notyourgrandmothersneedlepoint.com/2015/04/such-pretty-bird.html

Now Ruth is almost finished.  Look at the little flowers (and the big ones)!
http://www.notyourgrandmothersneedlepoint.com/2015/05/fini.html

I can't wait to see more of this charmer.  Stay tuned!  I'll update this article when the next class appears.  If you want to join the fun, visit Ruth's shop website.
http://www.bedeckedandbeadazzled.com/Classes/

Written by Jane/Chilly Hollow
Blogging at http://chillyhollownp.blogspot.com
and at http://chstitchguides.blogspot.com
© Copyright March 23, 2015 Jane M. Wood. All rights reserved.
Wednesday, January 14, 2015

Background Books

I recently managed to score a copy of June McKnight's Decorative Backgrounds for Needlepoint,  and have been browsing it.  It's a great little book (85 pages more or less), in June's usual small size with a wire binding, perfect for taking with you or just keeping in your stitching tote bag.  The backgrounds are divided into chapters:  variations on tent stitches, fast and easy stitches, delicate patterns, trellis patterns, Florentine stitches, pattern darning stitches and blackwork, pulled lace and bold beautiful designs.  None of the stitches included are particularly hard and I recognized almost all of them.  The great thing about this little book is that it's backgrounds only.  Inside its pages you have a nice selection of backgrounds that aren't going to drive you nuts with their complexity but which are going to be great choices for many canvases.  Even the "pulled lace" section is stitches that can be worked without distorting the canvas. They'll look good pulled or not, which is nice for the stitcher who is uncertain about yanking their threads enough to pull the needlepoint canvas out of alignment.

Is this book for the experienced stitcher?  If you like having good background choices all in one place, it is.  If you like complex and unusual backgrounds, then you will be better off investing in Carolyn Hedge Baird's Needlepointing in Your Nest, or any of Brenda Hart's books, or Lynda Richardson's new Stitches a' La Carte, or the Golden Gate Canvas Workers'  Background Stitch Reference Book since nothing in June's book is unusual or very complicated.

Is this book for the beginner?  Well, none of the stitchers are hard but they are background stitches, not stitches for small spaces, hair, clothing, plants and animals, buildings, etc.  This book is best for the stitcher who works a lot of canvases and wants background ideas for them.  A dedicated beginner who is certain they are hooked on needlepoint will enjoy this book but they might be better off with a book like Carole Lake's and Michael Boren's Painted Canvas Embellishment:  An Idea Book.

Finally, what sort of Master Enabler would I be if I didn't tell you where you could find the above books if your local shop doesn't have them?  In alphabetical order (and with thanks to Google), here they are.  But do shop around.  Prices vary some and you might find a good deal if you do a little hunting.

Brenda Hart
http://www.pfos.com/SalePages/PocketFullofStitchesNeedlepointBooks.htm

Carole Lake and Michael Boren
https://www.bedeckedandbeadazzled.com/Painted-Canvas-Embellishment/

Carolyn Hedge Baird
http://www.ndlpt.com/html/access.html

Golden Gate Canvas Workers Chapter of ANG
http://www.ruthkernbooks.com/catalogs/embroidery7.html

June McKnight
http://www.firesidestitchery.com/fs/books/index.cfm?fuseaction=getBooksList&CategoryId=33

Lynda Richardson
http://www.needlepointtooltime.com/product/Stitches%20a%20la%20Carte

Written by Jane/Chilly Hollow
Blogging at http://chillyhollownp.blogspot.com
and at http://chstitchguides.blogspot.com
© Copyright January 3, 2015 Jane M. Wood. All rights reserved.
Wednesday, October 8, 2014

Palma's Collages

As some of Blog readers already know, Palma Seljan loves the collages from Lani Enterprises.  With Palma's permission I've collected photographs of the collages she's finished and am posting them here for you to enjoy.  By the way, if you are interested in seeing more of Lani's collages, check out her website.
http://www.lanisneedlepoint.com/collage.aspx

The newest collages from last winter are here but the Easter collage Palma is going to blog-stitch here  is not on the Lani website yet as it is brand new.
http://www.lanisneedlepoint.com/newdesigns2014.aspx

Now, let's see what Palma has done to date.

Horses

The most recent finished collage is Horses.  She just finished it last month.


Gourmet

Gourmet Framed


Before that Palma stitched Gourmet which has been framed.

Wine


Wine Framed

Wine is pretty amazing!  It was also framed.


Sailboat
The Sailboat Table

Sailboat might be my favorite as it just screams Ocean!  It was made into a table top.

Alice
The Alice Table

Alice was the first collage Palma stitched.  She was hooked!  It was also made into a table top.

If you have a Facebook account, friend Palma Seljan to see more of her incredible detail in these collages in her FB photo albums.

So which one is your favorite?

Written by Jane/Chilly Hollow
Blogging at http://chillyhollownp.blogspot.com
and at http://chstitchguides.blogspot.com
© Copyright October 7, 2014 Jane M. Wood. All rights reserved.

Monday, October 6, 2014

Blog-Stitching Lani's Easter Collage

Palma's Easter Collage, Canvas by Lani

I have a special treat for you here at Blog--Palma Seljan has agreed to blog-stitch her next Lani collage right here!  This is a brand new canvas, so new it's not on Lani Silver's website yet.  Therefore I've posted a photo of the canvas above.  Palma plans to describe each box a section at a time. 

Stay tuned!  This is going to be fun.  

Written by Jane/Chilly Hollow
Blogging at http://chillyhollownp.blogspot.com
and at http://chstitchguides.blogspot.com
© Copyright October 5, 2014 Jane M. Wood. All rights reserved.

Friday, May 2, 2014

Let's Go To Class UPDATED

Susan Portra visited the Enriched Stitch over the weekend and Brenda Hart went to Bedecked and Beaddazzled. Luckily for us, folks are reporting in on their fun~ 
First, Brenda does Bedecked.
http://www.notyourgrandmothersneedlepoint.com/2014/04/where-to-begin.html

Here is what Suzy has to say about Susan's class.
http://astheneedleturns.com/bring-your-canvas-to-life-day-1/

http://astheneedleturns.com/gingerbread-house-class-recap/

UPDATE:  More on the Enriched Stitch class.
http://astheneedleturns.com/susan-portra-round-2/

I know someone who was in both classes.  I think I almost died of envy!

Written by Jane/Chilly Hollow
Blogging at http://chillyhollownp.blogspot.com
and at http://chstitchguides.blogspot.com
© Copyright April 28, 2014 Jane M. Wood. All rights reserved.

Monday, March 24, 2014

Blue Russian: The Final Glimpse

Northern Light Santa Finished

This morning I have one final glimpse of my completed Blue Russian Santa for you before he disappears on his journey to the finisher.   In this photograph you can see how much sparkle is involved with his metallics, silks, beads and crystals.  Those of you who are shop owners can visit him in person at the May TNNA show at the Leigh Design booth.  By then he will be a stand up figure, courtesy of West Coast Finishing.


Kirstin's Santa has Snow
This isn't the last of the Russian Santas, though.  You guys may remember that Kirstin is creating her own background for her Blue Russian.  See the snowy ground under Santa's feet above?  That is Brian's Steppe Stitch, given to Kirstin by Brian Shaw, the manager of The Needlepointer in Everett, Washington.  Brian gave the stitch to Kirstin.


Susan's Blue Russian in the Snow
Kirstin passed the stitch along to Susan whose Santa is outside in the snow in daylight.


Carolyn's Santa in Grass

And Susan shared it with Carolyn whose Santa is outside in the spring grass with his bird friends.  Doesn't matter, Brian's Steppe Stitch does good grass, too!

A stitch that everyone finds just perfect is a stitch that deserves to be shared, so I asked Brian for permission to diagram and post Brian's Steppe Stitch here.  Brian gladly gave it because he is a really nice person.  He says to tell you it's a variation of Brick Stitch.


I diagrammed this stitch turned upright in vertical lines.   If you use it for snow or grass, turn your canvas on its side and stitch it that way for a smoother line.  When you turn your canvas back upright, you will have nice long horizontal stitches.  This is a trick I learned from Brenda Hart who says long horizontal stitches lay better if you turn your canvas to stitch them vertically.

Each stitch covers 8 threads except for the black stitches which are compensation stitches.  Each stitch is a back stitch, which means you come up far away from you and go down next to you.*  Work from right to left for the first row, starting with a red stitch.  The second red stitch is three lines up from the first.  The third red stitch is also three lines up above the second stitch, but the fourth stitch (in blue) is TWO LINES above the third stitch.  In other words, you don't always come up three threads higher.  This is a little tricky, but it offsets the row to make a pretty pattern.  Because these stitches are back stitches, Brian's Steppe Stitch will put a lot of thread on the back as well as the front so make sure you have enough thread to cover the area you are using this stitch in.

Once you do the first row and are sure it is counted correctly, then you just add rows of stitches over eight following the pattern, except where you don't have enough room and have to compensate.

Enjoy the diagram and the pictures.  I hope to have photographs of more finished Russian Santas for you as spring dawns and folks start to complete their Santa stitching.

Once again, many thanks to Kirstin, Susan, Carolyn and most especially Brian Shaw!

*If you are not familiar with back stitches, this will help.
http://www.holiday-crafts-and-creations.com/backstitch.html

Questions? Email me at chillyhollow @ hotmail.com and I'll get back to you by the next day.

Written by Jane/Chilly Hollow
Blogging at http://chillyhollownp.blogspot.com
and at http://chstitchguides.blogspot.com
© Copyright March 20, 2014 Jane M. Wood. All rights reserved.

Tuesday, February 4, 2014

From the Seaside to the Medicine Cabinet

Today I have some fun finished pieces for you to admire.  First here is Palma's seaside collage from Lani. It is really something! This was worked in Brenda Hart classes.  Brenda and Palma did a great job, didn't they?
http://www.notyourgrandmothersneedlepoint.com/2014/01/and-were-off-and-running.html

The next piece is one of the Kirk and Hamilton poison bottles for Halloween.  They crack me up!  Faith used an Amy Bunger stitch guide to work up this wonderful Warts and All piece.
http://faithofaspider.blogspot.com/2014/01/it-may-be-poison.html

I can't wait to see both finished.  I know Palma plans to put the seaside collage in a custom table top....

Written by Jane/Chilly Hollow
Blogging at http://chillyhollownp.blogspot.com
and at http://chstitchguides.blogspot.com
@ Copyright 2014 Jane M. Wood. All rights reserved.

Friday, September 13, 2013

Finishing Friday

In yet another edition of Finishing Fridays, I have a really different and clever way of making up little mini socks for Christmas.
http://www.oneoffneedlework.co.uk/blog/what-to-do-with-the-leftovers/

Enriched Stitch has a lot of finishing to show off.  Some of these are class models, some are customer work.  All are beautifully finished in a variety of ways and Suzie credited all the finishers so you can tell your shop to use them if you see something that is perfect for some of your stitched-but-not-made-up pieces.
http://astheneedleturns.com/back-from-the-finishers/

Absolutely Needlepoint has some charming pieces to share.
http://www.theneedlebug.com/blog2/2013/09/birthday-bash-2/

And so does Bedecked and Beadazzled.
http://www.notyourgrandmothersneedlepoint.com/2013/09/hoot-hoot-its-cute.html

But I think Eye Candy tops them all when it comes to cute finishing.
http://eyecandyneedleart.blogspot.com/2013/09/a-winning-weekend.html

Written by Jane/Chilly Hollow
Blogging at http://chillyhollownp.blogspot.com
and at http://chstitchguides.blogspot.com
@ Copyright 2013 Jane M. Wood. All rights reserved.